The first thing that comes to mind when we think about the Milky Way is its core. However, to capture the full band of our galaxy, you’ll need to shoot a Milky Way panorama. Whether it’s a Milky Way arc, a vertical Milky Way panorama or a Milky Way mosaic, each of these will add depth to your composition in a unique way.
As a professional astrophotographer, I’ve been photographing Milky Way panoramas for several years, having my photos published in prestigious media such as NASA’s APOD. In this article, I’ll show you, step by step, how to shoot a Milky Way panorama, how to plan your photo, the gear you need, and how to stitch your panoramas like a pro!

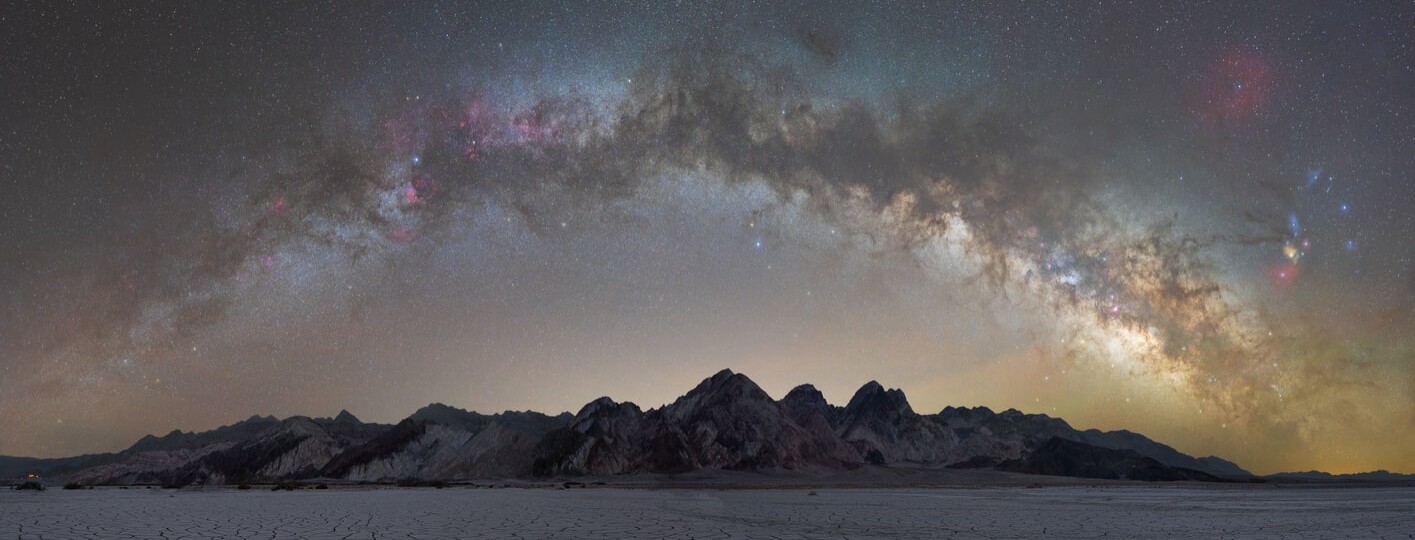
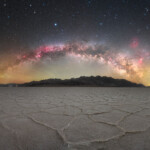
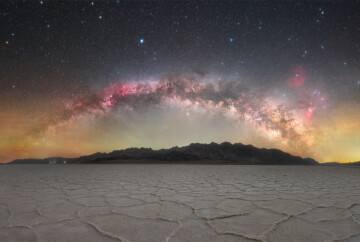
Milky Way Arc panorama in Spain
How to shoot a Milky Way Panorama in 6 Steps
Learning how to shoot a Milky Way panorama is a complex task, and many factors need to come together. The good news is that many of the concepts of photographing the Milky Way still apply here. Follow the next steps and photographing Milky Way panoramas will become second nature!
Let’s dive right into this Milky Way panorama tutorial:
1. Plan your Milky Way Panorama
The best time of the year to shoot the Milky Way and your geographical location play a key role in the planning of your Milky Way panorama and your composition.
In the Northern Hemisphere, from February to July you’ll be able to photograph a Milky Way panorama that includes all the galactic band arching from the northeast to the south. From July to October, the Milky Way rises too high in the sky, and even though you can still capture a panorama, it’ll be technically more challenging and not as photogenic.
In the Southern Hemisphere, you can photograph Milky Way panoramas from mid-January to late November in different positions in the sky either at the beginning or the end of the night. During the peak of the Milky Way season from April to August, the Milky Way is at its zenith during the central hours of the night which makes it difficult for panoramas.
Lastly, it’s possible to photograph a Winter Milky Way panorama during the winter months. What is special about this section of the galaxy is that it’s filled with hydrogen-alpha nebulae, which can be identified by the vivid red colors in the sky.
Other Milky Way arch planning tips
Apart from the season, you need to know the planning basics that we cover in our best places to shoot the Milky Way article related to moon brightness, light pollution maps, weather apps, etc.
You can also plan the best days to shoot your Milky Way panorama at a glance using our Milky Way Calendars.

GET THE CALENDAR WITH THE BEST DATES TO PHOTOGRAPH THE MILKY WAY IN 2026
You'll also receive our PDF guide to photographing the Milky Way!

Lastly, I recommend using an app to plan your Milky Way Panorama. My recommendations are Stellarium, Photopills, and Planit Pro, which will allow you to plan your panorama from home and when you are in the field. You can see full tutorials on how to use these tools for planning in my Milky Way basic course.
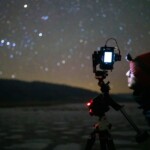
2. Choose the Best Gear for Milky Way Panoramas
As for any night shoot, the basics related to camera gear are a tripod and a good camera for Milky Way, preferably Full-Frame.
Talking about lenses, I recommend a focal length between 14 and 24 mm (for higher focal lengths, you’ll need to do tracked astrophotography using a good star tracker). The longer your focal length, the more images you’ll need to capture to cover the entire Milky Way, but on the bright side, you’ll get a high-resolution Milky Way panorama with tons of detail.
Shooting Milky Way panoramas will also require a few additional accessories. Fortunately, most of these items are inexpensive and if you are familiar with daytime panoramas, you might already have a few of them:
Leveling Base for Milky Way Panorama
This accessory, as its name suggests, will help you level your camera faster. If you don’t own a leveling base, you can still level using your tripod legs; it’s more time-consuming but you’ll save some money and space.

Use a leveling base in your Milky Way panoramas
Panoramic Ball Head
A panoramic ball head or panoramic base will allow you to pan your camera without losing your level. This accessory can be further improved if you use an indexed panoramic base, which will allow you to pan your camera at fixed intervals or degrees. This is especially useful to have a precise overlap in your milky way panorama images.

A panoramic base will help you pan your camera
L-Bracket
This little accessory is a must-have for any landscape photographer, especially if you are shooting panoramas. It’s an inexpensive item that will make the process of taking vertical images much simpler.
Nodal Rail for Milky Way Panorama
A nodal rail helps reduce parallax in your panoramas. This is usually not a problem for Milky Way panoramas unless you are shooting your foreground very close to your camera.
Star Tracker for Milky Way Panorama
Adding a star tracker to your setup will increase the quality of your panorama exponentially, but it will also add a new layer of difficulty. If you choose to use a star tracker for your milky way panorama, I suggest you use one with a higher payload than average to support the whole setup.
A star tracker will greatly improve your Milky Way panoramas
To learn more about tracked Milky Way panoramas, check my Milky Way tracking course, where there’s a complete tutorial dedicated to this subject.
3. Shoot the Full Band of the Milky Way Arc
In this section, I will cover the technical aspects of photographing the full band of the Milky Way:
Level your tripod
To capture a good Milky Way panorama, you need to start with a leveled base. To do so, you’ll have to adjust either your tripod legs or your leveling base as I mentioned in the previous section. You can use a bubble level to check if the level is correct.
Frame your Milky Way Panorama
Before you dial in your settings, you should decide how you are going to position your camera to frame the Milky Way.
-
- Vertical (portrait) Framing
The most common technique is to place your camera in portrait orientation, for both the sky and ground shots. This is especially useful when you want to capture the entire Milky Way arc when it’s a little higher above the horizon, around 35º or higher.

If the Milky Way is higher above the ground, use vertical (portrait) framing to fit more into your composition
- Horizontal framing
You can also shoot panoramas by placing your camera horizontally. This is convenient when the Milky Way arch is very low on the horizon, especially when it’s rising early in the season in the Northern Hemisphere. You could shoot a normal panorama by taking between 3 and 4 photos, depending on your focal length.
This technique is also used when shooting vertical panoramas (Milky Way vertorama). When the Milky Way is almost vertical, shooting horizontal frames up or down is a great composition option.

Horizontal framing is specially useful to shoot vertical panoramas (vertoramas)
Decide where to Start Shooting your Milky Way Panorama
Generally, the place to start shooting your pano won’t make a big difference. I shoot from right to left, which in the Northern Hemisphere is south to north. However, if the Milky Way core is going to be setting soon and you want to capture it, I recommend you start shooting the core first and make your way to the opposite end of the galaxy.
Set your Milky Way Panorama Camera Settings
To photograph a Milky Way Panorama, use the following settings as a guideline.
-
- Use manual white balance and set it to 4000K.
- Focus on a bright star.
- Use an aperture of f/2.8 or the widest in your lens.
- Set an ISO between 3200 and 6400.
- Adjust the shutter speed between 10 and 25 seconds.
The settings to photograph a panorama of the Milky Way are the same as the settings you would use to capture any single image of our galaxy. If you want to dive deeper into the settings, check our article on how to photograph the Milky Way.
Shoot the Panorama of the Milky Way
When you have everything ready, it’s time to shoot! When you take the photographs, there are a few factors you need to have in mind.
-
- ZIGZAG: This is important when you are shooting a multi-row panorama. Choose in which order you’ll take your photos. You can start left to right, then when you reach the end, you’ll tilt your camera up, then photograph the second row, this time starting right to left. This would be zigzagging. I don’t recommend doing this if you are using a star tracker for your Milky Way panorama.
- OVERLAP: the minimum overlap I recommend is 50%. Overlapping is crucial for correct stitching later in postprocessing. Overlapping this much means that you’ll have to take more images to cover the entire panorama, but it’s worth it.
- TAKE MORE PHOTOS THAN YOU NEED: One of the most common mistakes I see in Milky Way panoramas is the lack of space either at the sides or at the top. When there is a lack of space at the top, this results in a Milky Way image with a flat arc. Always make sure to leave enough room both at the top and sides of your image.
- TAKE MULTIPLE PHOTOS FOR NOISE REDUCTION: You can take multiple exposures of the same frame to do noise reduction via stacking in postprocessing. This is especially useful when you are not using a star tracker for your panorama. It will take longer to complete the whole image, but you’ll be able to get tons of detail and little noise. If you don’t stack, you can always one of the best noise reduction software to eliminate the noise.

Apply these tips to improve your Milky Way panoramas
NOTE: all these settings apply to normal Milky Way panoramas. If you want to use a star tracker for Milky Way panoramas, there are a few considerations. For example, you should start shooting from the direction the Milky Way is going to set first, you shouldn’t zigzag, and remember to re-level your camera every 4-5 minutes. I will write an in-depth article about tracked Milky Way panoramas soon. Stay tuned!
4. Review your Milky Way Panorama Images
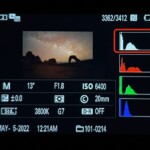
Check this carefully because a single bad image will ruin the whole panorama. Always check your Milky Way images when you are shooting. This is what you should be looking for:
-
- EXPOSURE: after the first image you take, look at the histogram. A properly exposed Milky Way photo should have the information sitting in the middle left of the histogram.
- SHARPNESS: Make sure that your stars look sharp. If that is not the case, check your focus and take another picture. You can see more focus tips in our Milky way photography guide.

5. Stitch the Milky Way Panorama
One of the most exciting moments in the process of photographing a panorama of the Milky Way is seeing the final stitched image.
In this section, I’ll show you how to stitch a Milky Way panorama using the best software available right now. It doesn’t matter if you photographed a 360 Milky Way panorama, a Milky Way vertorama, or a Milky Way mosaic, the stitching process will be the same:
Stitching a Milky Way Panorama in Lightroom
Lightroom is one of the most popular photo editing software, and also one of the most common for creating panoramas. However, Lightroom, like Photoshop, isn’t a dedicated panorama software, and it will lack most of the options we have available in professional software such as PTGui.
Follow these steps to stitch Milky Way panoramas in Lightroom:
- Disable lens corrections
After importing/selecting your images, I recommend that you don’t enable any profile corrections since it can lead to stitching issues.
In the Develop module, scroll down to the Lens Corrections section. Then uncheck the Enable Profile Corrections box. You can leave the Remove Chromatic Aberration box checked.

Disable profile corrections
Disable profile corrections
- Create your Milky Way panorama
Select all your images, then right-click on any of them, expand the Photo Merge menu, then click on Panorama

Create your Milky Way panorama
- Check the preview
After a few minutes, Lightroom will create a preview of your Milky Way panorama. In this window, you can choose which projection you’d like to use. Lightroom offers three different projections. Spherical is more suited for horizontal panoramas, while cylindrical works better for vertical panoramas.

Check the preview
I don’t recommend checking any of the boxes in this window. These automations generally don’t work well in Milky Way panoramas. You can try the Boundary Warp slider. It generally does a good job at filling the edges, much better than using the Fill Edges checkbox.
- Create the Milky Way panorama
Once you are happy with how your image looks, click on Merge to create the panorama of the Milky Way.

Create the panorama
Stitching a Milky Way Panorama in Photoshop
Photoshop is a popular software to stitch panoramas. However, Photoshop is not a specialized photo stitching software, and I only recommend using it if you don’t have any other option. It will get the job done, but it’s slow and you won’t have much flexibility to work with the panorama.
Follow these simple steps to stitch Milky Way panoramas in Photoshop:
- Import the images and create the panorama.
Open the File menu, go down to Automate, then click on Photomerge.

File > Automate > Photomerge
In the new pop-up window, click on Browse then find your Milky Way panorama images. Keep the layout in Auto and select the Blend Images Together option, leave the rest unchecked. Once you hit OK, Photoshop will start creating the panorama.

Browse to find your Milky Way images
This process can take several minutes depending on the number of images you stitch, the file size, and your computer processing power.
- Check the generated panorama
Once Photoshop finishes stitching, review the panorama.

Review the generated panorama
- Merge all the layers
To easily work with your panorama, merge all the layers. To do so, select all your layers by clicking on the first one, then hold the Shift key and click on the last one. Now use the following keyboard combination to merge all into a single layer:
- Windows: Ctrl + E
- Mac: Command + E

Merge all the layers

This is what the merged layers will look like
After this step, you can edit your Milky Way photo. Stick around, because in the next section I’ll show you how to edit a Milky Way panorama.
Stitching a Milky Way Panorama in PTGui
PTGui is arguably the best photo stitching software available now. It’s very effective, fast, and offers a wide range of options to bring your panorama to life. This is my go-to software to stitch Milky Way panoramas. Unfortunately, this software is not free, but it offers a lifetime license.
This is how you can use PTGui to stitch Milky Way Panoramas:
- Open PTGui and Load your images.
PTGui works with either TIFF or RAW files. I suggest exporting your images as 16-bit TIFF files when working with PTGui.
To load your Milky Way panorama images, you can either click on the Load Images button, or drag and drop the images.

Import your images into PTGui
Load the images and check that they have loaded correctly
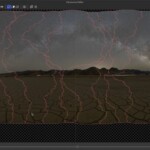
- Align the images
After you’ve loaded all the images, click on Align images and PTGui will start stitching the panorama.

Check the preview
- Choose your image projection
One of the best features of PTGui is the number of projections that you can choose.
For Milky Way panoramas, I recommend the projection “Mercator”. You can try different projections and choose the one that looks better for your photograph.

Choose your projection
Choose your projection
- Create your panorama
The final step is to create your panorama. For this, click on Create Panorama, the last item on the left-side menu, and choose the export settings.
If you are going to keep on editing the image, I suggest you export it as 16-bit TIFF or PSB.

Click on Create Panorama
Stitching a Milky Way Panorama in ICE (Windows)
ICE (Image Composite Editor) is another great Milky Way panorama stitching software available for Windows users. The main advantage of this is that it’s free, easy to use, fast, and offers more options than Photoshop or Lightroom when it comes to stitching panoramas. The main drawback is it doesn’t allow exporting 16-bit TIFF files, which will impact the amount of data available for editing your Milky Way panorama.
- Import your images.
Open ICE and click on New Panorama – From Images, then select the images you will use for your panorama of the Milky Way.

Create a new panorama
- Review the images
Make sure you’ve imported all your photos. If you are doing a single row panorama, you can leave the default options in this step. Click Next at the top-right corner.

Review the imported images
- Align and stitch your panorama
After the previous step, ICE will automatically start aligning and stitching your panorama. This will take a few seconds, or minutes, depending on the file size and your computer’s processing power.

Wait for ICE to finish aligning images
- Select a projection for your Milky Way panorama
On the next screen, you’ll be able to select the projection that looks better on your Milky Way panorama. Try different projections. My recommendations are Mercator and cylindrical. Once you are happy with how the Milky Way panorama looks, click Next.

Choose the projection that better suits the image
- Crop your image
In the next step, you can crop the resulting panorama. I generally skip this step, because I prefer to crop in Lightroom or Photoshop. Click Next.

Crop the image if you need to
- Export your photo
In the final step of the process, you’ll be able to export your Milky Way panorama. This is where ICE lacks a little bit. There are not many exporting options to choose from. I recommend exporting as TIFF or Adobe Photoshop if you are going to further edit your image.

Export your Milky Way panorama
6. Edit your Milky Way Panorama
By editing your Milky Way panorama, you’ll be able to extract all the colors and detail out of your image.
Make sure that you follow the right exposure adjustments, color balance, and details in the Milky Way band. I also recommend using some of the best noise reduction software to eliminate the noise. Editing is a very personal step so here you can apply your normal Milky way editing workflow.


Editing your Milky Way panoramas will make a big difference in the quality of your images
After many years and hours in the digital darkroom, I’ve created a logical and easy editing workflow that works and that I explain step-by-step according to your level in my Milky Way course.
Milky Way Panorama Examples
Now that we know how to photograph, stitch, and edit a Milky Way panorama, let’s see some examples that will spark your creativity and get you inspired.
Additionally, we’ve recently published our Milky Way Photographer of the Year list, where you’ll be able to get further inspiration from the best Milky Way photographers this year.
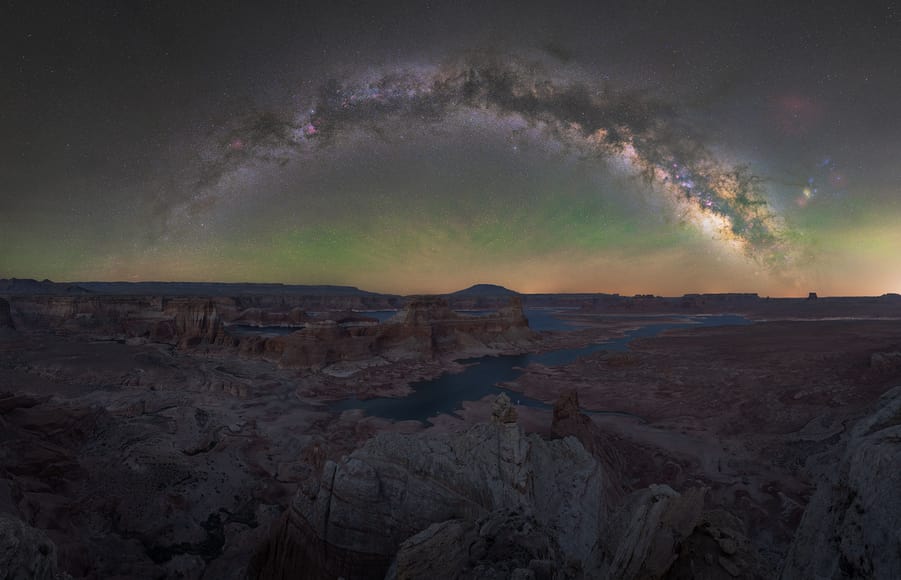
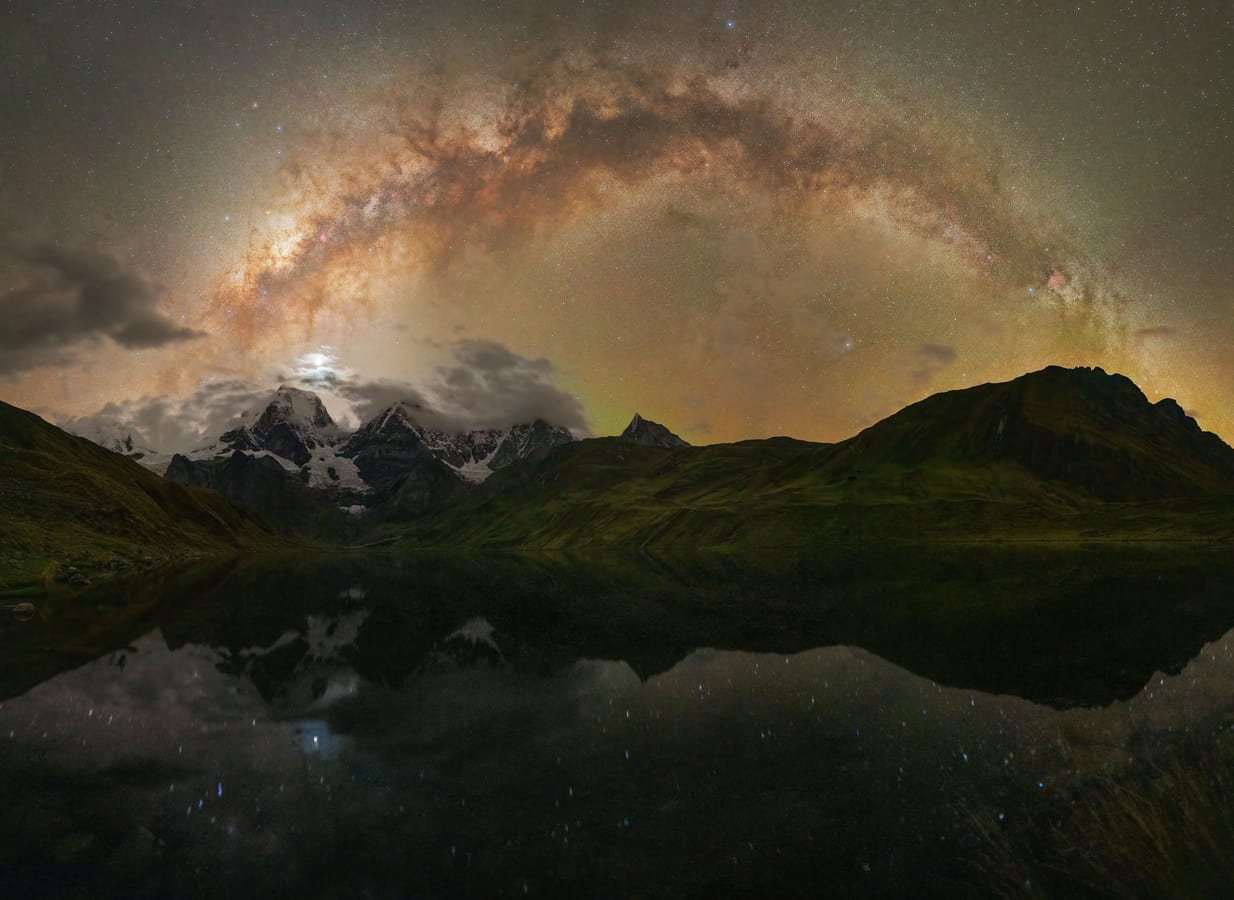
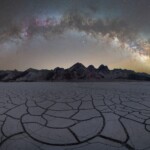
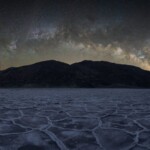
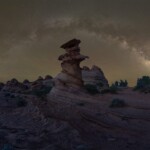
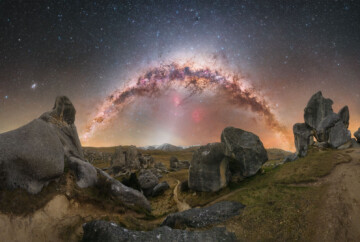
Milky Way Arc Panorama
This is one of the most common Milky Way panoramas you’ll encounter. It shows the full band of the Milky Way, framing the landscape. My recommendation is to try and find leading lines in the foreground that will lead the eye to the background. Another great composition tip is to find an element in the middle of the foreground that can create some symmetry with the shape of the arc.
Photograph the full band of the Milky Way in a panorama
Milky Way Multirow Panorama
Don’t be discouraged if the Milky Way is high in the sky. When this happens, you’ll need to capture multiple rows to fit the entire arc in the frame. This is more common during the late summer months in the Northern Hemisphere. Once you’ve completed one row, tilt the camera up and shoot the next row. Repeat the process until you’ve fit the entire Milky Way in your photo.

When the Milky Way is high above the horizon, shoot multiple rows to fit all of it in the composition
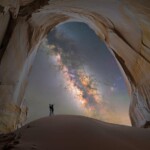
Vertical Milky Way Panorama
When the Milky Way is diagonal or vertical, the best option is to capture a vertical panorama, also called vertoramas. Instead of panning your camera sideways, you’ll tilt it up and down to capture more details of the Milky Way.

Vertical Milky Way panoramas are useful when the Milky Way is very high above the horizon
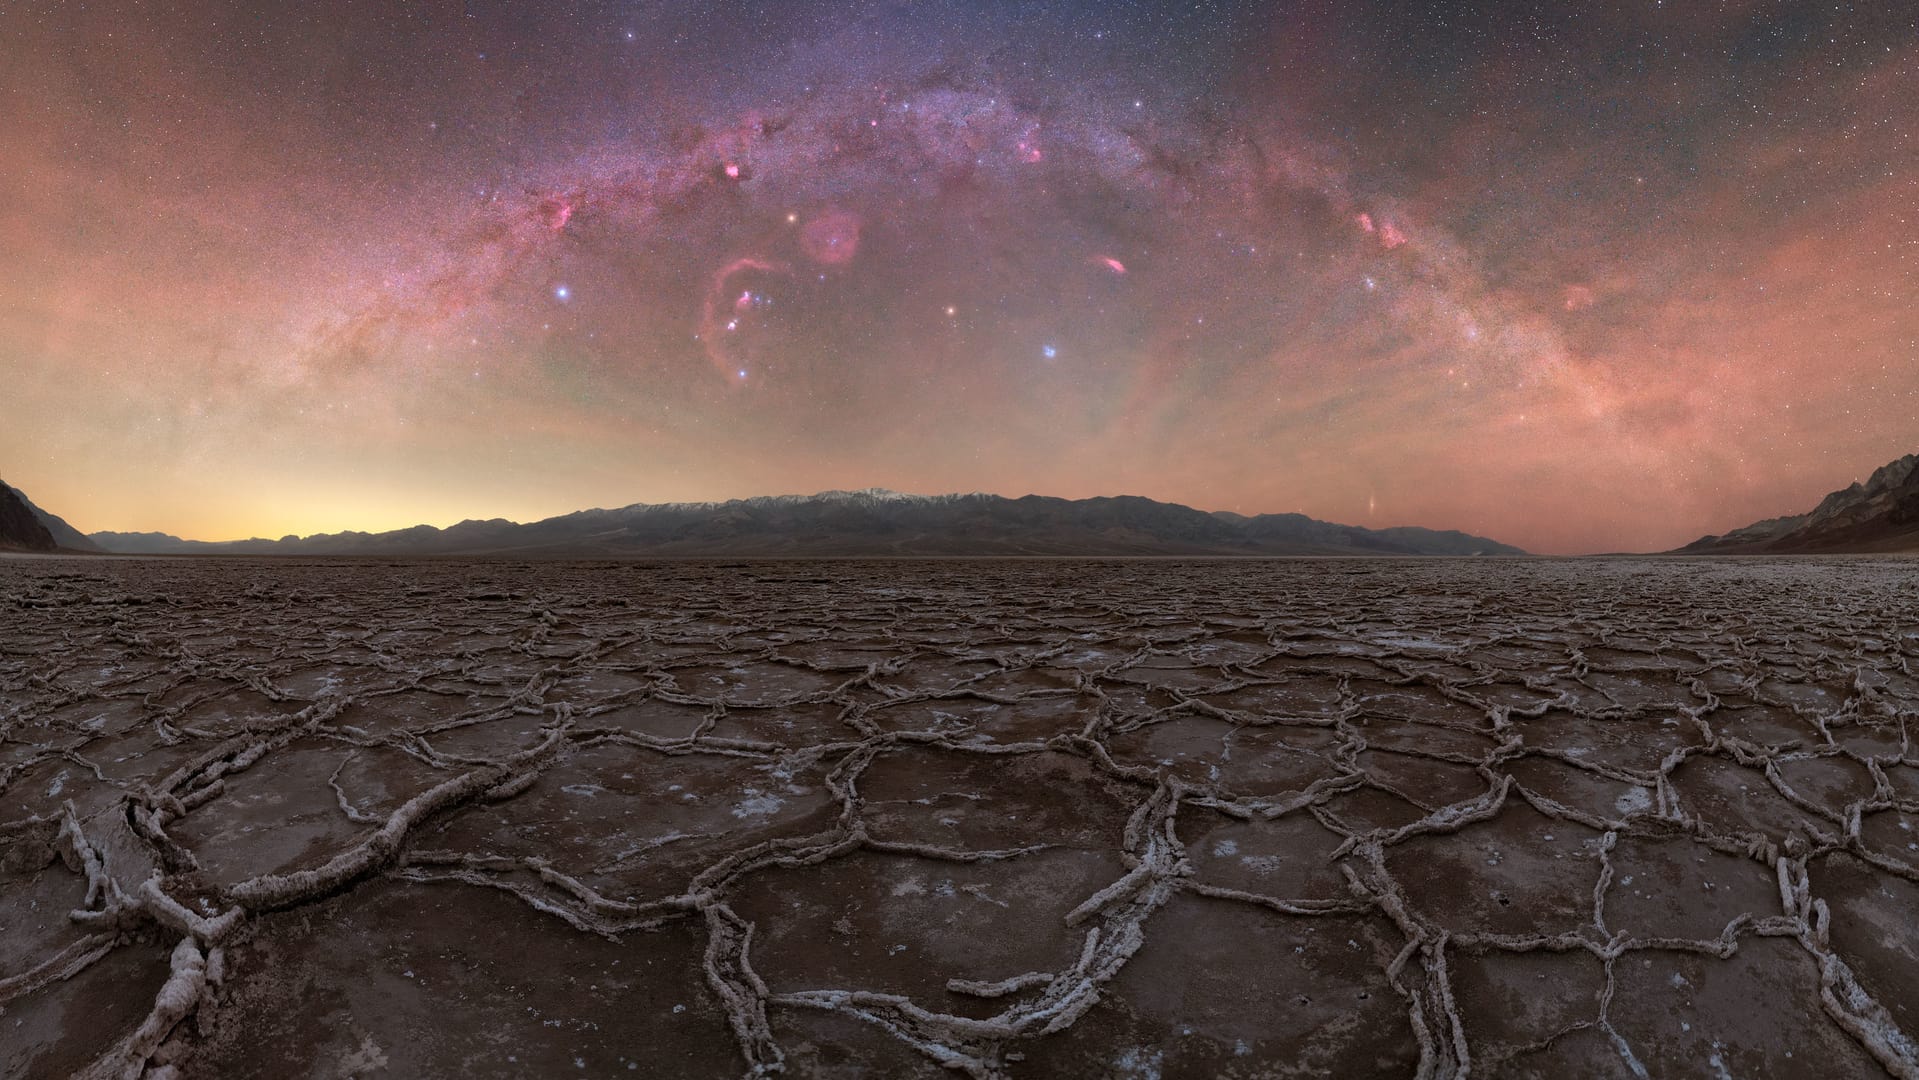
Winter Milky Way Panorama
The winter Milky Way is often overlooked, however, there are so many hidden gems that are worth photographing. This portion of our galaxy is filled with hydrogen-alpha nebulae, which emit a bright red light that looks otherworldly in the back of our cameras. Capturing H-alpha nebulae will often require an astro-modified camera; however, if you don’t have an Astro-modded camera, in my Milky Way Pro course, I explain how to simulate the nebulae details.

The Winter Milky Way is full of hydrogen-alpha nebulae
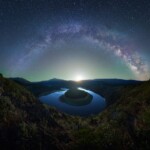
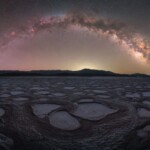
Milky Way 360 Panorama
Another fascinating option is to capture a 360 view of the night sky. This is particularly useful when there is a powerful foreground to work with. The technique for these kinds of panorama is the same as I’ve explained before, you simply have to do a full circle. These photos will take a little more time, but the result is often breathtaking.

A 360 Milky Way panorama offer a unique view of the world. Photo by Uros Fink.
Milky Way Tracked Panorama
This is my favorite way to shoot Milky Way panoramas. The quality of the images is superb, with a lot of detail and little noise. However, the technique is a little more complex than a normal Milky Way panorama. If you’ve never photographed a panorama of the Milky Way, I suggest you start without a tracker, and once you get the hang of it, add the next layer of complexity.

Milky way panorama captured with the Skywatcher Star Adventurer Pro
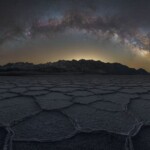
High-Resolution Milky Way Panorama
A high-resolution Milky Way panorama (also called Milky Way mosaic) is often captured with longer focal lengths such as 35mm or 50mm. For this technique, you’ll be working with a narrow field of view, that is why you’ll need to capture multiple photos to fit the galaxy into to frame. The amount of detail you get in these photos is astonishing.

Capture a high-resolution image of the Milky Way by making a mosaic
Milky Way Panorama NASA
NASA will sometimes feature the best Milky Way panoramas on the Astronomy Picture of the Day (APOD) site. I’m fortunate enough to count myself among the astrophotographers featured in APOD as you can see here. This is an example of a Milky Way panorama featured by NASA.

Winter Milky Way panorama featured in NASA’s APOD
8 Best Tips to Improve your Milky Way Panoramas
As a professional astrophotographer, I’ve gathered a lot of experience photographing Milky Way panoramas throughout the years. I’ve learned some lessons, some of them the hard way. For that reason I’d like to finish this guide by sharing some of the best tips to photograph Milky Way panoramas:
1. Leave enough room for the Milky Way
This is one of the most common mistakes I see in Milky Way panoramas. Either the edges of the arc are out of the frame, or the top of the arc looks flat. When you are In the field, make sure to take more photos than you think you’ll need.
2. Use a good quality lens
When it comes to panoramas of the Milky Way, some lenses may have too much coma which will make the stitching process more complicated, or impossible depending on how much overlap you have. If you need help choosing a good lens, read our article where we review the best lenses for Milky Way photography.
3. Overlap at least 50%
This is crucial if you want to make sure your stitching will work correctly. I overlap between 50% and 2/3rds, that is 66%. This makes the process a little longer, but it will guarantee fewer stitching problems.
Overlap at least 50% to make the stitching process easier
4. Shoot the sky separate from the ground
Whenever possible, try photographing the sky and the foreground separately. This way you can use the best possible settings for each portion and blend them together.
5. Use dedicated photo stitching software
Photoshop and Lightroom are amazing tools, but not for creating panoramas. You’ll often get flat Milky Way arcs even if you’ve left enough room in the image. Instead, I recommend using PTGui Pro, ICE (Image Composite Editor), or Hugin, which will give you a broad array of options to stitch Milky Way panoramas.
6. Try different panoramic projections
Something you’ll notice when you use a dedicated stitching software is the number of panoramic projections available to use. Apart from the typical such as cylindrical, rectilinear, or equirectangular, you’ll find others like Mercator, Vedutismo, or Stereographic which will come in handy for different situations.
7. Use a Star Tracker
If you want to take your Milky Way panoramas to the next level, you should start doing some astrophotography with a star-tracker! It will add an extra layer of complexity, but the images you’ll get from an astrophotography mount are outstanding. Check out our list of the best star trackers on the market!

Use a star tracker to get higher quality Milky Way panoramas
8. Use a longer focal length.
If you have a zoom lens, like a 14 to 24mm, zoom in to 20 or even 24mm to photograph the Milky Way. Using longer focal lengths will make the Milky Way appear bigger and with more detail.

Use longer focal lengths to get more detail in the Milky Way
Milky Way Panorama FAQ
Conclusion
Photographing a panorama of our galaxy can be challenging but following this Milky Way panorama tutorial, everything will be much easier.
Whether you want to photograph the Milky Way arc, a Milky Way vertical panorama, or a Milky Way mosaic, put all these tips into practice and you’ll capture mesmerizing images of our Milky Way full band.
Get ready and don’t forget to download your Milky Way Calendar to plan the best days to shoot the Milky Way this season!
GET THE CALENDAR WITH THE BEST DATES TO PHOTOGRAPH THE MILKY WAY IN 2026
You'll also receive our PDF guide to photographing the Milky Way!


For panoramas with foreground elements, should we focus on the foreground for foreground photos instead of only the star as suggested in the article? Will it still stack properly when focused on stars in the “sky” shots?
Yes, when shooting astro panoramas that include foreground elements, the key is to focus separately on the foreground and the sky, then combine them in post-processing. Make sure your foreground shots overlap the sky for easier blending in post-processing.
A really interesting article as usual! Thanks so much for your tutos and articles. I recently used your recom to choose my star tracker! 🙂 I do not regret!! And looking forward to reading the next one on tracked pano! Thanks in advance!
Thank you so much Eddy! It’s coming soon 🙂
Thank you Dan.
Heading to Monument Valley 5/15 so perfect timing of your tutorials!
Trying out my new Olympus 12mm 2.0 lens along with my 12-40mm 2.8 pro lens for a zoomed composition as you suggested.
Tough to get the 2.0 focused in dark surrounding vs. zooming the 12 to 40 on a bright star,
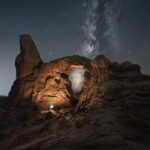
Shooting in Arches with the 2.0, had to point my camera down to my car’s turn signal lights that glowed when pointing my camera to get sharp focus with the stars.
Peter,
In those situations, I’d do a focus staking with separate focus on the stars and the foreground and then blend both images 😉