Using a star tracker for astrophotography is the best way to shoot the night sky in all its glory.
I’ve been doing Milky Way photography for many years, but it wasn’t until I started doing tracked astrophotography that I could finally capture the clean, colorful, and detailed images that I had been looking for a long time.

Using a star tracker for astrophotography provides more detail and colors.
Whether you are planning to do Milky Way photography with a star tracker or deep-sky astrophotography, in this article, you’ll learn all the basics of star tracking:
If you want to learn more about star tracker models, I encourage you to read our best star trackers for astrophotography article, where you’ll find detailed information about the best star trackers in the market. Below, you can also watch a video presentation that I gave about star tracker photography.
What is a star tracker in astrophotography?
An astrophotography star tracker (or just star tracker or astrophotography mount) is a device with a small motor that compensates earth’s rotation. By doing this, it will follow the star’s movement in the night sky, allowing you to extend your shutter speed while capturing sharp stars. Unlike when you photograph the Milky Way without a star tracker, there are no limitations like the 500 rule or the NPF rule.
To be able to track the stars correctly, you need to polar align your star tracker. This step, which I’ll explain in detail later in the article, is crucial to capturing pinpoint stars.
A star tracker can also be used to track the sun and the moon; however, in this guide, I’m going to talk mainly about tracked Milky Way photography and nebulae.

Why do you need a star tracker for astrophotography?
Using a star tracker for astrophotography has many benefits as opposed to photographing the milky way without a star tracker. These are the main benefits:
Increase the exposure time
This is the key factor when using a star tracker for astrophotography. You can decrease the shutter speed and get exposures of several minutes depending on the focal length you use. This will also reduce the digital noise in your images. Finally, thanks to increasing the shutter speed, you’ll have more flexibility to adjust the rest of the settings.
This is the difference between using a star tracker or shooting from a fixed tripod – 3 minute exposures
Reduce the ISO
As a direct result of increasing your shutter speed, you can reduce the ISO. Instead of using the typical night photography ISO 3200-6400, in tracked astrophotography, you can drastically reduce the ISO to values below 1600. This will reduce the noise and provide more dynamic range in your images.
Close the aperture
Closing the aperture will result in getting sharper images. Also, you’ll see a big improvement with less vignetting and lens aberrations like coma or chromatic aberrations.
All these three factors together will give you a higher quality image, with a ton of detail, less noise, and more colors. As mentioned earlier, acquiring a star tracker for astrophotography will increase the quality of your astrophotography exponentially.

A narrower aperture will result in sharper and more detailed images. Aperture closed from f/1.8 to f/2.8 to capture this image
Set up your star tracker in 7 steps
Knowing how to set up your star tracker is a crucial part of the process, and there are multiple ways to set up a star tracker depending on your tracking gear and your goals (simple tracked images, tracked Milky Way panoramas, etc.)
In this section, I’ll explain how to set up your star tracker for astrophotography using a simple setup with a tripod, tracker, and two ball heads.
1. Level your tripod
This is the first step because, without a leveled tripod or leveled base, you won’t be able to track the stars properly. The start tracker needs to sit on a leveled base, either using your tripod legs directly or a leveling base.
Here, I recommend using a bubble level if your tripod has one or an electronic level app on your smartphone. A leveling base can speed up the process but, personally, I don’t use it for tracking since it can add instability to your tracking setup.
1. Level your tripod carefully.
2. Mount the ball head or equatorial wedge
Remember, you’ll need a ball head or equatorial wedge (EQ base) to hold your star tracker. This accessory needs to be robust because it’ll hold the weight of the whole star tracker setup (tracker, camera, accessories, etc.)
Using an equatorial wedge (also known as Altitude/Azimuth base) is my recommendation here to help you with the polar alignment process that we’ll see later.
2. Place your EQ wedge or ball head on the tripod.
3. Slide the tracker on the ball head or equatorial wedge
Mount your tracker on top of your ball head or EQ base and make sure that it’s fixed with no shakiness.
When you mount the star tracker on the ball head or EQ wedge, don’t mess up the level. It’s very common to move the tripod legs when doing this. Re-check your level after this step.
3. Slide the tracker in the ball head of EQ wedge.
4. Mount the second ball head or EQ wedge on the star tracker
The basic star tracker photography setup uses two ball heads: one to hold the star tracker and the second one to hold the camera. However, there are multiple accessories you can use instead of a ball head, such as a 2-way head, a Z/V bracket, a panoramic ball head, etc. Your photography goals will determine the right accessory for you.
4. Mount the ball head.
5. Attach your camera
Attach the camera and all the accessories you’ll use for your tracked astrophotography session, such as an intervalometer or an external power supply. Make sure everything is correctly mounted.
It’s important that you attach all your camera accessories now before you do your Polar Alignment to reduce the risk of throwing off your alignment later.
5. Mount your camera and accessories.
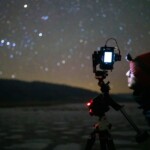
6. Align you star tracker with the North/South celestial pole
Polar alignment is the next crucial step in the process. Getting sharp stars in your tracked images directly relies on a correct polar alignment.
There are two main ways to polar align a star tracker. You can either use a polar scope or a laser (or both together). Both have one thing in common: you need to precisely locate the North or South celestial pole depending on your geographic location.
6. Polar align the star tracker.
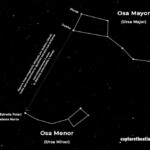
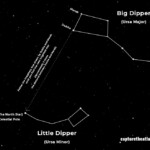
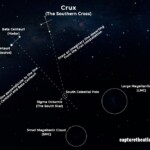
In the Northern Hemisphere, you’ll need to point your laser or polar scope to Polaris. In the Southern Hemisphere, you need to locate the south celestial pole.
To help you locate the celestial poles, we’ve prepared these two handy images which we encourage you to save to help you in the field.

North Celestial Pole.

South Celestial Pole.
If you are using a scope instead of a laser, you’ll need to check the position of Polaris/Sigma Octantis in a star-tracking app like PS Align Pro and place the stars in the same position in the reticle of your star-tracker.
As commented before, having an EQ wedge with an altitude knob and Azimut screws is the fastest and easiest way to fine-tune your polar alignment.
7. Take a test shot and check the sharpness in your stars
Finally, it’s time to take a test shot and verify if everything is correct. Turn on the star tracker and take a 1-minute test shot. Zoom in your image and check If you see the stars sharp like perfect dots, then you’ve done the whole star tracker photography setup process correctly
If you see trails in the stars and it’s not caused by the wind, repeat the previous steps.
After the test shot and once you know that the process is correct, increase your shutter speed until you see trailing in the stars or until you exceed 3-4 minutes. (which usually means overexposing areas of the Milky Way).
7. Zoom in to check the sharpness.
If you can shoot a 2 to 4-minute exposure with no star trails, congrats! you can start taking your Milky Way photos with a star tracker!
Don’t forget that planning is key in Milky Way photography, so I highly recommend downloading our Milky Way Calendar to find the best days of the year to shoot the Milky Way at a glance.

GET THE CALENDAR WITH THE BEST DATES TO PHOTOGRAPH THE MILKY WAY IN 2026
You'll also receive our PDF guide to photographing the Milky Way!

Best Camera settings for tracked astrophotography
If you are already familiar with how to photograph the Milky Way, then this section will ring a bell. However, with tracked Milky Way photography, there are a few key differences I’ll cover in the next few paragraphs.
A good starting point is:
Two-to-Four-minute exposures
Start with two-minute exposures and adjust depending on your focal length, the wind, and the kind of tracker you are using.
For wider focal lengths, you’ll be able to extend the exposure time further than 2 minutes even if your polar alignment is not perfect. But also consider the wind; if it’s too windy, the longer you expose, the chances of getting star trails will be higher. Finally, some trackers can hold a higher payload than others and will allow you to extend your shutter speed with no trailing.

You can extend your exposure time with a star tracker.
Aperture f/2.8
This will depend on the max aperture of your lens. I recommend you close your aperture from half to a full stop. For instance, if you use a lens with an f/1.4 max aperture, you’ll get significantly better sharpness and detail if you close down to f/2 or f/2.8.
As explained before, this will reduce the vignetting, lens aberrations, and improve the sharpness.
ISO 800
Start by using ISO 800, then adjust depending on the exposure after the first test shot. I generally keep my ISO between 640 and 1600. Use the lowest ISO possible to capture less noise and better dynamic range in your image file.
If you can’t track long exposures because of the wind or any other reason, you can raise your ISO to get the right exposure. You might see a little bit of noise, but you can easily eliminate it using a good piece of noise reduction software.
To help you with this and many other subjects, I created a Milky Way tracked photography course with over 23 hours of video content, where I teach star tracker photography in-depth including gear, setup, best tracked settings with examples, and all the post-processing.
Best tips for tracked astrophotography
Over the years, I’ve learned some useful tricks when doing tracked astrophotography. I apply these tips myself every time I’m out doing tracked Milky Way photography, and I guarantee that you’ll get high-quality images if you follow them too.
These are the tips I’ve gathered for this star tracker photography tutorial:
1. Start tracking easily
The number 1 mistake that I see in my astrophotography workshops is beginners trying to track images at longer focal lengths or to shoot complex tracked panoramas.
To avoid frustration, start using wider focal lengths between 14 and 20 mm, and don’t add more difficulty until you are comfortable with the bases of tracking.
2. Polar align before mounting your camera
Polar alignment needs to be as precise as possible, and if you try to do it with your camera mounted onto the star tracker, it will be a lot more difficult or even impossible with some tracker models. Always polar align before mounting your camera on the star tracker.
Once you mount your camera, recheck and fine-tune your polar alignment If necessary since it’s very likely that you’ll slightly move it in the process of attaching your camera.
Polar align before mounting your camera.
3. Use a laser to polar align
If lasers are allowed in your country, one of the best star tracking tips is to use a laser in the polar alignment process.
Most times, when you look through the scope, there will be either no stars at all or too many stars. Using a laser will help you immensely to get the closest alignment with the celestial pole.
4. Run aperture tests
If you are looking to obtain the best possible images, take test shots at different apertures to find the best balance between image quality and lens aberrations.
Some of the best lenses for Milky Way offer very high quality even when shooting wide open, but most lenses will benefit from being stopped down. There is no way to know the sweet spot in your lens until you test it.
5. Check the ISO-dynamic range ratio of your camera
The best cameras for Milky Way, like Full-Frame models, are designed to capture images in low-light conditions, but you always need to know your camera to know which ISO gives you the best performance.
Here, the best way to check this is to take a look at the read noise and dynamic range performance data offered by Photons to photos and, as always, to run your own tests.
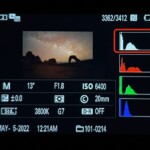
6. Always check your histogram
A properly exposed tracked Milky Way photo should have the information in the mid-tones. Also, another good rule of thumb is to zoom into the Lagoon nebula. If you see detail in the nebula and it’s not blown out, then your shot is correctly exposed.

The data in the histogram should be sitting around the mid-tones.
7. Shoot your foreground and sky separately
When you use a star tracker, you’ll notice that the foreground becomes blurry because of the movement of the star tracker. There are tricks like using the tracker at half speed, but I don’t recommend this if you want the best results and image quality.
Photograph the sky with the star tracker and then turn it off to photograph the ground with the best settings possible. Then, blend both images together in post-processing.
8. Use a counterweight
If your star tracker model offers the option, use a counterweight to balance your star tracker setup. This will help reduce the strain on the motor, and you’ll also be able to add a little more weight to the astrophotography mount. It’s also convenient to add stability in windy conditions.
You can perfectly use your tracker without a counterweight, but always consider your goals and the limitations of your gear.

Use a counterweight to improve stability.
9. Use a lens warmer
This little accessory will help keep your lens from fogging up when you are in cold and humid locations. Fog could appear right at the beginning of the session or after some hours. If you don’t own a lens warmer, a little trick is to use the lens hood, it will delay the fog, but it won’t prevent it completely.

Post-processing of tracked astrophotography images
When doing tracked astrophotography, you’ll need to process your images. When you track the sky, the foreground will appear blurry, which is why, as I explained in the previous section, you’ll need to photograph the sky and ground separately and then blend them together in Photoshop.


Editing your tracked Milky Way photos will extract all the detail and colors.
At this point, the most difficult part is the blending, since the foreground in your tracked image will be larger than the foreground in your non-tracked shot.
Once you blend both images, you can apply all the adjustments related to exposure, color, detail, etc. and enjoy the magic of star tracking when you see your images with an impressive quality.
In my Milky Way photography course, I teach over 12 hours of editing content where you’ll learn everything from blending tracked astrophotography with foreground to extracting maximum detail out of your tracked Milky Way images. I explain all my workflow step by step with plenty of advanced techniques and tips so you can make the most of your tracked astrophotography!


Get the most out of your tracked Milky Way images by carefully editing them.
Star tracker photography gear
There are basic items like a camera, a good milky way photography lens and a tripod that you’ll need for tracked astrophotography. Check out our specific articles on those items for more information. In this section, I’ll cover the dedicated gear you need for star tracker photography:
1. Star tracker
Choose the best star tracker according to your skills and needs. If you do long hikes, I recommend using a light star tracker such as the MSM Rotator, the Star Adventurer Mini, or the iOptron Skytracker Pro. If you are going to track mostly from an accessible location, you can carry a standard tracker such as the iOptron Skyguider Pro, the Sky-Watcher Star Adventurer Pro 2i, or the Benro Polaris.

Choose a star tracker according to your goals and needs
Don’t forget to check out our star trackers for astrophotography buying guide for more information.
2. Equatorial wedge
An equatorial wedge is the most precise base for a star tracker. With this item, you can fine-tune the position of the tracker to get a more accurate polar alignment. They are usually sturdier and more stable than a regular ball head.
3. Ball head
To mount the camera on the star tracker, use a good quality ball head with enough payload capacity to withstand the weight of the camera and all the accessories that you want to attach.
You can also use a Z and V bracket to mount the camera on the star tracker. These accessories are handy when doing tracked Milky Way panoramas.
4. Declination bracket
Additionally, you could use a declination bracket mounted to your star tracker to aid with the balance and sturdiness of the whole setup. If you are using counterweights, a declination bracket will be a must.
5. Polar scope or laser
A polar scope is an item you need to polar align your star tracker. I strongly recommend you get one that has the light integrated, which will make it both easier and more convenient to polar align.
If you use wider focal lengths and your country’s laws allow it, you can also use a laser to polar align. This method is less precise, so I don’t recommend using it for longer focal lengths or deep-sky tracked astrophotography. A laser will also be useful to help you locate Polaris in your reticle.
6. Intervalometer
An intervalometer will allow you to shoot in bulb mode without touching the camera during the process and introduce unwanted shakes that could ruin your image.
7. Other accessories
If you are planning more difficult images like tracked panoramas, you can use other accessories like nodal slides or L-brackets.
You can take a look at my current tracked panoramas setup in the video below in case you are interested in seeing the pieces I use.
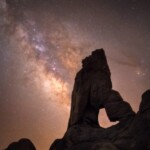
Tracked astrophotography Examples
As always, to give you some ideas and inspiration, I’ve gathered some tracked astrophotography examples in this section. I’ve captured these images by applying the same techniques I’ve explained in this article. I hope you enjoy them!
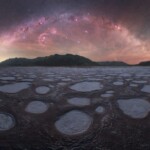
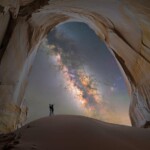
Tracked Milky Way
This is the most common subject to track with an astrophotography star tracker. The millions of stars, nebulae, constellations, and colors, all come together to make an eye-catching subject that will be perfect for your first tracked night images.

Photograph the Milky Way with a star tracker
Tracked deep-sky astrophotography
The difference when doing deep-sky astrophotography with a star-tracker is huge. Even using longer focal lengths or small telescopes, a tracker will allow you to capture all the detail of those distant targets in the night sky.
A star tracker is a must in deep-sky astrophotography.
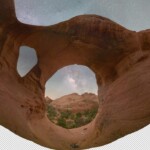
Tracked Milky Way panoramas
This is a more advanced technique where you combine the steps I explained in my Milky Way panoramas article and combine them with the steps presented here. The final result is worth the effort because you’ll get a high detail panorama.

Photograph a Milky Way panorama with a star tracker
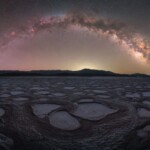
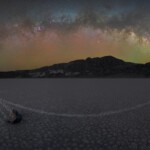
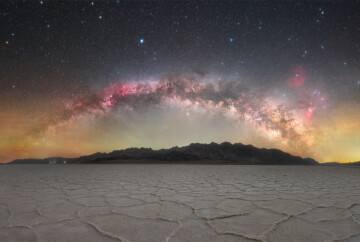
Tracked Winter Milky Way
Astrophotographers often overlook this part of our galaxy, but I encourage you to go out and photograph it! It’s full of hydrogen-alpha nebulae and beautiful constellations such as Orion, Taurus, and Gemini.

Tracked Winter Milky Way arc
Star tracker photography FAQ
Conclusion
Using a star tracker for astrophotography will set a before and after in your night photos. It’s the item that will set the biggest difference in your images once you are familiar with the basics.
If you are wondering if you need a star tracker for astrophotography, look at your recent night images. If you miss detail, color, and texture, then the answer is a big yes!
I highly recommend giving a try to a good star tracker and see the results for yourself. If you want to have a complete in-depth guide to track your images, I’m sure that my Milky Way Pro tracking course will help 😉
Happy captures & Clear skies!


Excellent and timely, as I finish shooting with my old Canon 5D MkII with non-tracked, but stacked images to a newer set-up with a Canon R5 mirrorless. I have always wondered about the panoramas and how one handles the foreground and Milky Way, and you answered it. So I will sign up for one of your 2026 classes and move forward, but now still processing older images from 2024. Now regretting not getting on board for 2025
Hi Richard,
Thanks so much! I’m glad you found it helpful! There’s never a bad time to sign up for my Milky Way Pro tracking course. You may also be interested in joining one of our photo tours! 😊
Thank you, that’s very helpful!
Many thanks Bruno! 🙂
Hi Dan, I recently got a small tracker and had decent results my first time out. My question is, what are your thoughts on track and stack the milky way or use single image? (A7III modified) Also, when tracking for 2 minutes at ISO 640, does it make sense to use LENR on sky or foreground shots?
Hi Bill, if you track with your astromodified camera I don’t think you need to stack them.