
A good starting point for star trails photography is ISO 800-1600; f/2.8, or the widest aperture on your lens; a shutter speed between 30 seconds and 1 minute; and a total of between 100 and 500 shots, depending on how long you want your trails to be.
These are the absolute basics. However, to successfully photograph star trails, there are a few more things that you’ll need to consider. If you already know how to photograph the Milky Way, some of these steps will sound familiar, but others may be new. Keep reading to find out how to turn these streaks of light into beautiful star trail images!

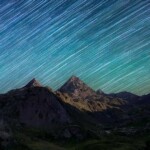
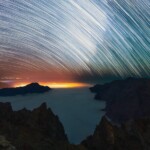
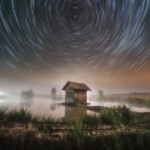
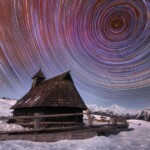
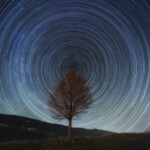
Circumpolar star trails are the most popular – Image by Uros Fink
In this guide, you’ll learn how to photograph star trail photos. We’ll also go over the best star trails stacking software, then we’ll cover how to plan your star trail images, and finally, I’ll share valuable tips that I’ve learned while shooting star trails over the years.
Are you ready? Let’s dive right in!
-
- What are star trails? Star trails explained
- How to photograph star trails – Best camera settings for shooting star trails
- How to do a star trail in Photoshop
- How to do a star trail in StarStaX (Windows and Mac)
- How to do a star trail in Sequator (Windows)
- How to plan star trail images
- Best camera gear to shoot star trail photos
- Best star trails photography tips
What are star trails? Star trails explained
To put it simply, star trails are the result of taking very long exposures of the stars in the night sky. Because of the earth’s rotation, from our perspective, the stars appear to be moving in the sky, offering us the possibility of capturing streaks of light. Unlike when we photograph pinpoint stars, where we limit our shutter speed, in star trail images, we ignore that limitation and shoot ultra-long exposures at night that range from a few minutes to a few hours. The longer you shoot, the longer the trails will be.

Star Trails photograph by Uros Fink
The best star trail photos will take around 2 to 4 hours to complete. The final result will depend on the number of images that you capture and the look that you are going for.
There are two main types of star trails: star paths and star circles. Photographing one or the other will depend on the direction in which you’re pointing your camera.
Star circles
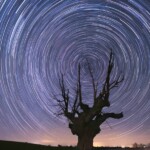
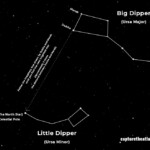
Depending on which hemisphere you are in, point your camera directly north or directly south at either of the celestial poles and you’ll see the stars moving in a circular motion. These are the so-called star circles, better known as circumpolar star trails, and they are the most typical star-trail photography subjects. In the next section, we’ll look at how to shoot this kind of star-trail photo.
I recommend saving these handy images to help you find the north and south celestial poles:

Find the north celestial pole for you star circles

Find the south celestial pole for your star circles
Star paths
On the other hand, when you start shifting your perspective and looking towards the east, or west, you’ll start seeing straighter star paths instead of circles. Star paths can be easier to shoot because you don’t need to find Polaris or the south celestial pole. If you are located near the equator, star path photos are more common than taking star circles images.

How to shoot star trails – Best camera settings for shooting Star Trails
In a nutshell, these are the best steps to photograph star trail images:
-
- Choose your composition
- Set your camera to manual mode (M)
- Use an aperture of f/2.8 or the widest in your lens
- Select an ISO between 800 and 1600
- Adjust your shutter speed to between 30 seconds and 1 minute
- Use manual white balance
- Focus manually on a bright star
- Take a test shot and verify your exposure and focus
- Set your shooting interval to 1 second longer than your shutter speed
- Program your camera to shoot between 100 and 500 photos.
After this section, you’ll find a full guide on how to plan your star trail images, and information on the best gear, tips, and examples.
Let’s take a deeper look at each step for shooting star trails:
1. Choose your composition
In star trails photography, it’s crucial to plan your sky and foreground elements.
As I mentioned earlier, the direction in which you point your camera directly affects how the streaks will look in your image. We’ll get more into star-trails planning below, but for now, bear in mind that planning is key.
Also, the best star-trail images include interesting elements in the foreground, so choose a subject that will add depth to your composition.

2. Set your camera to manual mode
Setting your camera to manual mode will grant you greater control over your settings, which will give you the best results.
When shooting star trails, the exposure triangle, which is aperture, shutter speed, and ISO, needs to remain constant; that’s why the automatic or semi-automatic modes on your camera won’t be useful in this situation.

3. Use an aperture of f/2.8 or the widest in your lens
Generally, I suggest using the widest aperture in your lens. This will allow you to gather more light and lower your ISO. In the next step, I’ll explain how the ISO impacts your star trail photographs.
4. Select an ISO between 800 and 1600
This is one of the best star trail photography tips that I wish I knew sooner: lower your ISO.
In night photography, it’s common to use high ISO values of between ISO 3200 and 6400. This is a good practice if you are shooting the Milky Way; however, this setting clips your highlights, showing the smaller stars as pure white.
Stars have many different colors apart from white. By lowering your ISO, you will prevent your stars from being overexposed and preserve their natural color. ISO 800 to 1600 is a good starting point.
NOTE: By lowering your ISO, you’ll also get RAW files with a higher dynamic range, which will allow for more flexibility during the editing process.
5. Adjust your shutter speed to between 30 seconds and 1 minute
For this kind of photography, the goal is to end up with a very long exposure image. Nonetheless, each of the individual shots shouldn’t be excessively long.
If anything goes wrong during the process and we have to delete an image because it was shaken, a 30-second gap will be less noticeable than a 5-minute one. Also, the stacking software will have an easier time filling in a shorter gap than a longer one.
As a rule of thumb, the longer the shutter speed, the riskier it will be to capture a perfect star-trail photograph (it’ll also increase the digital noise produced by the heating of the sensor).

Use shorter exposures instead of longer ones – Image by Joseph Cole
6. Use manual white balance
Set your white balance to manual. I recommend using a cooler color temperature (4000K or lower) for the best results.
Although white balance can be easily adjusted in the editing process if you are shooting RAW, I don’t recommend using auto white balance. This could result in your images having several different white balance values, which makes it harder to achieve a consistent look.
7. Focus manually on a bright star
Turn on the focus magnifier and point your camera at a bright star in the center of the frame. Don’t worry if it’s located outside of your composition; you can recompose after you’ve focused.
Slowly turn the focus ring until the star appears small and sharp on the LCD screen or in the viewfinder. The more out of focus you are, the bigger the star will look. Remember that focusing in photography is key to getting a sharp image.
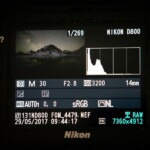
8. Take a test shot and verify your exposure and focus
Once you’ve completed all the steps above, take a test shot. Verify your exposure is right by checking your histogram. You should be able to see colors in the stars, but the image shouldn’t look too dark. Also, zoom in and make sure the stars look sharp.
If your exposure is either too dark or too bright, adjust your shutter speed, ISO, or aperture, in that order. Modifying your aperture will require refocusing your image.

9. Set your shooting interval to one second longer than your shutter speed
You will need an intervalometer to shoot star trails. If your camera doesn’t have an internal intervalometer, you can use an external intervalometer instead.
If your shutter speed is 30 seconds, your interval should be 31 seconds. This will ensure there is almost no time left between shots. Leaving a long interval between shots will create gaps in your image, which won’t look pleasing to the eye.
Adding one extra second beyond the exposure time as an interval is a good practice for photographing both star trails and time-lapse.
10. Program your camera to shoot between 100 and 500 photos
The more photographs you take, the longer your trails will be, but you’ll also need more space to store those photographs. I generally shoot around 200 to 300 photographs.
Now that the hardest part is done, all you have to do is press the shutter button and start shooting. Depending on your shutter speed and the number of photos you plan on taking, you might have to wait for a few hours.
Regarding your foreground, my recommendation is to capture a single shot with the best possible settings before you start taking images of the star trails and blend the foreground image with your sky later in post-processing.

Follow these steps to photograph star trails images. Photo by Uros Fink
NOTE: These star trail camera settings apply to both DSLR and mirrorless cameras. For DSLRs use mirror lockup to reduce vibration. For mirrorless cameras, I recommend using the electronic shutter.
Star trails post-processing tutorial – best star trails stacking software
Stacking star trails has become a simple task thanks to the variety of software that helps automate the process. Long gone are the days when photographers would take a single hour-long exposure to avoid stacking.
The advantages of shooting shorter exposures and then blending them together to form one long exposure star trail image outweigh those of a single exposure by far.
How to do a star trail in Photoshop
Using Photoshop to stack your star trail images is as easy as it gets.
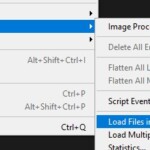
1. Load your images
Open the File menu, then hover over Scripts, and finally select Load Files into Stack.

Load your star trail files into Stack
In the new window, click Browse. Then, locate and select all your star trail images.
Don’t check any of the checkboxes in the window.

Review the images you are about to import
Once you’ve loaded your files, click OK.
Your pictures will start importing into Photoshop as layers. The process might take a few minutes depending on the number of images you are importing and your computer’s processing power.
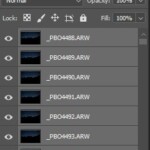
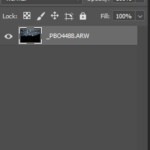
2. Select all your layers
Once Photoshop has finished importing, you’ll see all your images as layers.
Click on the first layer, then hold the Shift key and click on the last one.

Select all of your layers
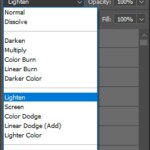
3. Change blend mode to Lighten
This is where the magic happens. Change the blend mode of the layers to Lighten.

Change the blending mode
After selecting the Lighten blend mode, you’ll instantly see your star trail image.
Lighten blend mode preserves only the brightest parts of an image, in this case, the stars, and hides the rest.
4. Stack your images
To easily work with your image, stack all the layers into one by using the following keyboard command:
-
- On Windows: Ctrl + E (press Ctrl key and hold. Then press E while still holding Ctrl)
- On Mac: Command + E (press Command and hold. Then press E while still holding Command)
You should only see one layer:

Merge all the layers into one
From this point on, you can edit your image as you normally would. If you took a separate shot for your foreground, don’t miss our detailed step-by-step tutorial on how to blend foreground and sky images in our Milky Way course.
How to do a star trail in StarStaX (Windows and Mac)
StarStaX is an amazing star trail stacking software available for both Windows and Mac. If you are looking to achieve incredible results, StarStaX will get you there. I generally choose StarStaX over Photoshop because it works faster, offers more options out of the box, and can it easily stack your images even on a less powerful computer.
StarStaX is an open-source program and it’s free to use. You can download it here.
Create your star trails image in StarStax
1. Load your images
You can either drag and drop your set of images or click on the Open Images… icon in the top left corner and select all your photos:

Import your images
NOTE: StarStaX can only process JPEG, TIFF, BMP and PNG image file formats. If you shoot in RAW, export your RAWs as any of these formats using your software of choice. Exporting TIFF files will preserve the most information from your RAWs.
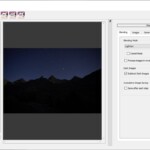
2. Quickly review your images
After importing your star trail photos you’ll see a list of all the photos on the left side, a preview of the selected photograph in the middle, and the preferences panel on your right.

Quickly review the images you’ve imported
3. Stack the star trail photos
Once you’ve imported and verified your images, you can start stacking.
The default settings will do the job. Click on the Star Processing… icon.

Render your star trail image
If you are looking for a more creative look, check the Comet Mode box and dial in how long you want your trails to be. This setting will make your stars look like comets with a trail.

Use the slider to select the length of the comet trails
This step will take a few minutes depending on the number of pictures and your computer’s processing power.
You’ll see a live preview of the process while StarStaX is working.
4. Save your image
The final step is to save your image. Click on the Save as… icon
If you intend on doing further edits to your star trails image, I recommend you save the image as a TIFF file.

Finally, save your image
How to do a star trail in Sequator (Windows)
Sequator is another awesome program when it comes to astrophotography. Unfortunately, it’s only available on Windows. If you are a Mac user, StarStaX is your best option.
Sequator supports RAW and 16bit TIFF files.
Download Sequator for free here.
Create your star trails image in Sequator
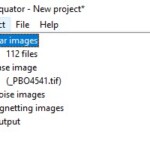
1. Load your images
Open Sequator and double click on Star images. Then, select all your star trail photos.

Import your images into Sequator
Once you’ve loaded all of your photos, the icon will turn green and Sequator will automatically select a base image for you. There is no need to modify this.

Make sure all of your images have been imported
2. Select an output
Double click on Output to tell Sequator where to save your image.

Choose your output
I recommend saving your final image as a TIFF file. This will give you more flexibility if you decide to keep editing your star trail photo.
3. Select your composition Method
Under Composition, choose Trails.

Choose the star trail mode
Check the Motion Effect box if you want your stars to look like comets.
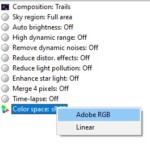
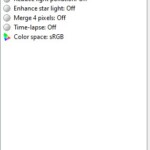
4. Select the color space
Right click on the Color space icon and select AdobeRGB.
I recommend using AdobeRGB, since it provides a wider range of colors.

Use AdobeRGB
5. Create your star trail image
After completing the previous steps, click on Start. This step will take anywhere from a few seconds to a few minutes depending on the number of photos you imported and your computer’s processing power.
Start rendering your star trails image
How to plan your star trail photo
There are multiple factors to consider when planning your star trails image. Just like any other night photo, planning properly ahead of time is key. You must think about the weather, light pollution, the moon, your location and more. This sounds like a lot, but with the tips you’ll read below, you’ll have your star trails shots planned in no time.
1. Choose the best subject for your image
In star trails photography, most of the time, you’ll find a subject in the foreground. This fixed subject can be anything from a building to a distant mountain. It’s important to choose your subject carefully because this choice will impact the kinds of streaks you’ll get in your final image.
If your subject is oriented north or south, you’ll capture circumpolar star trails; otherwise, you’ll get star paths.
2. Stay away from light pollution
Light pollution is the greatest enemy when it comes to night photography and, knowing where the darkest skies are will make everything easier. There are several apps you can use to find dark skies. I recommend using Light Pollution Map, which, in my experience, is the most complete and intuitive site. It’s also updated every year.
3. Find a night with no moon
A full moon acts the same as a big source of light pollution in the sky: it will cause most of the stars to completely vanish and make it nearly impossible to capture your star trail image.
Here I recommend using any type of lunar calendar. A good example is our Milky Way Calendar, which is also perfect for planning star trails.

I created Calendars for 20 different regions on earth. They are very easy to use and you can download the Milky Way calendars for this year here:
GET THE CALENDAR WITH THE BEST DATES TO PHOTOGRAPH THE MILKY WAY IN 2026
You'll also receive our PDF guide to photographing the Milky Way!

4. Check the weather
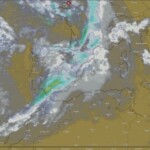
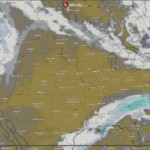
Finding a clear night without clouds is a must. The slightest chance of clouds could ruin your entire star trails image. I suggest using a few different sources of information to cross-reference the data because weather predictions aren’t always accurate. I use several apps to check and compare the weather. My favorite ones are NOAA, Windy, and Clear Outside.

Windy app showing the forecast for clouds
5. Arrive early at your location
I can’t emphasize enough the importance of arriving early when it comes to night photography. Walking in the dark, even with a headlamp, is challenging. Arriving early when there is still sunlight will help you scan the area and get familiar with it. It’ll also make it easier to find a composition.
6. Plan the length of your star trails
Yes, you can plan the length of your star trails, and yes, it’s very easy. Instead of going out to shoot and trying to guess how long your star trails will be, you can visualize and plan it beforehand. Once again, Photopills has a great tool to plan the length of star trails.

Best camera gear to shoot star trail photos
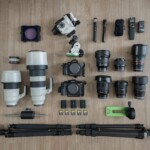
In star trail photography, there are a few items you need to bring with you to make your session a success. The gear you’ll need to capture your star trails image is relatively inexpensive, and you might have most of these articles already.
In short, this is the best camera gear for your next star trail session:
-
Camera
You’ll need a camera capable of shooting in manual mode. In terms of basic requirements, if your camera has a built-in intervalometer, that’s a plus, but don’t worry if it doesn’t because you can use an external one.
If you already own a camera to shoot the Milky Way or for night photography in general, that will work perfectly.
-
Wide-angle lens
The most breathtaking star trail images are captured with wide-angle lenses. You’ll need a lens of around 24mm or wider to be able to capture more of the scene and sky. Your aperture also needs to be wide enough. F/2.8 or wider is the best option.

Wide-angle lenses will allow you to get more trails in your frame
Any of the best lenses for Milky Way will work, since these also apply for star-trails photography.
-
Tripod
A sturdy tripod is a must when it comes to night photography. Your camera will be taking very long exposures and it needs to be still for long periods of time. A stable tripod is key to achieving the best results.
-
Intervalometer
An external intervalometer is fundamental if your camera doesn’t have a built-in one. This little item plugs into your camera and allows you to program your shutter speed, how many shots you want, and the interval between each one of those images.
-
Extra batteries
You’ll be shooting hundreds of images for a few hours at least, and you need to make sure your camera doesn’t run out of juice.
Having extra batteries to switch in and out will provide your camera the power it needs to last the entire session. An external power bank is an even better option, because you can plug it in before you start shooting; it will extend the battery life of your camera by a few more hours without you even having to touch the camera.
-
Memory card
Ensure you have enough space on your memory card. To get the best results, always make room for at least 200 images. Digital storage is very cheap nowadays, so don’t skimp on that.
-
Lens warmer
A lens warmer is optional, but I highly recommend using one in humid cold weather to prevent your lens from fogging. If you don’t own a lens warmer, a little trick is to put your lens hood on. This will delay any fogging, but it won’t prevent it completely.

Best star trails photography tips
Now that you know all the basics of star trails photography, I wanted to share some of the best star trail photography tips that I’ve learned through trial and error over the years:
1. Take several shorter exposures vs. a super long single exposure
There are two main ways to shoot star trails: a very long single exposure, or many shorter exposures. I strongly recommend you use shorter exposures. There are no real advantages to shooting a single very long exposure.
Shorter exposures:
-
- Your camera will overheat less.
- You will have many different photos to work with, this means, if one photo goes wrong, not everything is lost.
- You can turn your photos into a beautiful time-lapse.
- You get more flexibility in post-processing. You can decide how long your star trails are.
One single exposure:
-
- You will save space on your memory card because you are only taking one image.
- If anything goes wrong, you lose all the work you did.
- Your camera sensor will overheat faster.
- You get less flexibility for post-processing.
2. Use the electronic shutter or mirror lockup
The mechanical shutter can introduce vibrations into your image. To minimize this, I recommend using the electronic shutter (silent shutter) on your mirrorless camera or mirror lockup if you are a DSLR user. Not using the mechanical shutter will also extend its life because shooting that many continuous shots with the mechanical shutter can take a toll on its durability.

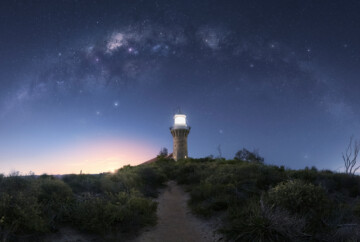
Use the electronic shutter or mirror lockup to reduce camera shake during star trails – Image by Uros Fink
3. Avoid touching the camera during the process
It’s important not to touch the camera for the duration of the process. Touching can not only introduce unwanted shake to the image, but also move the tripod and change the composition. This will make it impossible to align your images in post-production.
4. Make sure your tripod is very stable
Star trail images take a long time to complete. During this time, it’s key to ensure your camera and tripod are as steady as possible. Set up your tripod correctly to minimize any vibrations. If it’s windy, use the hook at the bottom of your tripod to hang your backpack and add a little weight.
5. Capture your foreground shot before the star trails photos
Shoot your foreground image first. Generally, the best moment to do so is right after blue hour. At that point, you’ll get a natural transition between the foreground and the sky while still retaining enough detail without cranking up your ISO too much.
Another benefit is that your camera sensor will be cooler, which will give you cleaner images without too many hot pixels.

Capturing the foreground before the star trails will help you get a cleaner image – Image by Joseph Cole
6. Lower your ISO to preserve the color in the stars
As I mentioned earlier, this is one of the best tips I’ve received for shooting star trails. Using lower ISO values to underexpose your image a little bit will help preserve the natural color of the stars and will give you colorful star trails that will captivate anyone who looks at them.
Star trails photography examples – Best photos of star trails
Star trails photography might seem a little challenging for a newcomer, yet it’s so rewarding when you start seeing the results. To help with inspiration, I’ve put together some of the best photos of star trails. This section is designed to show you some variety in style and techniques.
Circumpolar star trails
This is a staple when it comes to star trails photography. To shoot this kind of image, you need to find the celestial pole depending on which hemisphere you are located in. Earlier in this article, we explained how to find the celestial pole.

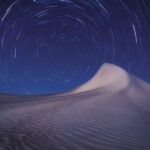
Circumpolar star trails captured at Lancelin Dunes, Australia – Image by Jose Luis Cantabrana
Don’t forget to save the image at the beginning of the article to help you find the north and south celestial poles.
Star paths
Star trails are not only about getting star circles. Pointing your camera east or west will also provide beautiful images. Try experimenting with your compositions and seeing the different patterns you get in your trails.
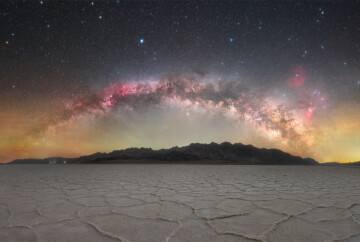
You can also photograph a Milky Way panorama mixed with star trails like the example below. This will require more advanced techniques but it’ll allow you to capture both circumpolar and star paths.

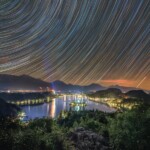
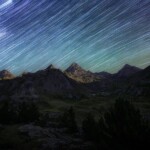
Star paths are amazing to photograph – Image by Uros Fink
Comet star trails
This is one of my favorite artistic techniques for star trails. Comet star trails will add movement and depth to your image. They are complicated to do by hand, but fortunately, both StarStaX and Sequator allow you to do them in just in one click. To do this in Photoshop, you’ll need an extension, such as OrionX or AstroPanel.

Comet star trails will add movement and depth to your image
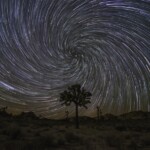
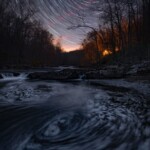
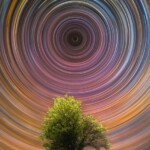
Vortex Star trails
Vortex star trails stand out from the rest and they are almost hypnotizing. There are two ways to do vortex star trails: either directly on location, by using a rig that zooms in a fixed amount after each photograph, or in post-processing. Doing vortex star trails in post-processing requires both LRTimelapse and Adobe Lightroom.

Vortex star trails are challenging, but the results are very creative – Image by Michael Ver Sprill
Star Trails FAQ
When it comes to star trails, there are a few questions that could arise. I’ve selected some of the most common questions in star trails photography in this F.A.Q section. If you have additional questions, make sure to leave them in the comment section below, and I’ll be more than happy to answer.
Conclusion
Star trails photography is fascinating, and I recommend you try it at some point. Unlike Milky Way photography, you can shoot star trails at any time of year. It’s a kind of photo that requires some patience because you’ll be shooting photographs for a few hours, but the results are worth it.

Star trails over Lake Bled – Image by Uros Fink
Hopefully, after reading this article, you’ve come to understand the differences between star circles (circumpolar) and star paths as well as, how to locate the north and south celestial poles.
When it comes to camera settings for star trail photography, these are the core concepts you need to remember:
-
- Shoot many individual images instead of one super-long exposure image.
- Use a 30-second to 1-minute shutter speed.
- Keep your ISO between 800 and 1600 to get the most natural colors out of the stars.
Additionally, remember that you’ll need a wide-angle lens, either an internal or external intervalometer, extra batteries or a power bank, a tripod, and enough space on your memory card.
Finally, when you are back home, use Photoshop, StarStaX, or Sequator to stack your star trail images. The process is quick and easier than you think.
This brings our star trail photography guide to an end. If you have any questions, feel free to post them in the comments below!


Dan – In preparation for trip to Big Bend National Park (dark sky location), I tried a star trail stack from my back yard (urban location – Dallas, TX). EXIF settings were f/3.5@18mm, ISO 200 and I was using an intervalometer to get about 300 30s RAW exposures. The camera is Canon R7, with a kit 18-135mm EF lens.
The resulting images were quite overexposed and I had to bring the exposure down by about 2.5 stops in post processing before stacking. I had tried ISO 1600 previously (as recommended above) and the images were completely blown out. Is the overexposure expected because of light pollution or is shorter exposures/lower ISO recommended when stacking?
Thanks for a great write up!
Hello Rakesh,
I recommend adjusting the exposure values to the lighting conditions in your location. If you’ve got light pollution, you might need to underexpose a little to protect the highlights, so ISO 1600 might be a little too high for your case. Take a few test shots at different ISO values and adjust depending on the exposure you get. Ideally, you want to protect the highlights because once they’re blown out, there’s not much you can do to recover them.
I hope this helps!
Hi GREAT article
Newbie, sorry for the stupid question are you shooting in RAW??
Thank you
S
Hi Steve,
Yes, I always shoot RAW and that’s what I recommend. It’s not a stupid question at all! I hope it helps.
Hi,
When I set my camera interval to be 1 second longer (21) than the exposure time (20) only 50 pictures were taken instead of the 100 I programmed to be taken. When I doubled the interval time, I got the number programmed.
Lastly, I like the mirror-lock suggestion but my camera shows a setting for stand-by not interval. Are they the same?
Thank you for the articles and any help you can share.
Hi Paul, make sure you have a fast SD card to render all the raw files quickly, 200/300 MB/s should work. If it’s still not working, just increase the interval 2 or 3 seconds more.
I think yes, but not sure what that setting is.
Thank you so much! 🙂
Excellent information, freely given. Thank you so much.
Really appreciate it Gavin, glad it helped. 🙂
Thanks much for a very interesting guide. So useful.
One question regarding Canon R5 settings :
I took several consecutive images with external intervalometer to process them for star trail in a PS later. However, at the end of my shooting night, I ended up in my camera with only one image showing my final star trail picture.
Any thoughts ?
Thanks much
Best
Nico
Nico, make sure you have all the RAW files of your star trails instead of one single image, so you can edit them with all the RAW information in order to extract later the colors and the details.
Hope it helps,
Dan
All I can say is Thank You. I will be making my first attempt at star trail photography next week, and the information you provide here is amazingly thorough and clear. You also explain why you suggest a certain approach. As a former school teacher, I am impressed with your preparation and presentation. One big worry I have, as a Lightroom only user, is whether the screens I see when I attempt to use PhotoShop look like the ones you so thoughtfully included in your instruction. If they do, I do believe my first attempt will be successful, and lead to many more. Again, Thank you
You’re truly welcome, AJ. So glad it’s clear for you 🙂
Hi, Wondering how some of them get the colors as showing up on the first photo of this article – clicked by Uros Fink. I have tried ISO as low as 640 with exposure of 105 secs, still no success. Any other trick perhaps?
Or how do you post process the star trails?
Hi! As I explained in the article, your shutter speed shouldn’t be longer than 1 minute. The main factor you need to keep in mind is to not blow the highlights in the stars. If your exposure is too long (or your ISO too high), you’ll blow the highlights and then the stars will just look white. Make sure to go through the steps explained in the article and let us know how it goes!
thanks,
what would be a good combinaison of iso/speed if i don’t have better than f4 ?
Hello Geoffrey,
With an f/4 lens you can still achieve great star trail images, actually, the narrower aperture will help you keep your images a little underexposed which will in turn preserve the colors in the stars. The best way to find out the correct exposure for your particular situation is to test it out, because it’ll depend on your location and other factors. A good starting point is f/4, ISO 800 and 1 minute exposure. Take a test shot then adjust accordingly.
Thank you for such an extensive and useful guide 🙏 I wonder, how do you obtain smoother trails as shown in the first picture of your tutorial?
Hi Santiago,
There are multiple ways, but it’s mainly done in postprocessing with programs such as Sequator and Starstax, and with Photoshop where you can use plugins such as OrionX and Astro Panel to make the job easier.
this was helpful but some of the photos are wayyyy better than anything I can imagine. It looks like they are using a radial blur to make their star trails wider and smoother. I would love to find out how to do this.
Hi Josh,
There are multiple ways to edit a star trail image. I’ve personally never used radial blur for this kind of photo. I recommend looking into plugins such as AstroPanel and OrionX, both for Photoshop. They have handy tools to edit night images such as star trails.
Great guide with lots of helpful hints, I’m sure it will help me refine my process. I’m curious about your recommendation to set the interval at 1 second longer than the shutter speed vs. continuous. just wondering what the end difference would be. Thank you.
I do recommend using a 1 second interval between each photo, that is the shortest interval most cameras allow. Shooting a continuous exposure is very risky and as I mentioned in the article, there isn’t any real benefit to it.
Can you suggest a technique to reduce the number of stars in post processing? I am familiar with the star reduction in the Milky Way, but I can’t figure out how to apply that to star trails.
Hi Praveen,
I’m not familiar with any method of batch reducing stars for star trail images; however, that’s not a common thing to do. In star trail images you work with all the stars you capture.
Hey, so you had said to set the camera to take 500 pictures in a row. I have a Nikon D3500 and have no idea how to do that. Could you help please? Thanks.
Hi, Joel!
That’s correct. To create a star trail image, the more pictures you take, the better. I generally use about 200-300 photos myself.
I’ve been doing some research about the D3500 and I was really surprised to see that it’s not compatible with any intervalometer on the market because it lacks an accessories port. I’ve seen a few workarounds like using a software intervalometer called qDslrDashboard, but I haven’t tested this method myself, and what I’ve seen so far looks pretty complex.
If you find yourself looking for a new camera in the near future, take a look at our best Milky Way cameras buying guide, it’s a really useful and complete article where we review the best cameras for night photography. Some even have an internal intervalometer.
Let me know if you have any more questions. Have a great day!
You mention ‘stay away from light pollution’ for star trails. For Milky Way, I understand Bortle 3 of lower is required. Is it the same for Star Trails?
I have also see some very nice star trail pictures that have fewer stars and the foreground has enough city lights? Would you recommend shooting star trails with even if the light pollution is not that low?
Yes, my recommendation is to get as far away from light pollution as you can. If you have a Bortle 3 (or lower) nearby then that’s perfect. You can still photograph star trails in a Bortle 4 or Bortle 5 sky, but you won’t see as many stars and you might get a yellowish tint in your sky due to the light pollution.
I agree with you, I’ve seen some really beautiful star trail images with very few stars, that’s an artistic choice you can make. If you are going to shoot star trails somewhere with a lot of light pollution, just be careful not to clip the highlights coming from the light pollution, because it’s very easy for it to happen.
Thank you for your comment Praveen!
Hi Dan,
thanks for sharing, great guide !
Can you just clarify about short exposure between 30 sec and 1 minute.
You say you should verify that stars are sharp but with 30 sec and more exposure there will be star trail (with any lenses) and stars will not be pinpoint and so not sharp. Then you say you can use the photos to make a time-lapse.
So i assume the idea is to take short star trails, and no pinpoint stars ?
Then regarding the time-lapse, i imagine it’s for a star trail time lapse only and not a regular one with pinpoint stars ?
Depending the response above, would you say it’s better to have single exposure with little star trails or with pin points stars to make a star trails photo ? Star trails from single exposure with pinpoint stars have the advantage that you can do all the regular things with it (including star trails) but the result is probably less good compared with exposure with little star trails ?
Greetings,
Lionel
Hi Lionel,
You are correct, at 30 seconds, your stars will look like trails, however, you can still tell if they are in focus or not. Another option, which I do myself, is to take a test shot, with a 15-second shutter speed (or less depending on the lens) just to verify focus.
With a wide-angle lens (17mm or less), even with a 30-second shutter speed, you can create a beautiful time-lapse. The motion in the stars will look smooth when you put the time-lapse together. With a narrower lens, if you want to create a time-lapse, then you should use a faster shutter speed for sure, but generally, for star trails you will mostly use wide-angle lenses.
If you want to photograph pinpoint stars then I suggest you use the NPF rule as explained in our Milky Way photography guide.
To make star trails image, my suggestion is to use longer exposures, between 30 seconds and 1 minutes as explained in the article. Of course you can create star trail images with shorter exposures where your stars look like perfect dots, however, remember that the shorter the exposures, the more images you’ll need to achieve the same results. 30 seconds to 1-minute exposures are the happy medium.
Generally, the photos I take for star trails are only for star trails and time-lapse.
I hope I’ve answered all your questions! Thank you very much for your comment Lionel!
Hi Prince,
All is clear, thanks for clarification, much appreciated !
Dan,
Just wondering if you feel there would be any dis advantage to shooting star trails at 60 second or 120 second exposures? I don’t care about creating time lapses from these images, just purely a star trails image. My thought is to reduce the amount of shots to process, reduce shutter use, and reduce the image noise with a lower ISO, and hopefully get a cleaner looking finished shot. If it helps, would be shooting with a Sony A7R3, silent shutter mode. Thanks in advance.
The only disadvantage I see is that if you get a bad shot for whatever reason, the gap will be bigger. With star trails you can slow down your shutter speed as much as you need, just keep in mind that it’ll be harder to fill in gaps if you get a bad shot with camera shake for example. I don’t recommend going over 1 minute.
As you said, if you slow down your shutter, you can decrease your ISO, giving you cleaner files with a higher dynamic range. After all, there are many ways to achieve the same result, you just have to experiment!
Thanks for your comment!
Prince
Awesome idea!! Great guide! I don’t do enough of these 🙂
I’m glad you enjoyed the guide, Chris! You should give it a go and feel free to share the results with us 😀
All the best,
Prince