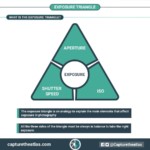
The exposure triangle is one of the best analogies to understand the photography basics that affect exposure: aperture, shutter speed, and ISO, and how they interact with each other.
In this beginner’s guide to the exposure triangle, you’ll find the exposure triangle in photography explained. Apart from giving you the definition of what exactly is the exposure triangle, I’ll show you how to use it to master exposure in photography.
At the end of the article, you’ll also find an exposure triangle cheat sheet that I’m sure you’re going to find useful. Furthermore, I’ve included a few exposure triangle examples to help you understand this topic.
Ready to see the exposure triangle made easy?
- What is the exposure triangle in photography?
- The exposure triangle basic camera settings
- How does the exposure triangle work?
- Exposure triangle chart
- Exposure triangle examples

GET OUR FREE EBOOK TO
MASTER THE PHOTOGRAPHY BASICS
20 LESSONS AND 80+ PAGES WITH EXAMPLES, INFOGRAPHICS, TIPS, AND MORE!
What is the exposure triangle in photography?
The exposure triangle is an analogy to explain the main elements that affect the exposure in a photograph: aperture, shutter speed, and ISO, and the way that these elements are related.
According to the exposure triangle definition, all three elements must be in balance in order to get a perfectly exposed photo. This often results in having an exposure value EV equal to zero when selecting the right metering mode. If, after achieving such a balance, you need to change any of the settings that affect the exposure, you will have to compensate by adjusting the other two settings to continue maintaining the EV and the balance in the exposure triangle.

As you can see, the exposure triangle is crucial to master exposure in photography and make the most of the scene that you’re photographing according to your goals. If you shoot in auto mode, your camera will do the work of adjusting the different settings so that the exposure triangle is balanced.
However, it’s essential that you understand how the different camera settings are related whether you are shooting in manual or auto mode.
If you don’t know how to start in photography, the first and essential thing is to understand how the exposure triangle works.
The exposure triangle basic camera settings
After this introduction to the exposure triangle, the key to understanding how the exposure triangle works is to be familiar with the basic camera settings affecting each side of the triangle: aperture, shutter speed, and ISO.
The first side of the exposure triangle: Aperture
The first side of the exposure triangle is related to aperture.
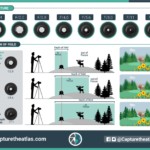
Aperture is the opening of the lens, and the wider it is, the more light the camera sensor will capture, thereby increasing exposure. Conversely, the narrower the aperture, the less bright the image will be, thus reducing exposure.

Depth of field is another effect of aperture. The greater the aperture, the smaller the focused area will be, while by using narrowed apertures, you’ll have a bigger area in focus. This should also be taken into account when adjusting the exposure triangle.

You can also read our ultimate guide on aperture in photography to learn more about this important factor of the exposure triangle.
The second side of the exposure triangle: Shutter speed
The exposure triangle and the shutter speed are also directly related.
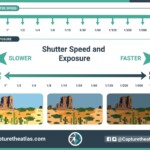
Shutter speed is related to the length of time the shutter of the camera is open and exposing the sensor to light, making it a setting that directly affects exposure.
The longer the shutter speed, the more light the camera sensor will capture and the longer the final exposure will be. On the other hand, the shorter the shutter speed, the less light that will hit the sensor, so the final image will be less exposed.

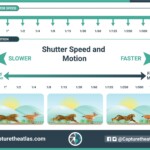
Motion is another effect of shutter speed that must be taken into account when balancing the exposure triangle. If you use a fast shutter speed, you can capture moving subjects or shoot handheld, while, when using long exposures, you can photograph stars, waterfalls, and rivers with the silk effect. You can learn more about long exposure photography in our guide.

You can learn more about this side of the exposure triangle in our guide to shutter speed.
The third side of the exposure triangle: ISO
ISO is the third element in the exposure triangle and also plays a key role in exposure.
In simple terms, ISO is the amplification of light captured by the camera. Digital cameras capture light naturally through the aperture of the lens and the length of time the shutter is open. What ISO does is “artificially” make the image brighter.

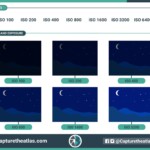
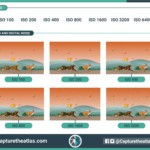
The downside of raising the ISO too much beyond the camera limits is the generation of noise in your photographs which will reduce the general quality of the image. This effect must be taken into account when balancing the exposure triangle.

Learning how ISO works is important for understanding the exposure triangle, so I suggest checking our ISO guide for beginners if this is a new element for you.
How does the exposure triangle work?
After breaking down the basic elements of the exposure triangle, it’s time to understand how to use the exposure triangle in photography so you can nail the perfect balance and get the right exposure in your photos.
The exposure triangle explanation is simpler if you understand two main concepts: exposure triangle stops and balance in the exposure triangle.
exposure triangle stops
The exposure triangle stops are fundamental for learning how to calculate the best exposure triangle settings.
But first, let’s dive into what exactly are photography stops.
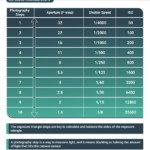
A photography stop is a way to measure light, and it means doubling or halving the amount of light that hits the camera sensor.
For example, if you adjust the shutter speed down from 1/4000th of a second to 1/2000th of a second, you’re increasing one stop and therefore doubling the amount of light. On the other hand, if you change your ISO 1 stop down from 400 to 200, you’re halving the amount of light. With aperture, it’s not as easy to know how much a stop equals, since it doesn’t correspond to doubling or halving the F-stop number.
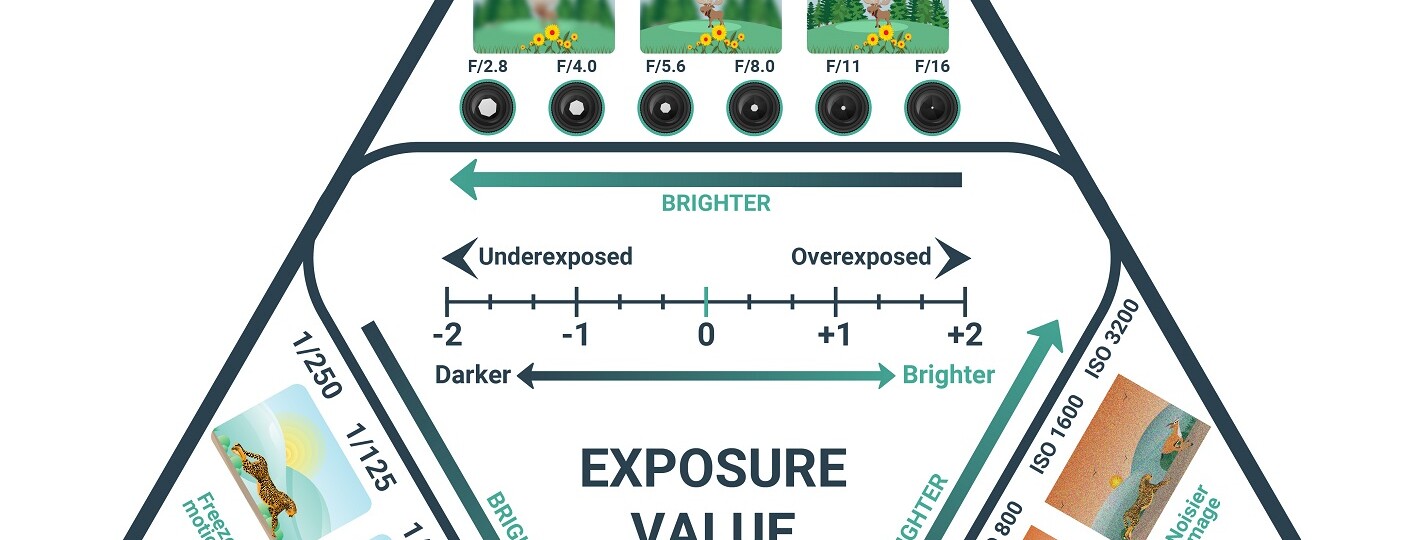
On the graphic below, you can see the relation between stops and the photography basics of the exposure triangle simplified:

Being familiar with the exposure triangle stops is key for reaching the ultimate goal: finding balance in the exposure triangle.
The final goal: balance in the exposure triangle
The basic exposure triangle rule is to strike a balance. When the three sides of the triangle are in check, you’ll have the right exposure value (EV), which is normally close to zero.
According to this rule, whenever you adjust one of the sides of the triangle, you’ll have to compensate by adjusting either one or two of the other sides, always keeping a balance, since that is the ultimate goal of the exposure triangle.
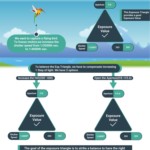
For example, if you have the exposure triangle in balance and the exposure value (EV) is equal to zero, and you want to increase two aperture stops, to maintain balance so that the exposure value (EV) remains zero, you must reduce an ISO stop and a shutter speed stop or two ISO stops or two shutter speed stops.
Exposure triangle case study
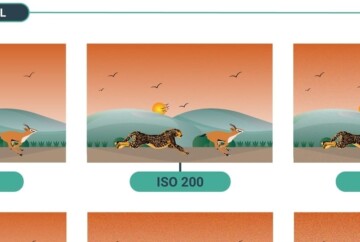
Let’s say that we set our exposure triangle to the following settings because it provides a correct exposure for a certain scene: f/8, 1/2000th, and ISO 200. However, we aren’t happy with the final image, since we’re photographing a flying bird and we’d like to freeze the motion.
To correct it, we must increase the shutter speed from 1/2000th to 1/4000th (which means decreasing 1 shutter speed stop). But, if we don’t compensate on the rest of the exposure triangle, our exposure value will change and the image will no longer be correctly exposed.

So to compensate, we’ll need to increase an aperture stop (from f/8 to f/5.6) or increase an ISO stop (from ISO200 to 400) to regain balance in the exposure triangle.
The logic is simple: If we’re capturing less light using a faster shutter speed, we need to either use a wider aperture or increase the ISO to compensate on the exposure triangle and be in balance again.
Which side to adjust first in the Exposure Triangle
There is no rule about which setting you should adjust first in the exposure triangle, or about which side of the triangle you have to use to compensate. It all depends on the light of the scene and the subject you want to photograph.
For example:
- If you want to shoot a still landscape with a large area in focus, you can start by setting a closed aperture like f/11, and then balance the exposure triangle either through shutter speed, ISO, or both.
- If your goal is to photograph the Milky Way or a night landscape, you can start with a wide aperture like f/2.8, a shutter speed of 25 seconds, and then adjust the ISO.
- If you want to photograph a bird or an animal that moves very fast, the first setting you must adjust is the shutter speed, to ensure that you freeze the motion.
As you can see, the first exposure triangle setting that you must adjust, in most cases, is the aperture or the shutter speed. The ISO is seldom the first setting you need to adjust; it’s a setting you use to balance your exposure triangle.
You can use an exposure triangle app calculator for iPhone or Android, but that’s not really necessary. The exposure triangle calculation might seem daunting, but once you start practicing, you’ll understand and change the settings quickly.
Exposure triangle chart
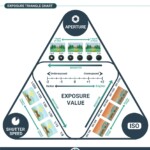
You can see all the exposure triangle basics and how the exposure triangle works summarized in the following exposure triangle infographic:

Exposure triangle examples
Now that you’ve seen all the theory related to the exposure triangle explained, the best way to reinforce this photography fundamental is to see some exposure triangle examples. I’ve included some exposure triangle exercises so you can start practicing today.
exposure triangle exercises
As an exposure triangle exercise, follow the subsequent steps:
- Choose a topic to photograph that is relatively accessible (a landscape in your closest park, a family portrait, a friend playing some sports, etc).
- Adjust the basic settings that you’d set for a normal exposure to get an exposure value EV of zero and ensure your picture is well-exposed.
- Now change one of the settings to try to pursue a different artistic outcome and count how many stops you have increased or decreased; for example, leave the foreground of the landscape out of focus, shoot the portrait with a larger depth of field, or try to freeze the motion in sport photography.
- After this, compensate on the exposure triangle by adjusting either one or both of the remaining settings to get back to an exposure value (EV) of zero.
- Zoom in to see the results of both shots. The important thing is, on one hand, to understand how to balance the exposure triangle, and, on the other hand, to master the photography basics related to the exposure triangle and how they interact with each other.
Conclusion
As you can see, the exposure triangle in photography can be easily explained if you break down the different pieces of the triangle and understand how they interact with each other and how you should compensate for them.
Remember that more important than knowing what the exposure triangle is on a camera is learning how to balance and compensate on the exposure triangle when you’re shooting. To do so, make sure you understand the exposure triangle diagram and use the photography exposure triangle chart included in the article to memorize it. You can also download my PDF photography guide where you’ll find more information about this.
I hope this exposure triangle guide helped you understand this important photography concept. Please don’t hesitate to leave any questions in the comments below!


This ebook really helped me as a begginner in photography. I learned more about the exposure triangle which made my pictures look better. Thank you so much for helping!!
Hey Jared, thanks! I’m so glad you found it helpful! 😊
this was extremely halpful it helped cheat my photography exam and now I’m at cool camera uni I appreciate you guys so mach
That’s so great to hear! I’m so glad you found it helpful! Happy shooting! 😊
Awesome
Glad you enjoyed it! 🙂
Thank you so much. A beginner here with a new dslr camera. I can see the relationship with each part of the Triangle. This will definitely help when I go out of auto mode. I may let the camera even the ISO for me though.lol
Thank you again. I’ll be back.
Gary
You’re welcome Gary, glad it helps! Now it’s important to practice 😉
Simple and to the point
Thanks, really appreciate it 🙂
What awesome infographics to really bring home these points!
Thank you Torah! Glad it helps 🙂
Firstly I would like to appreciate you for all of this you had put here.
Thanks for educating us.
But I have I question, how is that exposure triangle applicable in manual mode?
Thank you.
Thank you so much Prince, glad it helps.
In manual you just have to check the histogram to know if you’re exposing correctly. Make sure it’s in the center and not touching the sides.
Best,
Dan
Thankful for enlightening us. Am glad to have met the above. Much blessings to entire family. kindly donate more about the photography
Thank you so much and glad you found it helpful! 🙂
This is absolutely simple to understand. I’m Gabriel from Nigeria. I Love your article so precise and concise thanks a ton🙏🏾🙏🏾🙏🏾
Huge thanks Gabriel. So glad it helped!
It was really helpful for my photography class assignment.i got all I needed to know.thank you.
Glad this was useful, Eugene!
Man, this is an amazing job. I’ve been searching for a post this easy to understand for years and you made it so simple and so visual with the graphics. Astonishing. From now on this post is core-knowledge for me.
I’m glad you liked the article, Pablo. We try to make the articles as complete and easy to understand as possible.
Well explained & detailed. Thank you so much. I will need to read again & again. Then practice/practice/practice.
Very happy to hear you liked it, Dante.
Definitely, the best way to learn is to practice!
Absolutely Perfect..
The one stop solution to understand the photography aspects easily.
Great job Dan..
Covered the topic meticulously.
Thanks, Prateek!
I’m glad to see you found our Exposure triangle article useful!
Dan
Thank God I came across this. It’s so explanatory like ABC
Thanks for sharing
I appreciate
Thanks! Happy to see it helped!
Dan
Thank you so much for this awesome tutorial, very well explained, representation is neat and clear, easy to understand… I learned a lot from it. Thank you once again.
Thanks, Aries! Happy to see that our exposure triangle article was useful! 😉
This has been so helpful. Thank you so much for this.. . can’t wait to get out there now.
Neil
North Wales
Thank you, Neil!
Thank you for the article. It is well explained and easy to understand, however, I am new to photographyand my subject is wild life and in particular birds. What I would like to know is how do you choose the initial settings to get the E.V at zero before you make adjustments to the exposure triangle?
Many thanks for a great article.
Hi Grahm,
It depends on your subject, if your bird is flying, you could probably start with your widest aperture, the minimum shutter speed you need to freeze your subject (like 1/1200th of a second), and lastly adjust your ISO until you reach your zero E.V. If the bird is perched, I’d also start with the widest aperture, a slower shutter speed, and the ISO that matches 0 again. For birds is very useful to use a spot metering mode since they usually fill a fraction of the frame.
Hope this helps and you can capture beautiful photos of birds!
Dan
Easy explanation and good illustrations makes this a great resource
Thanks Christian! I’m happy to see you found our exposure triangle article useful!
Happy shooting!
Dan
Nice photo
Thanks Rinal!
Dan, thank you so much! I finally understand depth of field. You explain it in a very concise, easy to follow way. Your diagrams rock!
Thanks Yasmine! I’m glad to see you found our article useful and you liked our infographics 😉
Happy shooting!