Aperture is one of the photography basics and, along with the ISO and shutter speed, one of the three components of the “Exposure Triangle.”
But aperture doesn’t just affect the exposure, it also plays a key role in other photography aspects, such as the depth of field, the sharpness, and generally the final result of your image.
In this guide, you’ll find all the fundamentals of aperture in photography, and it’ll help you understand what is aperture in photography and how aperture affects your photographs.
- What is aperture in photography
- What are the F-stop numbers in aperture?
- Aperture and exposure
- Aperture and depth of field
- Aperture and sharpness
- What is the best aperture in photography?
- Aperture photography examples

GET OUR FREE EBOOK TO
MASTER THE PHOTOGRAPHY BASICS
20 LESSONS AND 80+ PAGES WITH EXAMPLES, INFOGRAPHICS, TIPS, AND MORE!
What is aperture in photography?
Aperture in photography is the opening of the camera lens, which is related to the amount of light that passes through the camera lens to the image sensor.
The aperture mechanism in the lens that allows more or less light to come in is formed of a series of opaque “blades” called diaphragm. When the blades are open, your camera sensor will capture more light, whereas as the blades progressively close, less light will hit your sensor.

Aperture in photography can be explained in a similar way to our eyes, since it works like the human pupils: the wider they are, the more light will pass through and vice versa.
One of the best photography tips for beginners is to understand what the aperture is through practical exercises in which you vary this setting in manual mode.
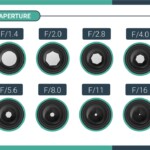
What are the F-stop numbers in aperture?
The F-stop number (or focal-stop number) is a reference to how open or how closed the aperture is in your camera lens.
In aperture and photography, the most common F-stop values follow a sequence like this:
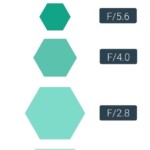
f/1.4, f/2, f/2.8, f/4, f/5.6, f/8,f/11, f/16, f/22

The maximum and minimum aperture number or F-stop value varies from lens to lens, and you’ll set the specific value on your lens/camera in order to determine the desired aperture that fits your goals.
Increasing/decreasing the F-Stop number coincides with opening up or closing (also called stopping) down your aperture.
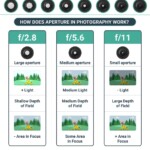
What is a Large and a small aperture?
A large aperture is a wide opening of the lens, which allows it to capture more light. This is also called low ranging, since it’s related to low F-stop values, usually ranging from f/1.4 to f/4.
When you use the largest aperture in your lens, you’re using a “wide-open” aperture.
A small aperture is the opposite: a narrow opening of the lens blades that doesn’t allow the passage of much light. It’s also called a high aperture, since the F-stop values related to it range from f16 to f22.
When you use the smallest aperture in your lens, you’re using a “stopped down” aperture.
It’s important to understand and be familiar with these terms. Below, we’ll dive into the practical uses of aperture in photography, and you’ll constantly see the different scenarios and results of shooting using different aperture values.
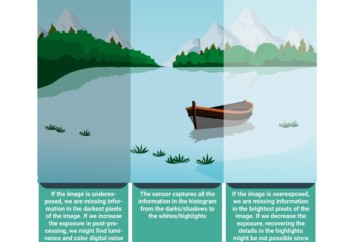
How Aperture and exposure are related
As we anticipated in the introduction, aperture affects exposure and plays a fundamental role in determining, along with the ISO and shutter speed, the optimal exposure in an image.
With a fixed ISO and shutter speed, the wider the aperture (or lower F-values), the brighter your image will be, and the narrower your aperture (higher F-values), the darker it’ll be. Large apertures are also known as fast apertures since they allow you to decrease the exposure time, and small apertures are also known as slow apertures, since they allow you to increase the shutter speed.

This is the most important aspect of aperture in photography. Depending on what you want to capture, there are certain situations where you shouldn’t change your ISO and shutter speed; aperture will be the key to a proper exposure.
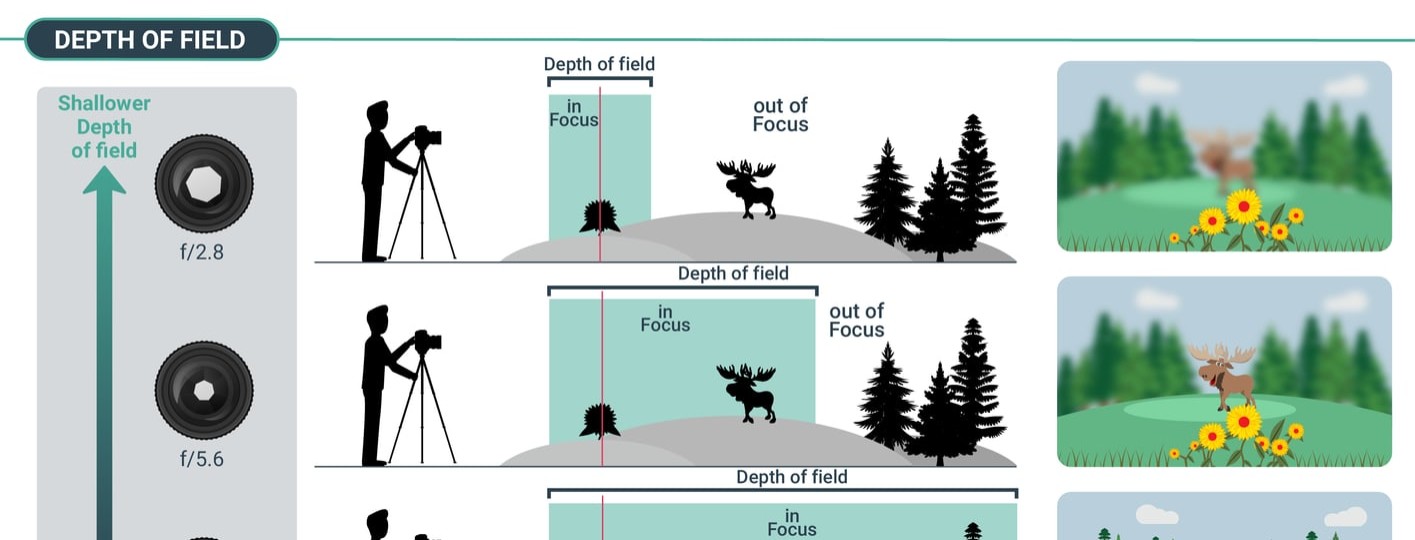
Understanding Aperture and Depth of field in photography
The second most important aspect is the relation between aperture and depth of field.
The depth of field is the proportion of the image that is reasonably sharp and in focus.
According to the physics laws in optics, the larger the aperture you use, the shallower depth of field you’ll be able to capture, meaning more areas of your images will be out of focus and less sharp.
Conversely, the smaller the aperture you use, the greater the depth of field you’ll see in your image, meaning a bigger proportion of the image will be in focus.
Thus, the smaller aperture you use, the shorter the hyperfocal distance will be.

The aperture and depth of field that you have to look for depend mostly on:
- The scene that you’re photographing
The type of scene that you want to capture will usually dictate if you require less or more depth of field.
For instance, if you’re photographing landscapes, you’ll probably aim at having as much of the image in focus as possible, whereas if you’re shooting portraits, your goal might be a blurred background, so all the attention goes to the subject.
- Your artistic view
From an artistic point of view, there is no rule to determine the depth of field and aperture in your image.
For example, you can intentionally leave the foreground of your landscape out of focus to lead the viewer’s eye to the background. Or, in a portrait, shoot everything in focus because the background says something important, too.

Medium aperture to leave the foreground out of focus and lead the viewer’s eye towards the subject. f/6.3, 1/2500, ISO 400
At the end of the article, you’ll find some examples of the best apertures to use depending on the photography genre.
You can “break the aperture and depth of field rules” by doing a focus stacking. This is, however, a more advanced technique that I don’t recommend doing if you are still starting out in photography.
Aperture and sharpness in your photographs
Another crucial factor beyond the exposure and depth of field is how aperture affects sharpness in photography.
Using extreme aperture values in photography is not recommended. When you use a very large aperture, your lens can’t physically produce the sharpest results, since the diaphragm will be wide-open, trying to capture as much light as possible.
That way, as you open your aperture below f/5.6 values, you’ll be able to notice how your image loses sharpness.
Aperture and diffraction
The same thing happens when you set a small aperture. In that case, there is a phenomenon related to aperture in photography called diffraction, which is an optical effect that results in poorer quality throughout the image. You can see this phenomenon as you start closing the aperture above f/16 values.
Which is the sharpest aperture?
There is no rule of thumb to know which is the sharpest aperture in a lens, since this varies depending on the lens model.
However, the sharpest aperture is always close to the lens “sweet spot,” that is, the aperture or F-stop value that produces the highest quality in terms of sharpness.
To calculate this sweet spot roughly, move two to three F-stop values from the maximum aperture of your lens. For example, if the maximum aperture in your lens is f/4, this would be between f/8 and f/11 → f/1.4, f/2, f/2.8, f/4,f/5.6, f/8, f/11, f/13, f/16, f/22.

I recommend testing your lens by shooting the same scene using different aperture values and then comparing by zooming in on the details to see which aperture produces the sharpest results. Also, I recommend you to check the best tips and tricks to take sharp photos.
If you have had to take a photo with extreme aperture values and your image is a little “soft” and not very clear, don’t worry. You can correct it later using a software to improve the sharpness of your images. I normally use Topaz Sharpen AI.
How to set the aperture in camera
Learning how to set the aperture in a camera is one of the key things you need to know when you start using the manual mode.
Before digital photography, the aperture was manually set on the lens by selecting the specific F-value.
This changed in digital cameras and, today, you can set the aperture in your digital camera electronically using the aperture button when you operate your camera in manual mode. There are still some manual lenses that require you to set the aperture manually, but all the electronic lenses that are compatible with your digital camera will allow you to easily choose your aperture.
The button to adjust aperture depends on the camera model. Since aperture is one of the basics in photography, it’s usually located in an easily reachable place on the camera.
In most camera brands, you can set the aperture by moving the wheel dial located on the front right top of the camera.

You can learn more about how to change all the camera settings here.
Aperture mode VS. Shutter mode
You can also make your camera automatically choose which is the best aperture for each situation through shutter mode (S). This semi-automatic mode can be useful if you know what shutter speed you want in advance. For example, if you know that for shooting a flying bird, you need at least 1/2000 of a second, you can set this parameter and the shutter mode will decide which is the best aperture.
If you decide to use the Aperture mode (A) instead of the shutter mode, you’ll set the aperture, and the camera will automatically calculate the shutter speed.
You can learn more about the different camera modes here.
Which aperture is best? Bigger Vs. smaller aperture
One of the most common questions in photography is which is the best aperture? Shall I use a big or a small aperture?
As we commented before, there is no black and white answer, and your choice will depend both on the type of photography that you’re taking and on your artistic goals.

However, and just as a reference, below, you’ll find a list of the most common and best apertures used across different photography genres.
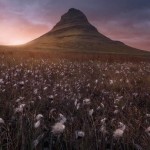
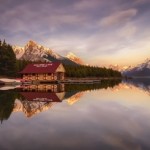
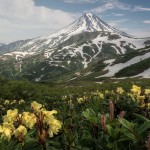
Aperture in landscape photography
Putting different artistic choices aside, the best aperture in landscape photography is the one that allows you to have as much area of the image in focus as possible.
As we mentioned before, you can achieve this result by using the “sweet spot” aperture on your lens. In most landscape photography lenses, this will be between F8 and F11.
There are some specific cases that you should also consider:
Best Apertures in landscape photography
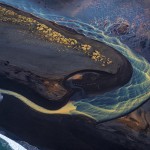
- f/1.4 – f/4: Best aperture for landscape aerial photography.

f/2.8, 1/2000 sec, ISO 400
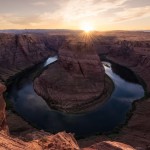
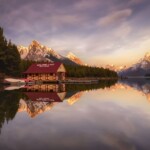
- f/8 – f/13: Best aperture for general landscape photography.

f/11, 0.6 sec, ISO 100
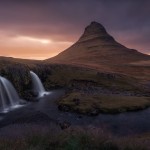
- f/13 – f/16: Best aperture when you need more depth of field or when you want to decrease the shutter speed without lens filters.

f/22, 0.8 sec, ISO 100
Aperture in Night photography
The best aperture for low light conditions will be different, since you’ll need to capture more light and, therefore, use a wider aperture.
Generally, the best aperture in night photography goes from the max. aperture setting on your lens like f/1.4-f/2.8 to small f-stop values like f/5.6.
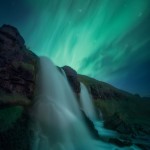
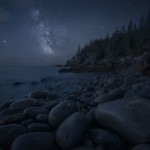
Aperture in Milky Way Photography
To shoot the Milky Way, you’ll need to capture as much light as possible, since increasing the ISO over the limits of your camera will result in noise in photography and increasing the exposure time will turn the stars into trails instead of sharp spots.
For that reason, the best Aperture in Milky Way photography is always the largest possible according to your lens. You can read more in this article about Aperture and settings for Milky Way photography.
![noise in photography [:es]Milky way two jack lake banff canada alberta mirror pines sky photography night banff montañas rocosas de canada [:en]Milky way two jack lake banff canada alberta mirror pines sky photography night[:]](https://imgcap.capturetheatlas.com/wp-content/uploads/2017/06/two-jack-mirror-milkyway.jpg)
f/2.8, 30 sec, ISO 2500
Aperture in full moon photography
In some cases, when there’s a full moon illuminating the landscape, you can close down your aperture to higher F-values like f/5.6 – f/8. That way, you’ll have more depth of field and a sharper image.
f/5.6, 3 sec, ISO 2000
Aperture in Northern Lights photography
Photographing the Northern Lights requires pushing your camera to the limit, since you’ll be shooting in extreme low light conditions, and the shutter speed to freeze the movement of the Aurora must be very short (just a few seconds).
According to this, the best aperture in Northern Lights photography will also be the widest possible. You can find more in-depth info on this article on aperture and settings for Northern Lights photography.
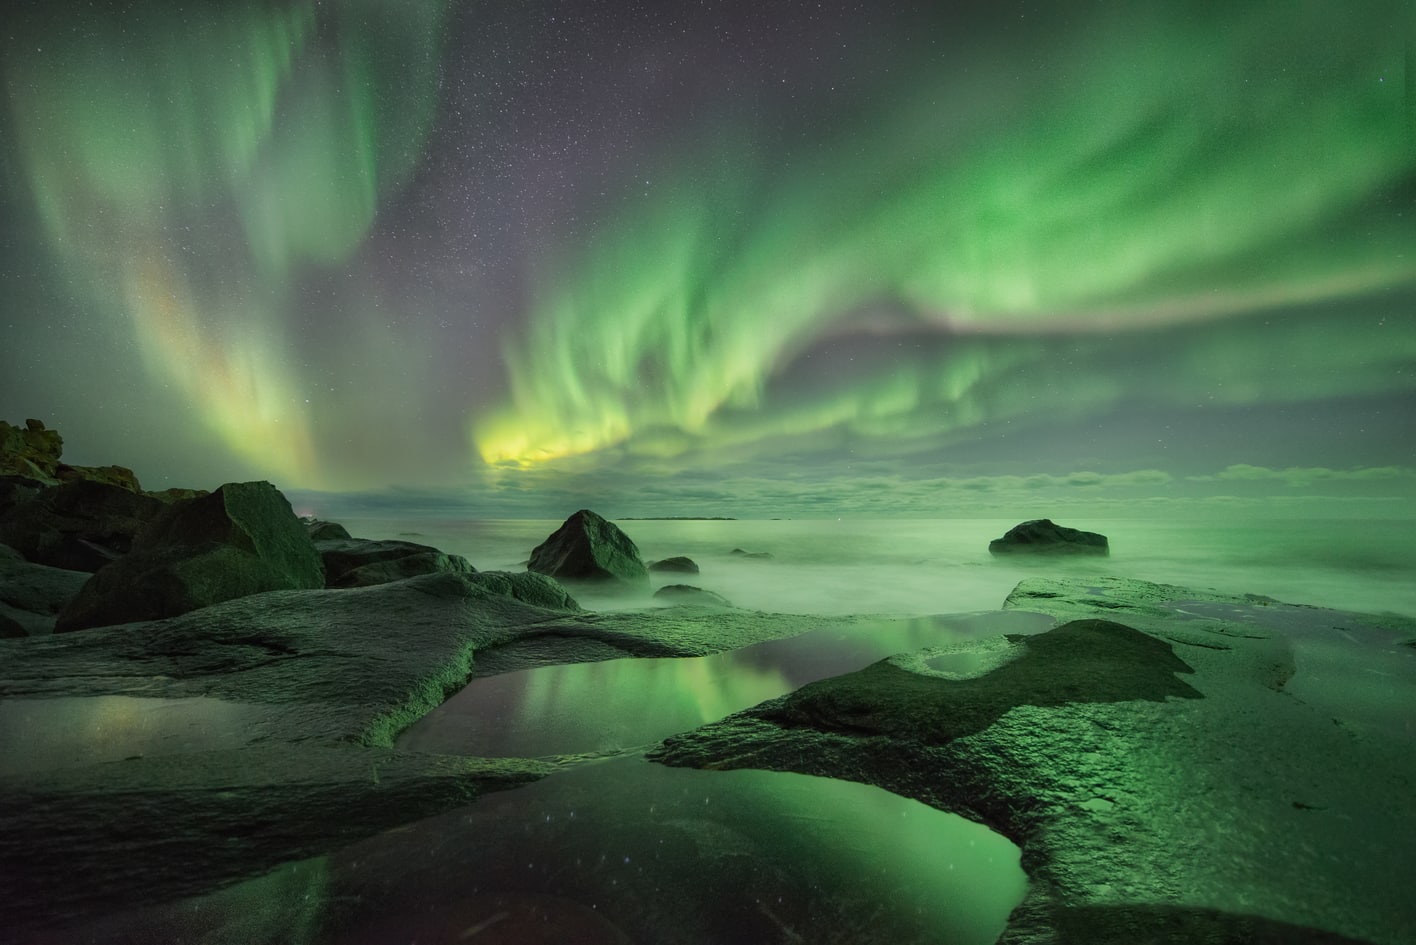
f/2.8, 4 sec, ISO 6400
Aperture in portrait photography
Unlike landscapes, when you’re shooting portraits, there is usually one (or several) subject(s) that stand out from the other elements in the frame.
The best aperture in portrait photography to emphasize the subject is any wide aperture, usually between the max. allowed by your lens like f/2.8 and f/5.6.
The goal, more than capturing light, is to use the shallow depth of field to focus just on the subject, leaving the other elements of the image blurred.
This also depends on the lens and type of portrait. For example, if you’re using a long focal length like 50 mm or 85 mm with a wide-open aperture like f/2.8, getting too close to the subject will result in areas of the subject being out of focus.
This blurred effect caused by the aperture is also known as Bokeh in portrait photography. The faster the lens and the larger the aperture, the stronger the bokeh will be and the more your subject will stand out.

f/1.8, 1/60 sec, ISO 400
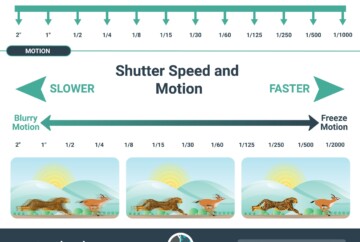
Aperture in sports photography
In sports photography, the subjects are usually moving at high speed, so the goal is to freeze their movement.
According to this, the best aperture in sports photography is commonly a large aperture, with values between f/2.8 and f/5.6.
Sometimes and, depending on the scene and the focal length, you might need a larger depth of field, and for this, you’ll have to set narrower apertures like f/8.

f/5, 1/800 sec, ISO 6400
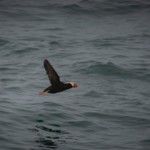
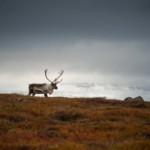
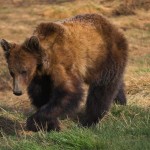
Aperture in wildlife photography
Similar to the previous case, the best aperture in wildlife photography is a fast aperture that allows you to freeze the movement of the animal. This, of course, will depend on the animal and scene that you’re photographing.
The best aperture in bird photography will always be the maximum allowed by your lens. If, for instance, you’re shooting several animals at a far distance and they’re moving slowly, you can use a slower aperture from f/5.6 to f/8.

f/8, 1/8000, ISO 400
Other effects of Aperture in photography
Beyond all the aperture effects on exposure, depth of field, and sharpness that we’ve already seen, there are other interesting side effects of using different apertures in some light situations.
Aperture for Sunstars and Moonstars
To create the visual effect of a sunstar/sunburst or a moonstar, you’ll have to close down your aperture to high F-Stop values from f/16 to the smallest aperture on your lens. That way, the sun/moon beams will be sharper.
This aperture effect also depends on the number of blades on the aperture of your lens. Lenses with an odd number of blades will capture double the number of beams.
f/11, 1/60 sec, ISO 100
Aperture and Dust spots in your images
Apart from the optical effect of diffraction already mentioned, using small apertures from f/13 to f/22 will make the dust spots in your camera sensor more noticeable. Because of this, an effect of aperture is capturing the dirt on the sensor.
If you’re shooting something uniform like a blue sky, be careful, since these spots can be very obvious if you decide to stop down your aperture.
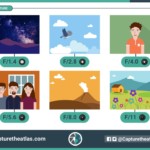
Aperture photography examples
To better understand what is aperture in photography and how aperture in photography works, you can check out the examples below, which are images taken using different aperture values.
Small Aperture in photography examples:

Small aperture to capture all the landscape in focus. f/11, 0.6 sec, ISO 100

Very small aperture to get everything in focus with a close foreground. f/16, 1/125 sec, ISO 100

Very small aperture to increase the total exposure time. f/16, 30 sec, ISO 100
Medium aperture in photography examples:

Medium aperture for shooting “slow-moving” wildlife. f/5.6, 1/2000 sec, ISO 640

Medium aperture to photograph landscapes in low-light situations like caves or canyons. f/6.3, 1/60 sec, ISO 640

Medium aperture to shoot a portrait with 2 or more people. f/5.6, 1/2000 sec, ISO 200
Large Aperture in photography examples:

Large aperture to capture more light and decrease the exposure time. f/2.8, 8 sec, ISO 5000

Large aperture example to shoot the Milky Way and the stars. f/2.8, 25 sec, ISO 5000

Very large aperture to photograph portraits with a blurred background and Bokeh f/1.8, 1/50 sec, ISO 100

Large aperture for shooting “fast-moving” wildlife. 1/8000 f/2.8, ISO 1600
Aperture in photography F.A.Q
Below you’ll find the response to some of the most common questions for understanding aperture in photography:
Conclusion
Beyond reading the theory and checking the aperture examples, the best way to really understand what is aperture in photography is by practicing.
Practice shooting scenes with different light and different aperture values, and zoom in on the images later to see how the exposure and the depth of field change, the two main effects of aperture in photography.

To complete your understanding of aperture and exposure, I suggest checking out our beginner’s photography guide (you can download it as a PDF photography guide), where you will learn about the other two basics in photography:
And it’ll also help you understand the following concepts:
I hope this guide to aperture in photography helps increase your knowledge about this important topic and, especially, helps you shoot wonderful images!


always loved photography since a child and finally deciding to take it serious and possibly into a career. I want to learn EVERYTHING and this was very helpful and not confusing at all. Thank you
Thank you!
Clear and to the point. Well done! My only suggestion would be to review the use of expressions like “The Best”. For a beginner (one that first takes and then makes) they are misleading because one is lead to believe in a strong statement without knowing how it was reached, hence no understanding. For a real photographer (one that first makes and then takes) they are not true because a real photographer has one’s own language with personal bests and worsts, as you clearly show in your very fine images. Aperture, ISO, exposure, focal length, etc. are only tools and… there is more than one way to skin a cat…
Hi Florin,
Thanks for your message and for sharing your feedback! It’s true that there are no rules in photography, but I just wanted to provide a reference for someone who is starting out. When you learn new things, especially in photography, the amount of information and things to grasp can be overwhelming, so I think that understanding the basics provides a good foundation for “breaking” the badly so-called “rules”.
Best,
Dan
I just bought my first DSLR camera and I want to learn to use it in manual mode. I’ve used my friends camera in the past, but always in auto mode. This post was very helpful. I really appreciate the illustrations to help me understand how aperture works.
Thanks April! You’ll see a big difference using your DSLR in manual mode! I’m happy to see you found our aperture article useful!
Happy shooting!
Dan