
Hyperfocal distance in photography sounds like a complex and daunting topic. However, it’s not as difficult as it seems, and with the right definition and examples, you’ll easily understand hyperfocal distance and how to effectively use it in photography.
In this article, you’ll see hyperfocal Distance explained. I’ll break down not only what is hyperfocal distance but also how to find and use hyperfocal distance in a variety of settings.
Since finding the hyperfocal distance isn’t always an easy task, we’ll explore several tools to calculate hyperfocal distance, including hyperfocal distance charts. I will also be going over the best hyperfocal distance calculator apps for quick results.
Lastly, I’ll be providing several hyperfocal distance visual examples to polish your understanding of hyperfocal distance!
With all this in mind, let’s begin exploring hyperfocal distance together!
What is Hyperfocal Distance?
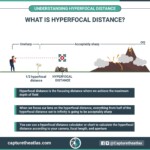
Hyperfocal distance can be defined as the distance you must focus to reach the maximum depth of field. The hyperfocal distance is important because everything from half of the hyperfocal distance out to infinity is going to be acceptably sharp.
When focusing on a given point in a scene, there are usually areas in front of and past the point of focus that are significantly less sharp. While capturing some blur can sometimes be the intention, we usually want as much of the scene to be in focus as possible. That’s why hyperfocal distance in landscape photography and similar genres is so important.

Hyperfocal distance and depth of field (how much of a given scene is in sharp focus) are interrelated. If you are not familiar with this term, I strongly recommend taking a look at my depth of Field guide!
Also, I recommend knowing how to focus in photography and the focus modes you can use to focus on the hyperfocal.
Regarding hyperfocal distance calculation, there’s no need to learn by heart the hyperfocal distance formula, because there are several tools available that we’ll explore to quickly calculate the hyperfocal distance exact point in space.
How to Use the Hyperfocal Distance?
While the term “hyperfocal distance” sounds technical, it’s much easier to understand than you might think! Besides, it’s essential to learn how to use the hyperfocal distance since it’s one of the best ways to take sharper photos!
Below are the key steps to use hyperfocal distance in photography:
1. Ask yourself: Is Hyperfocal Distance necessary?
Knowing where the hyperfocal distance is isn’t always necessary – it depends entirely on the subject matter at hand. Hyperfocal focusing comes into play when we want to maximize the depth of field in our image.
If I have a foreground subject that’s of interest but I also want an acceptably sharp background, I need to be aware of my lens’ hyperfocal distance. However, if there is nothing in the foreground of interest, focusing on infinity is much faster and ensures my important background elements have the greatest sharpness.

1. Ask yourself: Is the Hyperfocal Distance necessary?
Astrophotography can also be a challenge because focusing on the hyperfocal distance doesn’t necessarily translate into sharp star points. However, if you’re also into night photography, you can find more info in my how-to Photograph the Milky Way guide!
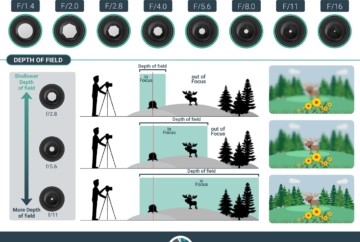
2. Set the aperture for Hyperfocal Distance
The aperture value (how much light is taken in through the lens) significantly impacts the hyperfocal distance and depth of field. When using small apertures like f/11 or f/16, I can photograph relatively near subjects while still having an acceptably sharp background.
If I’m using a wide aperture like f/1.4 or f/2, the hyper-focus distance will be further away and I’ll have to focus on a more distant subject for the rest of the background to look crisp. This will make it difficult to have both foreground and background in focus at the same time.
As whenever we use the hyperfocal distance we will be trying to maximize the depth of field in the entire scene, the logical thing is to use a small aperture if we want to have everything relatively sharp. However, this is not possible in night photography where we will need to use large apertures most of the time.

2. Set the aperture for Hyperfocal Distance
Note that the precise hyperfocal distance value also depends on your lens focal length and your camera sensor size. Most hyperfocal distance charts include both values in the table for simple understanding.
3. Find the Hyperfocal Distance
So how to find the hyperfocal distance? Turns out there are a few popular ways to do so! The simplest are hyperfocal distance calculators or charts in which you must find the hyperfocal distance for your sensor size, the aperture you are going to use and the focal length of your lens.

3. Find the Hyperfocal Distance
Double the distance method
It is difficult to estimate the hyperfocal distance without calculators or charts. However, you can use the double the distance method, which is to focus twice the distance of the closest element you want in focus, to try to make both the element and the background appear relatively sharp.
For example, If an interesting rocky outcropping is 10 meters away from the camera, according to this calculation you should focus at 20 meters so that both the rocks and the background mountains are acceptably in focus. You won’t be focusing at the hyperfocal distance, as you won’t be maximizing depth of field, but at least you will ensure that both the rocks and the mountains in the background have an acceptable sharpness.
The double the distance method is very quick and effective. But using hyperfocal distance calculators, apps, or hyperfocal distance tables, will give you cleaner results tailored to your individual camera setup.
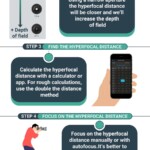
4. Focus on the Hyperfocal Distance
To focus on the hyperfocal distance, you can do it either via manual or automatic focus.
My recommendation is to try using manual focus to hit the precise hyperfocal distance point in the frame. If your camera has focus peaking, enable it to gauge where the plane of focus is at while making adjustments. Magnification via Live View also helps bring hazy details into clear focus.

4. Focus on the Hyperfocal Distance
If you’re not entirely certain whether you’ve found the hyperfocal distance, it’s always better to go slightly further out rather than closer to the camera. The closer the chosen point is to the camera, the more out of focus the background will be.
I prefer to simply leave my camera in manual focus while hunting for the hyperfocal distance. Once I decide to change either the aperture setting or focal length, I’ll need to then recalculate the new hyperfocal point.
5. Check the Results for your Hyperfocal Distance
Lastly, take the time to zoom in on the details and check the final image once you’ve taken the shot to see how the results match up to your expectations. If there seems to be less sharpness than expected throughout the frame, try recalculating and focusing on the hyperfocal distance using the above rules.
The LCD screens of modern DSLR and mirrorless cameras come with plenty of focusing aids, including focus peaking and split prisms to ensure the results are to your liking.

5. Check the Results for your Hyperfocal Distance
You can check, save, or print the below hyperfocal distance infographic to remember the steps when you’re shooting in the field!

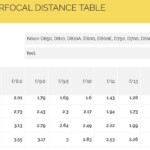
Hyperfocal Distance Chart
Hyperfocal distance tables are tools commonly used for immediate access to the focal point that gives maximum sharpness for a given camera and focal length.
However, general hyperfocal distance charts are less reliable today because there is so much variation in the camera sensor sizes. A Canon APS-C sensor is not quite the same size as a Fujifilm APS-C sensor. And Micro 4/3rds sensors have vastly different hyperfocal distance values from full-frame ones.
That’s why customized online hyperfocal distance charts are incredibly useful. Many, such as the popular PhotoPills chart, allow you to input your precise sensor along with the focal length and aperture.

Online Hyperfocal distance chart – Photopills
If you prefer a physical hyperfocal chart to carry in your camera bag, consider inputting your gear values and printing a hard copy from DOFMaster instead. Online tools are by far the easiest way to calculate the hyperfocal distance!
Hyperfocal Distance Calculator
Hyperfocal distance is made easy by using any of the many online calculators and tables out there.
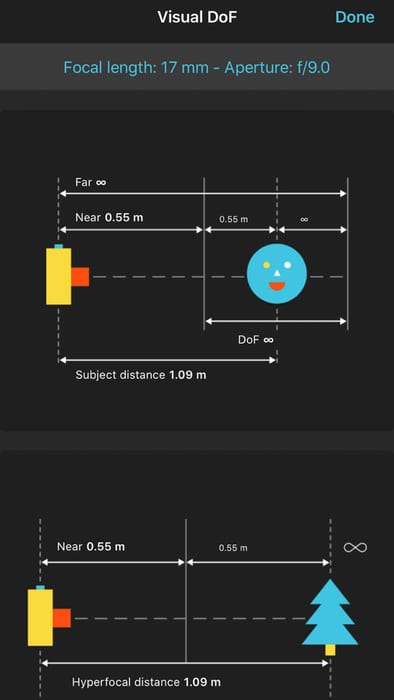
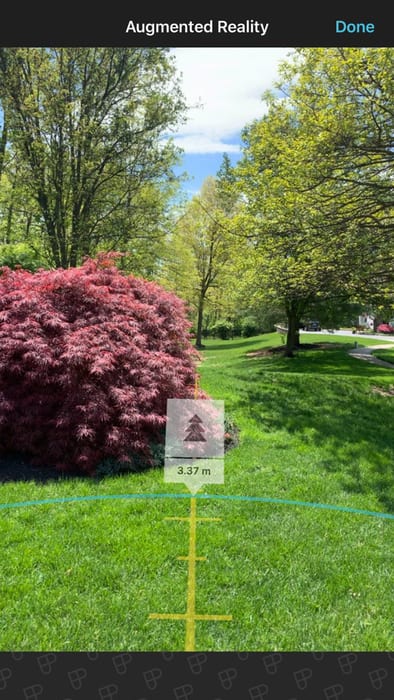
Photopills was mentioned earlier as a fast, popular hyperfocal table accessible on both computer and phones. It also includes an augmented reality mode to use with your phone where you can easily see where you need to focus on hyperfocal distance.
DOFMaster’s online Depth of Field Calculator includes the hyperfocal distance calculation for a given combination of camera sensor, lens focal length, and aperture. It also shows graphic examples, but the main drawback of this hyperfocal distance calculator is that it doesn’t include the latest camera models, like most mirrorless cameras.

DOFMaster’s Online Hyperfocal distance calculator
Another hyperfocal distance calculator is Outsights Environmental Photography. It’s specific to full-frame, and medium format sensors, all of which are commonly used in the landscape genre.
A good hyperfocal distance tip is to keep these sites bookmarked for calculating the hyperfocal distance in the field as needed.
Best hyperfocal distance apps for iPhone and Android
Since nearly all of us have smartphones in our pockets these days, it makes perfect sense to download a hyperfocal distance calculator app and keep it at the ready.
Photopills, available for Android and iOS, is consistently rated as one of the best hyperfocal distance apps. The app also includes not just the hyperfocal distance but helps you plan where and when to be for astrophotography events, like shooting the Milky Way, tracking astronomical bodies, and much more!

Best app to calculate the hyperfocal distance
Hyperfocal Pro is another popular choice that’s more focused specifically on hyperfocal distance calculation. You’re given distances down to the millimeter as well as illustrations and savable custom scene profiles for a given camera and lens combination.

Hyperfocal Pro interface
Some people can feel overwhelmed by a wealth of additional information, tables, and features, though. For the simplest hyperfocal distance app for Android, try out Hyperfocal, an excellent free app for quickly calculating the hyperfocal distance with minimal fuss.
Hyperfocal Distance Examples
To help you have a solid understanding of how hyperfocal distance in photography works, below you’ll find a few examples of hyperfocal distance that will also show you when to use it and when it’s not necessary.
Hyperfocal distance examples – When to use it?
In the following hyperfocal distance examples, you’ll see cases where I shot using the hyperfocal distance because it was necessary:
- In this case, I had to focus on the hyperfocal distance to have the entire composition acceptably sharp, from the fallen leaves and creek up to the background.

Val D’Aran, Spain – 0.6 sec, f/11, ISO 100
- In this other case, I also used the hyperfocal distance focusing with my wide-angle lens (14 mm) at that distance. That way, I could take from the cactus in the foreground and the background acceptably sharp.

Monument Valley, AZ, USA – 1/6 sec, f/8, ISO 640
- In this other hyperfocal distance example, to capture more sharpness in the lines in the foreground, I calculated the hyperfocal distance to maximize the depth of field of the image.

Antelope Canyon, AZ, USA – 1/4 sec, f/8, ISO 200
- You can find plenty of hyperfocal distance examples for night photography. However, if you want to have the stars totally sharp, it’s better to focus on the stars directly. Still, in the photo below, I focused at the hyperfocal distance, and star blur is almost imperceptible. In any case, to focus on night photography, I always recommend using the manual mode as I explain in my Milky Way photography guide.

Two Jack Lake, Canada – 30 sec, f/2.8, ISO 2500
Hyperfocal distance examples – When Not to use it?
Below, you’ll find another series of examples where hyperfocal distance isn’t necessary:
- In this image, there wasn’t any element in the foreground close to my camera, so focusing on the wooden cabins was enough to capture everything acceptably sharp.

Hamnøy, Norway – 15 sec, f/11, ISO 100
- Same as in the above example, the waterfall in the foreground was at least 60 feet from my camera, so I managed to capture great sharpness in the image focusing to infinity.

Sunwapta Falls, Canada – 0.4 sec, f/9, ISO 100
- In this Northern Lights image, as I always do in night photography, I focused to infinity using a bright star to make sure that all the stars on the sky were as sharp as possible.

Emerald Lake, Canada – 3 sec, f/2.8, ISO 2500
- In this last example, I didn’t use the hyperfocal distance since the flowers in the foreground were too close to my camera. In these cases, if you calculate and focus on the hyperfocal distance, if your foreground is too close to the camera it could be out of focus. To solve this, I did a more advanced technique called Focus Stacking.

Kamchatka Peninsula, Russia – 1/100 sec, f/16, ISO 100
Hyperfocal Distance F.A.Q
Conclusion
We’ve come full circle in our understanding of how to use hyperfocal distance in photography!
By using it to fine-tune sharpness across the depth of field, we gain even greater control in the end result of our image. Using Hyperfocal distance will also increase your understanding of how aperture, focal length, camera sensor size, and depth of field are related.
Finding the hyperfocal distance can be a challenge if you aren’t using a hyperfocal distance calculator app or infographic, but always remember that for a rough hyperfocus distance calculation or you can use the double the distance method to have, at least, the most important elements of your scene in focus.
However, I still recommend sticking to precise measurements when using the hyperfocal distance in landscape photography. If you aren’t precise when viewing the final result on the LCD screen, you may find more lack of background sharpness than expected when viewing your images at home.
If you’ve found this hyperfocal distance guide to be helpful or have any questions, feel free to shoot me a comment and let me know!


My Dear – while going through the website I found your esteemed web site. Very nicely arranged and very good information and notes to the Learners. i am very happy to come across your esteemed web site. By the way kindly explain me – Now I am doing Nature and Wildlife Photography. My Camera + Lens combination in the WILDLIFE is Nikon D 7100 + NIKKOR 200-500mm. f/5.6 E ED VR Super Telephoto Zoom Lens. I Love Nikon a Lot. Now there on the Lens Baral you we find the Focus Limit Switch Full / Imfinity Modes. Now when you are working with this Lens to capture Bird life and Wildlife what is the Best Mode to switch on , means Full / Infinity ? My settings are AF-C and BBAF – Back Button Auto Focus . Aperture Priority Mode. I need a clear understanding of this Full / Infinity Focus Limit Switch. Awaiting your early Reply in Appreciation. Kindly add me to your Subscription Mailing List. Warm Regards.
Hi Sumangala,
Thanks for your nice words about our site, I’m glad to see you’re finding our guides helpful.
Regarding your question, the Full/infinite button on the telephoto lens has a function; When it’s set to “Full” (Default mode), your lens will focus on anything close or far away frm you. When it’s set to a different mode like, for example, 10m – infinite, your lens won’t focus on anthing close to you.
We can’t subscribe people to the website or legal reasons but you can do it yourself, I’ll be happy to see you in the Capture the Atlas community 😉
Best,
Dan