Exposure is the foundation of and one of the most important basics in photography.
Understanding what is exposure on a camera and how photography exposure works are the first and fundamental things you need to learn when taking your first steps in digital photography, and it’ll be the key to being successful when you start shooting in manual mode.
In this exposure photography guide, you’ll find exposure made simple. Not only are the basics of photography exposure explained but also examples are given so you can learn, practice, and have the perfect exposure on your photos.
- Exposure definition
- What is Exposure Value?
- How to expose in photography?
- Measuring exposure: The exposure meter
- Exposure and the histogram
- Exposure examples in photography

GET OUR FREE EBOOK TO
MASTER THE PHOTOGRAPHY BASICS
20 LESSONS AND 80+ PAGES WITH EXAMPLES, INFOGRAPHICS, TIPS, AND MORE!
exposure definition: Understanding photography exposure
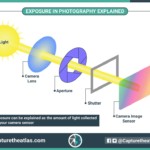
Exposure in photography can be easily explained as the amount of light collected by your camera.
When the light passes through the camera lens to the camera sensor for a determined period of time, the amount of light that reaches the camera will determine the final look of the image.

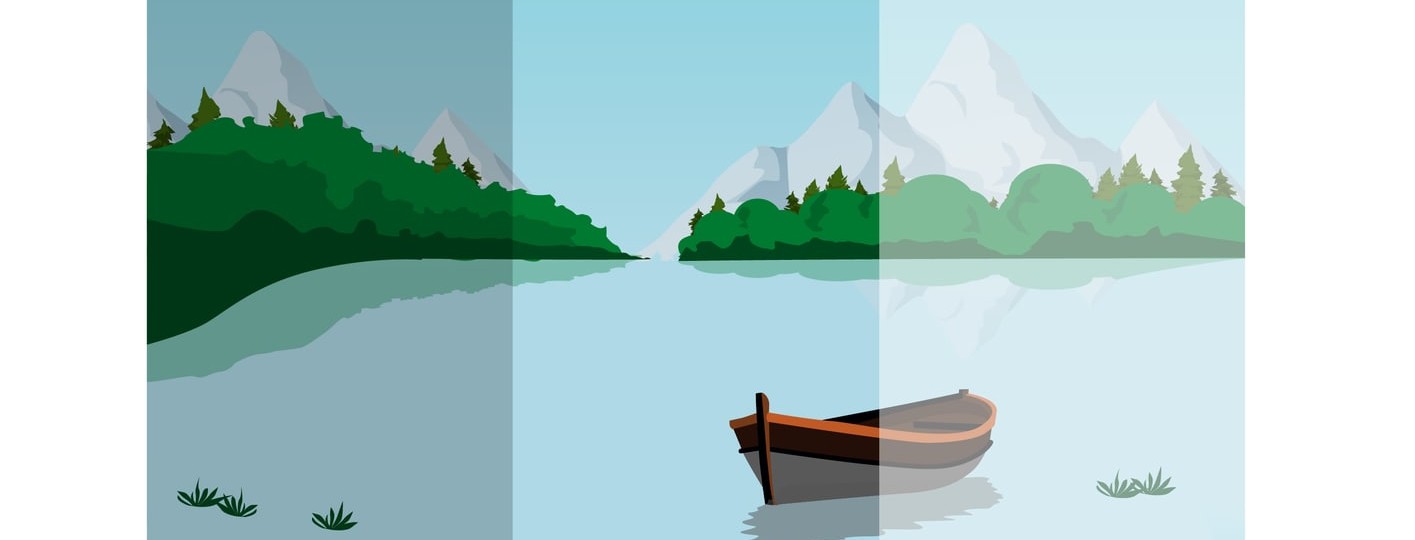
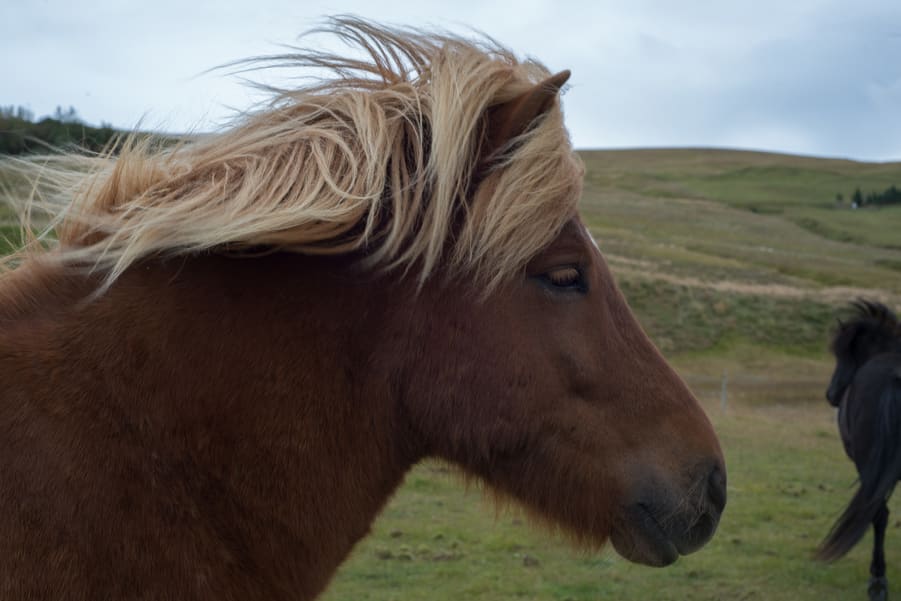
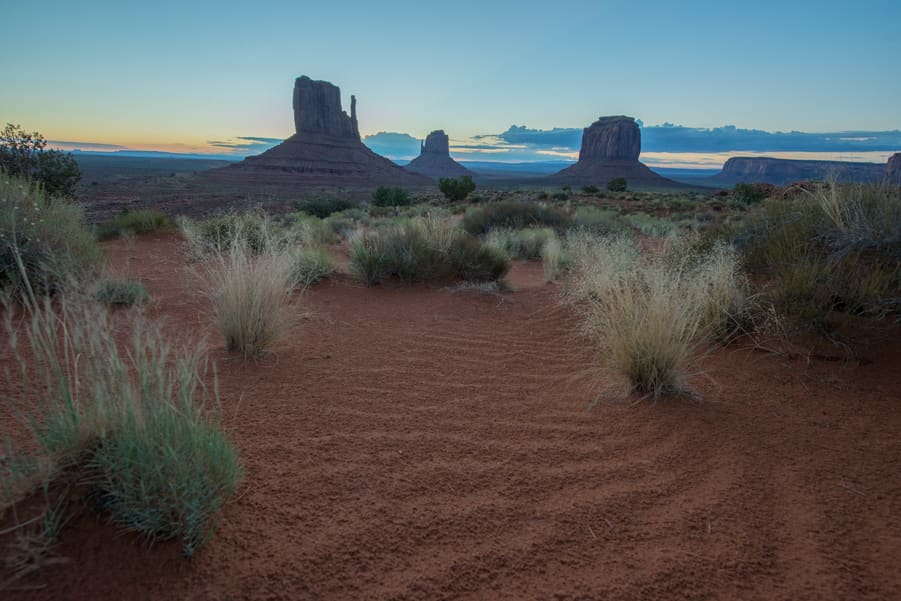
The main effect of photography exposure is to capture the image with a determined brightness. When you shoot a perfectly exposed photo, you are capturing all the details in the highlights and the shadows.
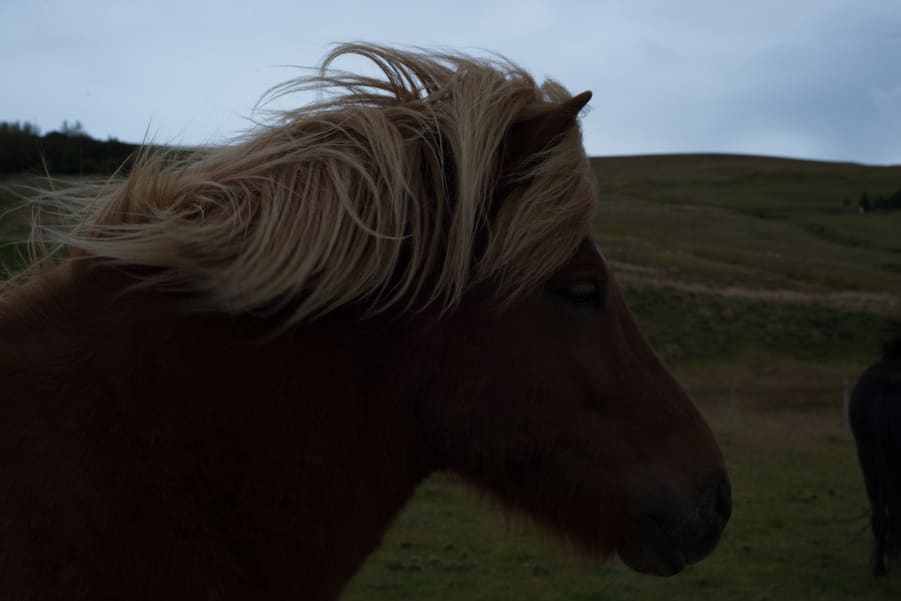
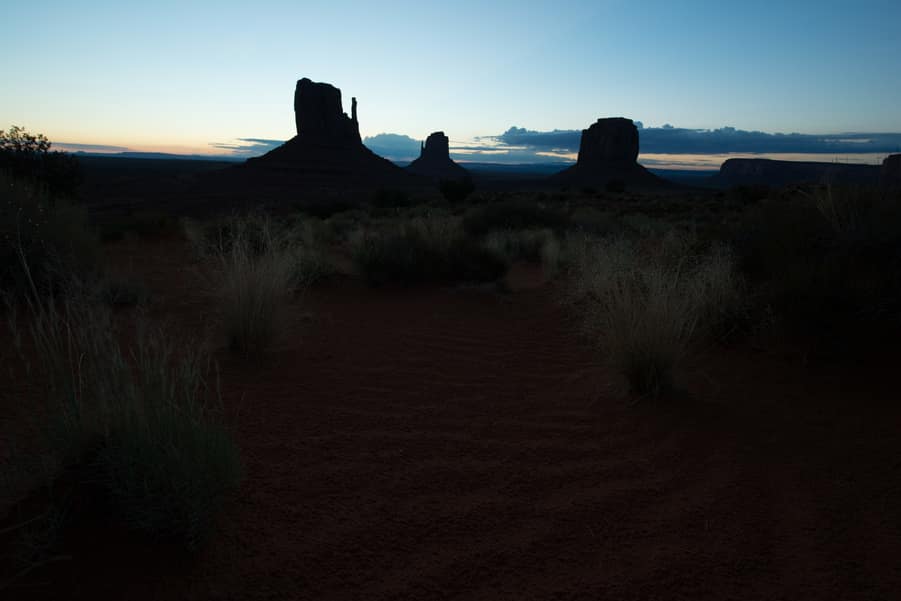
The exposure effect when the camera sensor doesn’t receive enough light is called underexposure. We can also say that we got “crushed shadows” or we “crushed the blacks,” and the result is that we have no information in the darkest areas of the image.
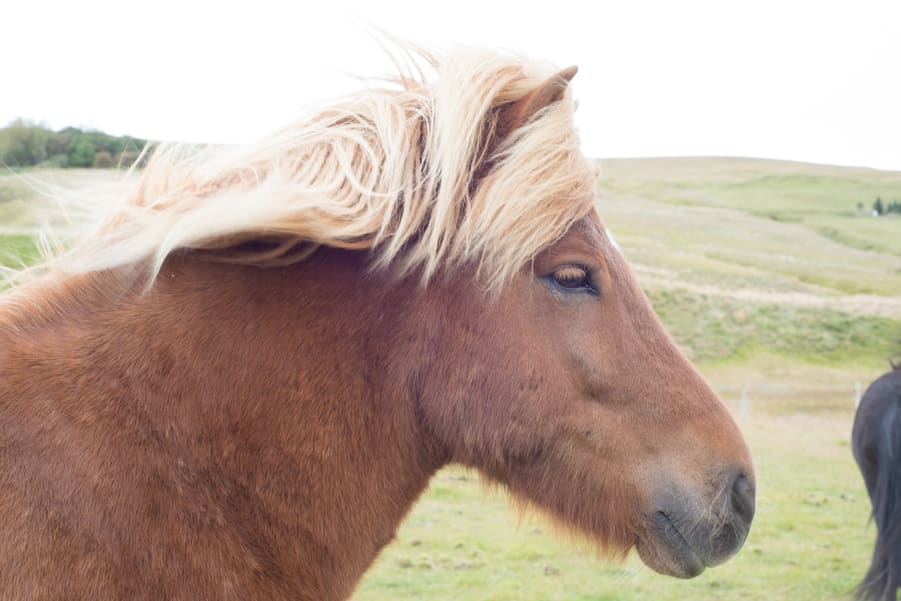
In contrast, the exposure effect when the sensor captures too much light is called overexposure. When this happens, we can also say that we have “blown out highlights” or “burned out highlights,” and the result is that we have no information in the brightest areas of the image.

What is exposure value? The basic photography exposure settings
Exposure is not applied through a series of rules, but, rather, through three basic settings that are the key for understanding exposure in photography and learning how to master exposure in your images.
Exposure value is the result of the interaction of the three main exposure basics: aperture, shutter speed, and ISO. It’s measured by the light meter, as we will see later.
Now, let’s see how a basic exposure affects the exposure value.
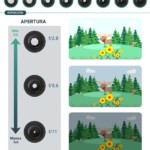
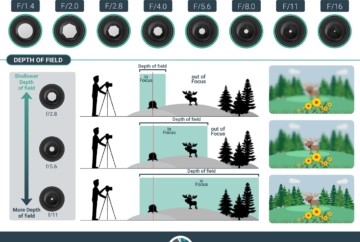
Exposure and aperture
In a few words, aperture is the opening that determines how much light passes through the camera lens to the sensor.
For this reason, exposure and aperture are completely related. If you use a wider aperture, the camera lens will allow more light to reach the camera, and the image will be brighter (more exposed). If, conversely, you close down your aperture and block the amount of light that passes through the lens, the image will be darker (less exposed).

You can learn more about the effect of aperture on exposure and other elements like sharpness and depth of field in our guide to aperture in photography.
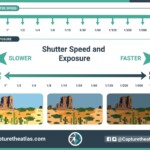
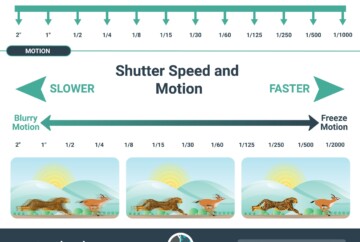
Exposure and shutter speed
Shutter speed is the length of time that the shutter of the camera remains open, collecting light.
Exposure and shutter speed are also directly correlated. The longer you leave the shutter of your camera open capturing light, the brighter the image will be, and the quicker the shutter is opened and closed, the less light will hit the sensor, which will result in a darker image.

To learn and master exposure, shutter speed is crucial. Check more about the effect of shutter speed on exposure and motion in our guide to shutter speed.
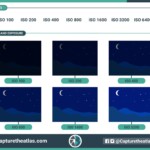
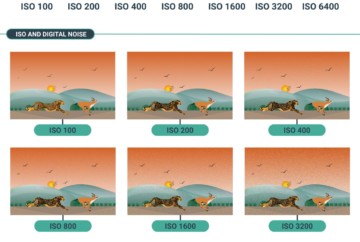
Exposure and ISO
ISO is the amplification of the light captured by the camera sensor.
The final exposure on your image and the ISO are completely related, even though ISO is not a natural part of exposure.
The reason is because ISO works in an artificial way to brighten the light in the image that has been already captured through the aperture and shutter speed.
Putting it simply, the higher the ISO, the brighter (and more exposed) your image will be; the lower the ISO, the darker it will be, if the other settings are fixed.

ISO sounds more daunting than the other settings, but you can find more information and examples to understand how exposure, ISO and digital noise are related in our guide to ISO in photography.
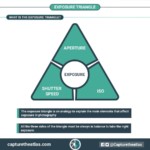
Balance in exposure: how to expose in photography?
Once you’re familiar with the three photography basics and understand how these settings affect the exposure value and other elements, the essential thing is to strike a balance among the three for the exposure (something that’s also known as the exposure triangle).
If you have the right exposure on your camera, which, most of the time, means an exposure value equal to zero, if you decide to change any of the three settings affecting exposure, you’ll have to adjust any of the others to balance the exposure and keep the exposure value equal to zero.

When shooting in manual mode, the best tip to learn how to expose in photography is to think first about the settings that you need according to the light of the scene and your photography goals. Normally, there are one or two settings that you’ll know in advance, and then you’ll need to play with the other or two others to get a well-exposed photo.
For instance:
Are you shooting a landscape in broad daylight? You know that your aperture must be around f/11 to ensure a great depth of field, and the ISO must be 100 to ensure that you have no digital noise, so the exposure adjustment to balance and get an EV of zero will be the shutter speed.
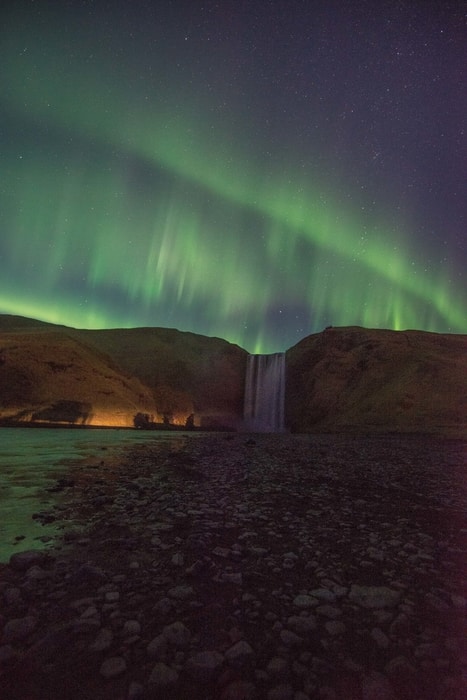
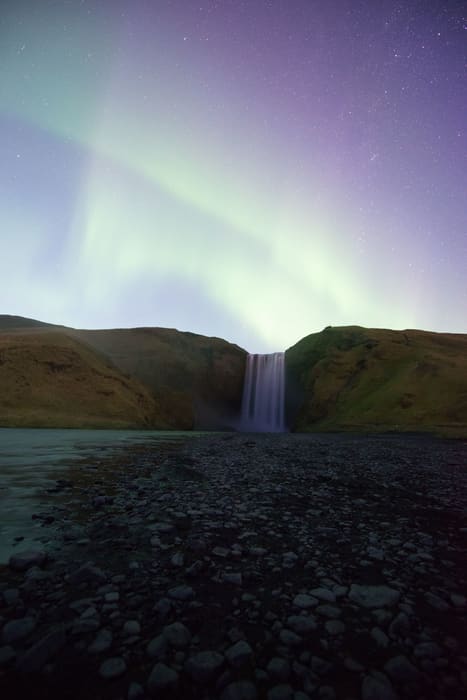
Are you shooting a night scene? Your aperture will be the widest to capture as much light as possible (f/2.8) and the time will be 25 seconds in order to capture sharp stars and not trails, so the exposure adjustment to balance and get an exposure value equal to zero will be the ISO.
Are you shooting a flying bird? To freeze the movement of the bird, you know that you need a fast shutter speed around 1/2000th of a second and a low ISO to avoid digital noise (100), so the setting to balance the exposure and get an EV of zero will be the aperture in this case.
These are just three examples, but there are more depending on each situation. My recommendation to maximize your exposure control is to practice and shoot as much as you can in all kinds of light situations. At some point, you won’t even think about which exposure setting you need; you’ll just set it automatically.
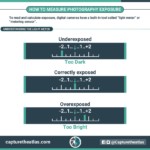
how to measure photography exposure: The exposure meter
As we’ve seen, the exposure value (EV) is the result of the interaction of the aperture, shutter speed, and ISO, and should be around zero to get a well-exposed image. When choosing these settings, you’ll seek to balance exposure, so it’s essential that you know how to read and calculate exposure. To help with that, we have written a guide on light metering in photography, however, there are some easy terms you need to know to understand exposure.
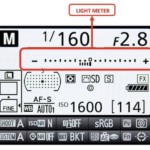
Luckily, digital cameras have a built-in tool called a light meter or “metering sensor” that will help you measure the exposure value of the image for the selected settings. That way, you can adjust them to get a well-exposed image.

To read the exposure, in most cases:
- If the EV is 0, we will get a correctly exposed photo.
- If the EV is greater than 0, we will get an overexposed photo.
- If the EV is less than 0, we will get an underexposed photo.
To calculate the right exposure, you should aim at being as close to 0 as possible. However, there are a few exceptions to this exposure rule that you’ll see later on.

Another essential thing to learn in exposure is that the difference from one exposure value to another is called an exposure stop. Each move of one stop either to the right or the left will double or halve the amount of light captured by the camera.
Getting familiar with the terminology and effect of exposure stops is important in order to balance and compensate for the main exposure settings seen in the previous section.
Exposure metering modes
To evaluate the exposure and calculate the exposure value (EV) through the light meter, digital cameras use several metering modes.
The most popular exposure metering modes in photography are:
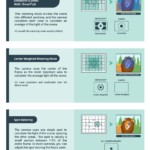
- Matrix metering: This is the most popular meter mode and consists of an evaluation of the light across the entire image. The frame is divided into multiple areas, and the exposure value is calculated according to the general brightness to strike a balance between highlights and shadows.
This exposure metering mode is called Evaluative metering in Canon cameras.
- Center–weighed metering: In this mode, the camera uses the center of the frame to evaluate the general brightness and image exposure.
- Spot metering: In the last mode, cameras uses a single focus point that you can manually adjust to measure and calculate the exposure value.

Using one method or another will depend mostly on the scene and the subject that you’re photographing. Make sure that all the exposure elements are good and you aren’t losing information in the highlights and the shadows by checking the histogram once you take your picture.
You can check our guide to learn how to select the right metering mode.
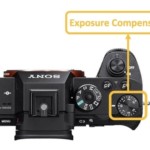
exposure compensation
When you shoot in automatic (P) or semi-automatic (A) and (S) mode, or in manual mode with Auto-ISO, the camera will adjust one or more of the basic exposure settings so that the exposure value is zero in order to get a perfectly exposed photo, as we explain in our camera modes guide.
However, there are some light and color situations that are tricky to balance for most digital cameras, where an exposure value equal to zero will result in an overexposed or underexposed image.
If, for example, there is high contrast in the image between whites and blacks, the light meter will try to make a balance, but if one of the high-contrast areas is bigger than the other, the final image will probably be overexposed or underexposed.
If you’re shooting manually, it’s totally fine, since you can decide to take the photo with settings that result in an exposure value that’s different from zero. However, to solve this problem in automatic modes, there’s another tool incorporated into digital cameras called exposure compensation.

This tool corrects the zero value from our light meter by moving the natural zero of our light meter to the right or left, so that the camera doesn’t try to balance to an exposure value of zero. Instead, it balances to an exposure value that is more overexposed or underexposed than the initially estimated value.
A good example of this is when we try to photograph a snowy landscape in automatic mode. The camera will generally underexpose the image because the light meter finds too much white in the scene.
In that case, you can set the exposure compensation to +1 or +2 to add one or two more exposure stops to the final image. That way, the camera will calculate the correct exposure by adding one or two more stops of light, compared to what it had initially considered as its initial zero value.
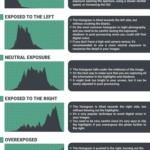
How to know if an image is well exposed – histogram
The light meter and the exposure value help us to adjust the exposure settings (aperture, shutter speed, and ISO) to try to get a well-exposed image. However, it is only an estimate that is made before taking the photo by considering the light of the scene and the settings at that time.
To check if you shot a well-exposed photo, you should review its histogram and check that it has a correct distribution and that there are no crushed shadows or blown-out highlights. You may find useful our guide on how to read the histogram here.

One of the most common mistakes, when you’re starting to shoot in manual mode, is to try to learn the setting that you should use in each situation by heart. However, the reality is that any time you change the scene or adjust a new setting, you will have to check the histogram of your test photos in order to adjust the exposure setting correctly by trial and error.
Photography exposure examples
Exposure is made simpler through examples and practice rather than just theory, so to better understand how exposure is used, below you’ll find a series of photography exposure examples.

Photography Exposure F.A.Q
Below you’ll find responses to some of the most common questions for understanding exposure in photography:
Conclusion: How to master photography exposure
As you can see, photography exposure can be made simple.
Learning what is exposure in photography and which are the exposure settings is the first step.
In order to master exposure, I recommend playing with exposure as much as you can, shooting subjects in different light situations, and trying to balance the main exposure elements.
Exposure is a basic in photography, and the sooner you learn how to calculate and set exposure on your camera, the sooner you’ll start seeing results!
To give you a better understanding of photography exposure, I strongly suggest you check out our ultimate beginner’s guide to photography (also available as a PDF photography guide) and the articles on the main elements in exposure:
Moreover, I recommend you read our article on the exposure triangle to learn how to read a histogram.
Hope you found this article useful. Please don’t hesitate to leave a comment if you have any questions related to photography exposure.


Thank you SO much for this site. It’s EXTREMELY helpful in understanding Photography. Keep up the good work!
Hi Paul, thanks so much, I appreciate it! 😊
Greatly appreciated, very well-articulated and the detail is superb.
Thanks a lot, David! So happy it helped. 🙂
Well-described explanation on exposure!
Thanks a lot John! 🙂