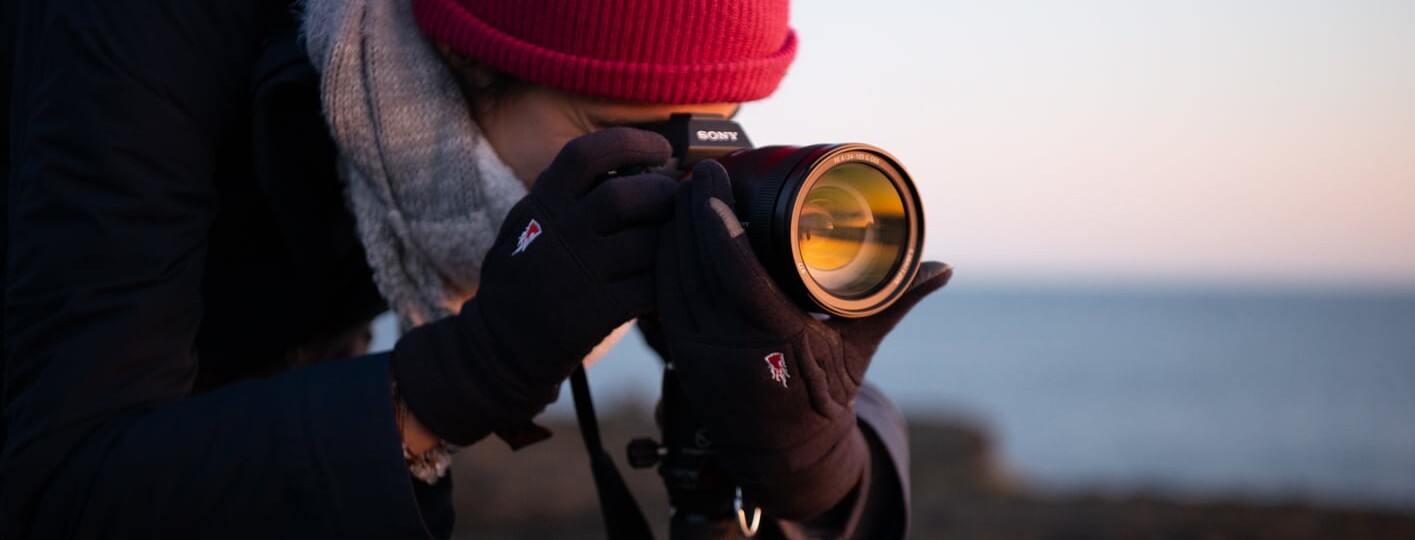
Light metering is fundamental because it helps the camera know precisely where and how to look at the light within the frame. Without understanding light metering in photography, you can end up with a poorly exposed image even if there is plenty of light to work with.
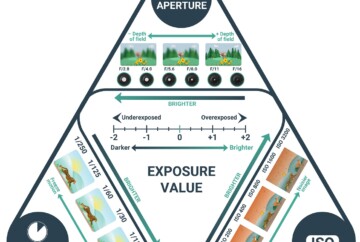
Knowing how to use the light meter relies on understanding the interplay of shutter speed, ISO, and aperture. By reading the exposure meter in camera you can adjust each of these values until your eyes and the light meter both agree, or you can directly help your camera do it for you if you shoot in automatic mode.
In both cases, if you shoot in auto or manual mode, using the exposure meter correctly is essential to get correctly exposed photos.
After this light metering tutorial, you’ll have a perfect understanding of what light metering in photography is and how to use metering for shooting great images!
- What is light metering in photography
- Light metering in-camera – How to use the light meter?
- The importance of light metering in photography
What is Light Metering in Photography?
In short, light metering can be defined as the process of measuring the light of a scene before taking a picture. This process is done using a light meter or exposure meter.
A light meter works by detecting the amount of light striking either the sensor or the subject. By following the information provided by the light meter, you can select the exposure triangle settings (aperture, shutter speed, ISO) that will result in optimal exposure for your subject.

Light metering is the process of measuring the light of a scene before taking a picture
Each type of light metering is defined by where the light meter is placed. Most photographers today use the exposure meter in the camera rather than a separate handheld device. However, handheld light meters are extremely important in some cases as we’ll see below.
Another use of light meters is finding which aspects of a scene or subject are the most intensely illuminated. If there are drastic changes in light intensity within the scene, choosing the right light metering mode will be the difference between a properly exposed subject and a poor photograph.
Light metering in photography is explained using one of the following light metering types:
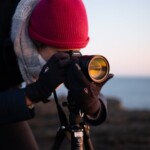
Reflective Light Metering
Reflective light metering is what your camera uses to measure available light. Simply put, the camera meters by judging exposure based on light reflected from the subject.
Cameras with built-in light meters, like all modern digital cameras, use reflective light metering. This is usually more than accurate enough but sometimes the light meter can be confused by abrupt shifts in light absorption within the scene. One example is reflective light metering off of the white dress of a bride only to find that the dark suit of the groom is underexposed.

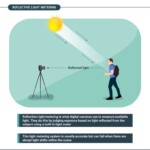
Incident Light Metering
Handheld incident light meters are used to directly measure the amount of light hitting a subject. This is done by placing the meter close to the subject; the white circular zone (lumisphere) is where lighting is collected for the measurement.
Incident light metering is different from reflective metering because the device is measuring light before it reflects off of the subject. Therefore, you can get a slightly more accurate measurement of the total illumination in the area.

When reading an exposure meter, the device will display the aperture, shutter speed, and ISO settings needed to obtain optimal exposure for a given scene.
In retrospect, light meters in film cameras were extremely important because you risked wasting film if the exposure settings were off. While the near-limitless capacity of digital technology is more forgiving, incident light metering still has a place in genres where moments can’t be easily repeated and timing is crucial, like wedding and event photography.

Light Metering in Camera – How to Use the Light Meter
Light metering in digital photography isn’t too difficult to grasp, and understanding how light metering in camera works will go a long way in improving your work as a photographer.
Now, we’ll be discussing how to use the in-camera light meter and differentiating between each type of in-camera metering. Lastly, I’ll explain light meter readings and what to do with the information received from them!
How Does the Camera Light Meter Work?
A digital camera light meter uses a reflective metering design to gauge exposure. Usually, the light meter is activated either constantly when the camera is on or with a half-press of the shutter.
First, the camera takes in light reflecting off of the subject through the lens (TTL). Then, the built-in exposure meter informs you as to whether the image is underexposed (not enough light), well exposed, or overexposed (too much light).

Through the lens (TTL) metering system
The TTL light metering system also helps the camera gauge how much exposure to provide if you’re using a flash setup. In short, using the light meter in photography is the best way to get good exposure and minimize the amount of time spent in post-processing.
HOW TO METER IN-CAMERA?
In order to understand how to use the light meter in-camera, we’ll need to discuss the three major ways your camera can meter. Each setting informs your camera as to what’s most important within the frame.
Remember that light metering in Nikon vs Canon and other brands may use different terms. Consult your user manual and camera menus to determine precisely which metering mode will be best for each occasion.
Each of these metering modes are also discussed in greater detail and with plenty of examples in our guide to Metering Modes in Photography:
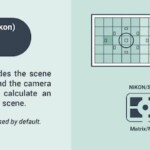
Matrix or Evaluative Metering
Matrix/Evaluative/Multi metering is used when you want to optimize good exposure for the entire scene. The camera breaks up the scene into sections and averages the exposure settings to ensure there is a balance between highlights and shadows.
This is the most popular light metering because it can be used for nearly any scene or subject. Landscape photography and other genres that use the entire frame rely heavily on Matrix metering.

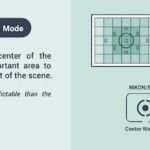
Center-Weighted Metering
Using center-weighted metering, the camera places the most importance on the center for light metering. The corners of the frame aren’t used for exposure metering, making this perfect for portraits and other styles where you’ll be using most of the center of the frame.

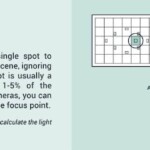
Spot Metering
When using spot metering, the system measures light using a single focus point instead of sections of the image frame. Spot metering is used when a single element within the frame is especially important, or with backlit subjects.

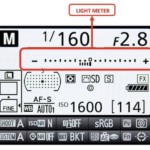
Where is the Light Meter on a Camera?
Usually, you can view the light meter in camera along the base of the electronic viewfinder, optical viewfinder, or LCD screen. A simple line with sections and a -/+ axis makes up the entirety of the built-in exposure meter display.

Camera Exposure Meter
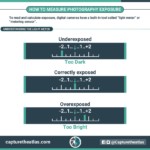
When the gauge indicates a negative exposure value (EV), the camera light meter is sensing that the subject or resulting image will be underexposed and vice versa. You should be aiming for as close to the center of the axis or 0 as possible.

Thanks to the light meter and exposure adjustments you choose in response, poor illumination should be a thing of the past! Exposure is a fundamental photography basic and I go into this in even greater detail in my Exposure in Photography guide!
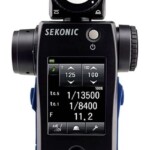
When to Use a Handheld Light Meter?
Knowing not only when to use the light meter, but choosing the right kind, is essential because sometimes, in-camera TTL light metering isn’t accurate enough. Environments with multiple light sources and subjects with both deep shadow and bright highlights should be measured using a handheld light meter.
Handheld light meters are also useful for studio genres like product, macro, and still life photography. Exact measurements of ambient light are needed to bring out all of the fine detail that can be lost if an image is even slightly over or underexposed.

Handheld Light Meter
Light metering is also essential for film photography since improper exposure means poor grain, low tonality, and a potentially wasted frame. Look here for more information on film cameras and light meters!
The Importance of Light Metering in Photography
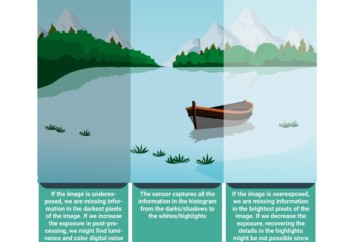
The importance of light metering lies in getting the right exposure in-camera. Proper exposure forms the basis for capturing the image with the most complete information in the highlights and shadows and with the maximum color detail.
Light metering and exposure go hand in hand. By measuring one, you’ll better understand how each aspect of the exposure triangle (aperture, shutter speed, ISO) affects your image. If you know how to use the light meter, you can maximize image quality in-camera. You’ll also save time in post-processing since you may not even need to make too many adjustments.

Light metering is essential to get the best exposure
Without understanding the exposure meter, you’re liable to end up with blown highlights, crushed shadows, high digital noise, and other elements. This might result in a wrong histogram that can be hard to fix in post. Still, if you do find issues like digital noise arising, there are different ways to fix it, which I share in my Noise in Photography article.
Light metering in photography F.A.Q
Conclusion
In order to understand how to use the light meter, it’s fundamental to be familiar not only with what light metering is, but also with the different types of light meters (TTL and handheld).
From there, it’s much easier to understand each of the main types of in-camera light metering: Matrix/Evaluative, Center-Weighted, and Spot Metering. It’s also important to remember how to find and read the exposure meter in-camera, which provides straightforward, valuable information even if you think you have the right settings in place.
Lastly, the importance of light metering and why good exposure leads to good pictures helps us close this chapter on understanding the light meter.
Maybe you have more questions on exposure after reading this light metering in photography guide. In that case, take a look at my Exposure in Photography guide, which discusses each aspect of the Exposure Triangle in greater detail!
If you have any questions related to light metering in photography, feel free to leave them in the comments below!


GREAT LESSON
LOVED IT
Thanks so much! 😊
Dan, very well explained. Thanks for sharing knowledge.
I feel metering is very important and tricky to expose proper picture. What people fail to understand is where exactly in the frame metering should be measured, example: do I take metering in the highlight area ? So that that particular portion / part ( portrait) not over exposed / not burnt..!!??
I feel as a mentor, I would like to emphasize this very strongly.
Appreciate if you can make some example, certainty people will appreciate.
Have a great weekend!
Cheers
Garani Venkatesh
India
Hi Garani, thanks for your words. Yes, it’s usually better to take the metering in the highlight area. My advice is to always check your histogram, no matter what metering you’re using. It’s always easier to recover the shadows than the highlights later in post-processing.
Thank you, this was very helpful
Thanks a lot Jen 🙂