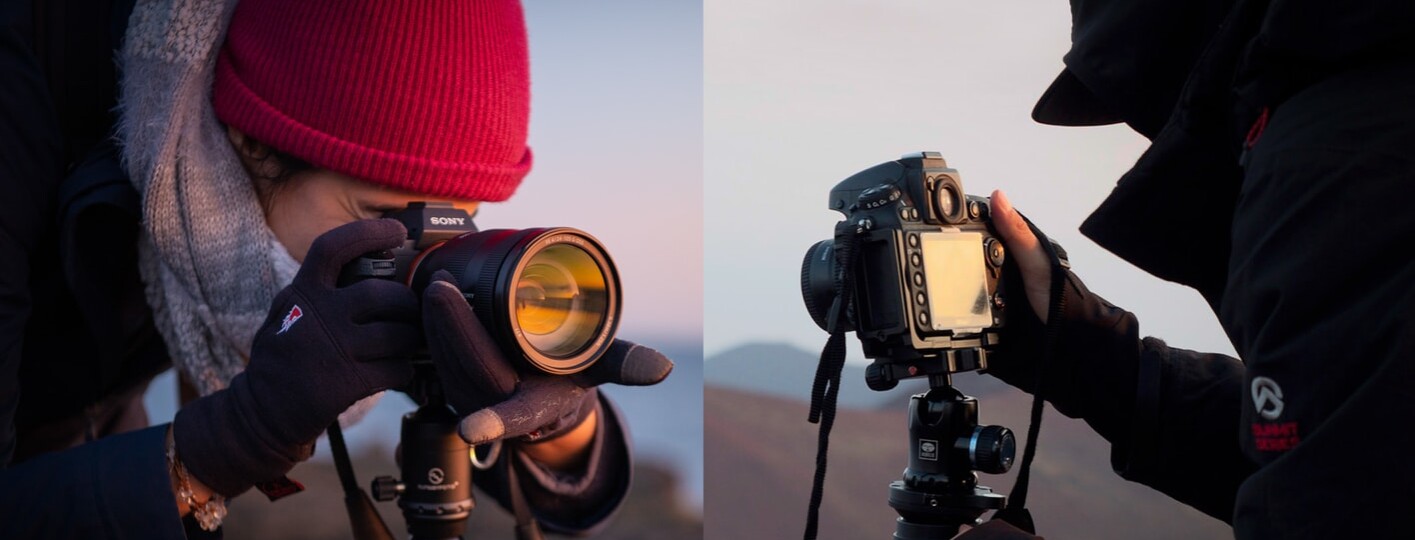
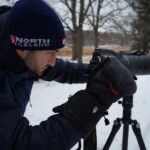
Mastering photography camera settings is fundamental to beginner photographers to help them hone their photographic skills.
However, camera settings can be overwhelming to grasp considering the different names, functions, and camera buttons, dials, and wheels. Does it sound familiar to you?
To help you better understand photography settings, I’ve created this guide to camera settings where you’ll find the best camera settings and what they do.
We’ll start off with the three basic camera settings that you need to know, and from there we’ll move into other good camera settings that are commonly used in photography. To make things easier, I’ve also included plenty of camera settings examples and specific articles in case you want to dive deeper into each specific photography camera setting.
Ready to learn what each camera dials and buttons do? You’re about to master the best camera settings in photography!

GET OUR FREE EBOOK TO
MASTER THE PHOTOGRAPHY BASICS
20 LESSONS AND 80+ PAGES WITH EXAMPLES, INFOGRAPHICS, TIPS, AND MORE!
Best camera settings in photography
In a nutshell, these are the best basic camera settings in photography:
- Aperture: f/1.8-f/5.6 in low light or for a narrower depth of field, and f/8-f/16 for a wider DoF
- Shutter Speed: From 30 seconds to 1/4000th of a second depending on the scene
- ISO: 100-3200 in entry-level cameras, and 100-6400 in more advanced cameras
- Camera Mode: Manual camera mode or Aperture-priority mode
- Metering Mode: Matrix/Multi/Evaluative depending on your camera model
- Focus Mode: AF-S for stills and AF-C for moving subjects
- Focus Area: Single-point for stills and Dynamic/Zone for moving subjects
- White Balance: Automatic WB
- File Format: Raw File (or JPEG if you don’t want to edit your pictures)
- Drive Mode: Single shooting for stills and continuous for moving subjects
- Long exposure noise reduction: Off
- High ISO noise reduction: Off
- Color Space: sRGB
- Image stabilization: On when shooting handheld and Off when shooting from a tripod
- HDR/DRO: Off
Below, you’ll find all the camera settings explained along with the ideal camera settings depending on the genre and subject that you’re shooting.
We’ll start with the basic exposure camera settings, and then move into other important photography settings.

As mentioned above, for a better understanding of the photography camera settings and to learn how to adjust them, I highly recommend reading the specific camera setting article that you’ll find in each section!
1. Aperture – The first basic camera setting
The aperture is one of the most important photography settings, and one of the basic camera settings for beginners.

1. Aperture setting on camera
What is the aperture camera setting?
Simply put, the aperture is the opening of the camera lens, which affects the amount of light that passes through the lens to the sensor. For this reason, this camera setting has a direct impact on the exposure of the image, and it’s critical to the depth of field, sharpness, and final look of the image.
The maximum and minimum aperture is determined by a number popularly known as F-stop value, which follows a sequence like this (The smaller the number, the larger the aperture and vice versa):

Best aperture camera settings
In your aperture camera settings; when you want to have a large portion of the scene in focus (big depth of field), you should use a narrow aperture, that is, an aperture between f/8 and f/16. A good example of a narrow aperture is landscape photography; I usually shoot my landscapes between f/8 and f/11.
If, conversely, your goal is to have a small portion of the scene in focus while blurring some areas of the image, or if you’re shooting in low-light, you should aim at a wide aperture from the max. opening of your lens like f/2.8 down to f/5.6. Examples of this are portrait and night photography.
How to change the aperture setting on camera
In most cameras, the aperture dial is at the top right of the camera body, either in the front or rear dial.
2. Shutter Speed – An essential photography setting to capture motion
Shutter speed is another fundamental setting on camera that’s also related to the main exposure camera settings.

2. Shutter Speed camera setting
What is the shutter speed camera setting?
In short, shutter speed is the length of time that the camera shutter is open and capturing light. The shutter speed camera setting plays a key role in exposure and it has two important effects: Motion and shakiness.
Shutter speed is measured in seconds and fractions of a second. Following this sequence, the higher the number, the longer the exposure time:

Best shutter speed camera settings
Regarding shutter speed camera settings, when you want to capture motion like in long exposure photography or want to shoot in low-light like in night photography, you should use a slower shutter speed, generally from 1/60th of a second up to several minutes. This photography setting is usually limited to 30” in most cameras, so to increase this time, you’ll need to use the Bulb mode camera setting and a shutter release. As an example, my camera settings for Milky Way photography in terms of shutter speed is usually between 15-25 seconds.
On the other hand, when you want to freeze motion, you should aim for a fast shutter speed, generally between 1/60th and the minimum shutter speed setting of your camera, which is usually 1/4000th of a second. A good camera setting example of this are action shots, like in wildlife or sports photography.
How to change the shutter speed setting on camera
In most cameras, the shutter speed dial is at the top right of the camera body, either in the front or rear dial.
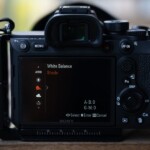
3. ISO – A key setting on camera
ISO is the last exposure triangle setting and possibly the most difficult camera setting for beginners.

3. ISO photography setting
What is the ISO camera setting?
In brief, ISO increases the light information captured by the camera sensor. The ISO directly affects the exposure and the digital noise, so it’s also a critical camera setting to avoid digital noise.
ISO in photography is measured in a range of “ISO levels”, which follows a sequence like this: (the higher the number, the higher the ISO, amount of light, and digital noise):

Best ISO camera settings
The ideal ISO camera setting depends on the camera sensor size and other factors like the type of photography.
When you’re shooting under good light conditions, you should use a low ISO setting. ISO values from ISO 100-ISO 400 are considered low ISOs.
However, in those situations where there’s not much light available or you need to increase the shutter speed, you’ll most likely have to set a high ISO setting, usually between ISO 800 and ISO 6400. You should set the max. ISO according to your camera. A good reference point is ISO 3200 for entry-level cameras and ISO 6400 for more advanced cameras.
To see an example, the ISO photo setting for the Northern Lights will be higher compared to the ISO camera setting for shooting in broad sunlight.
How to change the ISO setting on camera
The placement of the ISO setting button completely changes from camera to camera, but most models include a direct button to change it. I recommend checking your camera manual if you’re not sure where the ISO is on your camera wheel.
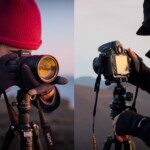
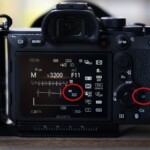
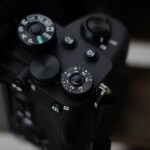
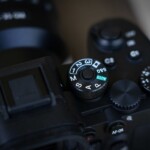
4. Camera Modes – The main camera wheel
Once you know the three basic camera settings, now it’s time to learn how to change the camera settings for exposure.

4. Camera Modes settings
What are the camera mode settings?
Briefly, camera modes are controls that let you set the main photo settings of aperture, shutter speed, and ISO in order to get the best exposure in a photograph.
You’ve probably heard before that the best dslr or mirrorless basic settings require a fully manual control in-camera. While this is true to some extent, you can also benefit from using any of the semi-automated or priority modes.
These are the main camera modes photography settings:
- Program Camera Mode (“P Mode”): Using this mode, your camera automatically sets the aperture and shutter speed.
- Shutter-Priority Mode (“S/Tv Mode”): In this mode, you set the shutter speed and the camera sets the aperture.
- Aperture-Priority Mode (“A/Av Mode”): You set the aperture and the camera adjusts the shutter speed.
- Manual Camera Mode (M): Using this mode, you choose all the camera settings.
Best camera Mode settings
Program shooting mode is a basic camera setting for beginners and for shooting challenging subjects where it’ difficult to determine the best settings. Once you start feeling more comfortable with your camera settings, you’ll most likely want to jump into any of the other camera modes.
Shutter-Priority is aimed at those cases where you know the minimum shutter speed you need to freeze the movement of the subject, like for shooting birds in flight, in sports photography, or when shooting from an airplane.
The aperture-priority camera setting is useful in a wide range of scenarios. Once you know the aperture you need, like a narrow aperture for landscapes or a wide aperture for portraits, this mode will make things easier for you. It’s also a very common mode for shooting wildlife.
Manual is the ultimate mode, and the camera setting beginners find more daunting. You can use it in many situations, like in landscape, panoramas, night & astrophotography, etc.
If you want to make the most of your camera wheels and nail the exposure, I’d recommend using either Manual camera mode or Aperture-Priority mode. My camera setting mode is Manual 95% of the time, like when shooting the Milky Way, Northern Lights, long exposures, etc.
How to change the Camera Mode setting
All digital cameras allow you to change the camera mode using the main camera wheel or dial placed on top of the camera body.
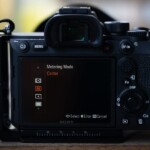
5. Metering Modes – The fundamental camera setting to measure light
The last adjustment related to camera setting and exposure is the metering mode.

5. Metering Modes setting on camera
What are the metering mode settings?
In short, metering modes are the way your camera measures the light of the scene. In digital cameras, this is done by using the exposure meter built into the camera body.
Disregarding the camera mode, understanding how light metering works, and the different metering modes is fundamental. Your camera settings for a sunny day will be very different from your camera settings for astrophotography, and the way you calculate the light will have a direct impact on the final exposure of your shot.
If you are shooting in one of the auto modes your camera has, the metering mode will change the way your camera adjusts the settings. In case you’re shooting on manual, your reference to know if the photo will be correctly exposed is the expose value (EV), which will change depending on the metering mode too.
These are the main camera metering mode settings:
- Multi/Matrix metering: Using this mode, the camera evaluates the light of the entire scene, splitting the frame into different zones.
- Center-weighted metering: The camera takes the center of the frame to calculate the light of the scene.
- Spot metering: The camera uses a single focus point to calculate the light.
Best metering Mode settings on camera
Multi metering is the default mode in most digital cameras and will serve your purpose in most situations.
The center-weighted camera setting comes in handy when your subject is in the middle of the frame, like in a headshot portrait or in some wildlife shots.
You can set spot metering when your subject or the specific area of your subject that you want to capture is very small, like the eyes in a portrait, a small bird in the frame, or the moon against a dark sky.
My go-to camera settings related to metering modes are always Multi/Matrix except in rare occasions where I use spot metering, like in my camera settings for photographing the moon.
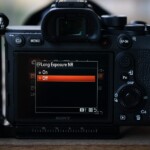
The exposure compensation camera wheel
The exposure compensation dial/button is also related to the camera metering modes. Using this function, you can increase/decrease the light metering value in your camera, letting the camera know you’re interested in having an overexposed or underexposed image.

The exposure compensation camera wheel
You can adjust this camera setting when using any of the camera’s automatic or semiautomatic modes. It’s a good way to help your camera in challenging light situations, particularly when there’s high contrast, such as in a snowy scene. It’s also helpful when capturing a scene according to your artistic vision.
How to change the Camera Metering mode setting
Some advanced cameras include direct buttons to change the metering mode, but in most cameras, you’ll have to do it from the menu or functions button.
How to change the exposure compensation setting
The exposure compensation can be changed either using a small button along with any of the front/rear dials or using the specific exposure compensation dial if your camera includes this wheel.
6. Focus Camera settings – Important camera settings to take sharp photos
One of the basic camera settings for taking sharper images is to adjust the different focus camera settings.
Generally, we can divide these camera settings into Manual focus mode (M) or Autofocus Mode (AF) depending on the type of photography that we’re doing.
Regarding the Autofocus Modes, it’s important to differentiate between the camera focus Modes and focus areas:
Please note that the Nikon camera settings and Canon camera settings related to focus are generally the same, but they have different names.
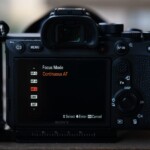
Focus Mode settings
Focus modes are the tools to decide whether the camera locks or continues to adjust focus once the focus button is pressed.

6. Focus Mode Camera setting
There are two main focus mode camera settings:
- Single Autofocus Mode (AF-S/One-shot AF): Using this mode, the camera locks the focus on the subject but if it moves, the camera won’t adjust focus to compensate. It’s the best setting mode for still subjects (and one of the best camera settings for landscape photography).
- Continuous Autofocus Mode (AF-C/AI-Servo): Using this mode, once you’ve locked your focus, your camera will try to track the subject when it moves within the frame. It’s the best setting mode for moving subjects, like in wildlife, sports, and street photography.
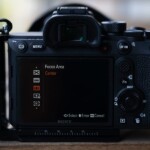
Focus Area settings

Focus Area photography settings
As regards photo settings related to focus areas, these are the main modes to choose:
- Single Point Area Mode (single-point AF/Manual AF Point): Using this mode, you can select a single focus point. It’s the best focus area for landscape, still portraits, macrophotography, and architecture.
- Dynamic Area Mode (Dynamic AF Area/AF Point expansion): Once your focus point is selected, if your subject moves, the camera will use several focus points to track it. It’s the best for wildlife, sports, and street photography.
- Auto Area Mode (Auto AF Area/Automatic AF Point selection): The camera automatically decides the focus points to use. It’s the best for scenes where you need to focus on something easy and close to the camera.
There are other good camera settings to learn related to focus areas, like EYE Autofocus, but this will depend on your camera model.
How to change the Focus camera settings
The buttons and dials to change the camera focus settings vary from camera to camera. In most entry-level cameras, you can do it from the menu while most advanced cameras include direct buttons or customized buttons to do it.
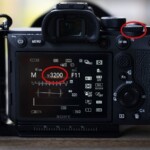
7. White Balance – the importance of the Kelvin camera settings
Another basic (and easy) camera setting to learn is the white balance.

7. White Balance Camera setting
What is the white balance camera setting?
In short, white balance is a photography setting to get the colors of your image right without being affected by the color of the light source of the scene. The white balance camera setting is key to keeping your images from taking a warm or cool tone when they shouldn’t, something also known as “color cast”.
White balance is closely related to color temperature, which is measured in Kelvins or “K”. The higher the number in the scale, the cooler the color will be.
Regarding the white balance settings on camera, there are three main types:
- Automatic white balance (AWB): As the name says, the camera automatically adjusts the best WB camera setting.
- White Balance Presets (Semi-Automatic White Balance): The camera offers different preset modes related to different color temperatures.
- White balance manual camera setting (Custom white balance mode): You can manually adjust the white balance by either setting a specific Kelvin number or creating a custom white balance.
Best white balance camera settings
AWB is the most popular and widely used white balance setting and the one set by default in most digital cameras.
White Balance presets are the best for environments where a single type of light dominates the scene.
Manual White Balance is one of the best camera settings at night and in situations where the light can change, like when shooting panoramas. It’s also a fundamental camera setting in product photography to maximize color accuracy.
Unlike the previous camera settings, you can perfectly change your white balance in post-processing as long as you shoot in Raw. My camera setting related to white balance is in AUTO most of the time except when shooting in low-light or panoramas.
How to change the White Balance photo settings
This also varies from camera to camera, with most entry-level cameras including this setting in the menu and most advanced cameras including direct or customized buttons.
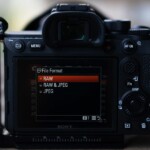
8. File format settings – A fundamental camera quality setting
The best camera quality setting is related to the file format, and it’s as simple as Shoot in Raw!

8. File format photo setting
Raw files contain much more information than JPEG, which is essential when you edit your images and need to make the most of the color and dynamic range.
Some cameras offer the option of “compressed” and “uncompressed” Raw files. If your camera model can compress the Raw without losing quality, then go for this option. If there’s any quality loss, I’d recommend using the uncompressed raw file camera setting option.
If you don’t want to edit your photos later, you can also shoot in RAW + JPEG, but bear in mind that your SD cards will fill up sooner.
How to change the file quality settings on camera
In most cameras, you have to do it from the menu, even though some advanced cameras allow you to change this with a direct button.
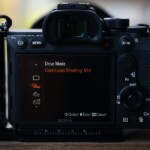
9. Drive Mode – A basic camera setting for beginners
Drive Modes are good camera settings to familiarize yourself with and use depending on the type of subject that you’re shooting.

9. Drive Mode Camera setting
What are the drive modes camera settings?
Simply put, drive modes are used to control the shooting frequency.
The main drive mode camera settings are:
- Single Shot: When you press the shutter, you’ll take a single photo. It’s a simple mode and the best in most situations.
- Continuous/Burst Mode: When you press the shutter, your camera will take several photos. The number of pictures that you can shoot in a burst will depend on your camera model. Most advanced cameras also have the option to shoot a low burst or a high burst depending on the subject.
- Shutter Delay: When you press the shutter, the camera will release the shutter after a specific time like 2, 5, or 10 seconds.
- Mirror Lock-up: Using this setting, the DSLR lifts the mirror to avoid vibrations and issues like mirror slap. This is anexclusive DSLR camera setting.
Best drive mode camera settings
You can use Single-shot in most situations, and Continuous when you shoot action like wildlife, sports, etc.
Shutter Delay is a very useful mode when shooting from a tripod. To avoid vibrations and get sharper images, you can set a 2 or 5-second delay. It’s the best mode for shooting long exposure photography, landscapes, and night photography without using a remote shutter. It’s also a handy camera setting for selfies and portraits where you want to include yourself in the frame.
Lastly, mirror lock-up is one of the best DSLR camera settings when you have your camera on a tripod and you’re using a slow shutter speed (usually slower than 1/60th of a second).
How to change the Drive Mode
You can change this camera photography setting from your camera menu/functions.
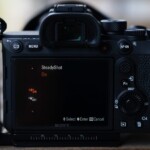
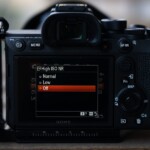
10. Long exposure noise reduction – A controversial photography setting
This is a somewhat controversial camera setting; some photographers use this photo setting while others never use it.

10. Long Exposure Noise Reduction setting
What is the long exposure nr camera setting?
Using long exposure noise reduction, your camera will process some noise reduction in your file.
The main downside of this basic camera setting is that you won’t be able to operate your camera while it’s processing the noise reduction, and the process takes the same time as the shutter speed. For example, if you shoot the Milky Way for 30 seconds, the camera will take 30 seconds to reduce the noise and you won’t be able to use your camera during that time.
For that reason, in my camera settings, long exposure noise reduction is always off.
I prefer to do the noise reduction in post-processing, mostly using the Topaz Denoise AI, as a plugin for Photoshop (but you can use the standalone version or the plugin for Lightroom too).


How to turn on/off the long exposure noise reduction
You can change this camera photography setting from your camera menu/functions.
11. High-ISO noise reduction – A photo camera setting to turn off
This is another setting on camera that’s like the previous one; your camera will reduce the noise resulting from using a High ISO.
In this case, this noise reduction can be applied only if you shoot in JPEG, so if you shoot in Raw (as you should!), you can turn this camera setting off.

11. High-ISO noise reduction on camera
How to adjust the High-ISO noise reduction setting
You can change this photo setting from your camera menu/functions.
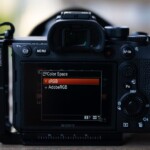
12. Color space – A setting on camera to ignore
The main camera photo settings related to color space are sRGB and AdobeRGB.
- sRGB: This is the most widely used color space and your best bet for color accuracy across different devices and browsers.
- Adobe RGB: It includes more colors, but some devices and browsers aren’t capable of displaying all the colors, creating strange color swifts.
While color space is very important in photography, if you shoot RAW, it’s something that you can adjust in the digital darkroom, so your color space photo setting on camera doesn’t matter.

12. Color Space camera setting
How to change the color space camera setting
You can change this camera setting from your camera menu/functions.
13. Image stabilization – A key camera setting to adjust
We can’t leave image stabilization out of this camera settings guide. It’s a very helpful camera setting that will allow you to shoot handheld at slower shutter speeds.
Advanced digital cameras and lenses offer top-notch image stabilization features, so you can use it to your advantage in certain situations:
- Image stabilization On: Use this when you shoot handheld unless you need a super-fast shutter speed.
- Image stabilization Off: It’s very important to turn this camera setting offwhen you’re shooting on a tripod or other stable surface to avoid blurry pictures.

13. Image stabilization camera setting
How to turn on/off the image stabilization
You can change this camera photography setting from your camera menu/functions and in some lenses from the lens body.
14. HDR/DRO – A creative setting on camera
This is a considerably new camera setting and it’s aimed at creating a high dynamic-range image on camera.
While it’s a nice idea, cameras are not good enough at creating automatic HDR images yet, so if you want to achieve a natural HDR look in your images, my advice is to turn HDR/DRO off and create this effect in post-processing or using a specific plugin like HDR Pro from Nik Collection.

14. HDR/DRO camera setting
How to activate/deactivate the HDR camera setting
You can change this camera photography setting from your camera menu/functions.
Conclusion
As you’ve seen throughout this photography settings guide, there are many important camera settings to learn if you want to take the best possible images.
All these are good camera settings, but there are camera settings for different types of photography, so feel free to use all these as a general reference.
My recommendation is to master the three basic camera dials (Aperture, Shutter Speed, ISO) since these will have the biggest impact on your final image. Learning the basic camera buttons and wheels and what they do is important, so go beyond the theory and put them into practice, it’s the best way to understand them!
If you want to have a better understanding of camera settings, check out our specific camera settings articles (or download our PDF photography basics guide) and, if you have any questions, feel free to leave them in the comments!


This is such an amazing and helpful website—truly impressive! The content is outstanding, and it’s super easy to use. Honestly, it’s the best site I’ve visited today. Keep up the good work; I highly recommend it to everyone.
Thanks so much. I’m glad you found it useful! 😊
Good Job Very Easy i understand well all of this topics thanks for guidance
Thanks so much for reading! I’m glad you enjoyed it! 😊
Thanks Dan,
Greetings!
G
For very nicely explaining article with appropriate guidance for beginners like me..
Recently on 15th June I have purchased canon R10 with standard lens 18-150 from Amsterdam, in the Netherlands.
Paresh vadgama
India
Hi! That’s a versatile option for landscape and wildlife photography! Just be aware that for astro, you’ll need higher ISO. Happy shooting! 😊
Hi Dan, thank you very much for the great explanation. very very helpful and easy to understand. have a great day. thank you
Thanks, James! 😊
These has been great to who is still upcoming in filming industry
Thanks so much 🙂
Your guide on camera settings is a comprehensive resource for photographers. It’s clear and easy to follow, making it suitable for both beginners and more experienced photographers looking to fine-tune their skills. The explanations of aperture, shutter speed, and ISO are particularly helpful.
Thanks a lot for your words, Peter. So glad you found it helpful! 🙂
Thank uhh sir🤍♥️
You’re welcome, Sarad 🙂
Thanks Dan. Amazing article and well worth a quick refresher.
Hey Matt, so glad it helped! You’re welcome 🙂
Thanks Dan! Well done and well written, helpful and detailed explanation in the general terms of all one needs to know about some of the more complex settings and how to use them. Will have to download the free eBook about photography basics, similar to Andrew above, I am having same issues with either under or overexposing in low light scenario like sunset or sunrise, but it may very well be the wrong lens choice. Using Nikon D850 with NIKKOR AF-S 28-300mm f3.5-5.6 G VR ED IF Lens in above scenarios. I want to achieve a point where I do not have to edit my photos and just transfer the JPEG images from the camera to my phone without downloading and editing. How hard is that to achieve having perfect JPEG shots?
That’s a tough question…Cameras don’t work like iphone or smartphone cameras where you shoot and they apply some auto editing to make it look better…cameras shoot in RAW files or JPEgs and you are limited to a picture profile applied to the Jpeg.
If you don’t want to edit your images at all, I wouldn’t shoot RAW and just get a camera with a nice picture profile so you can get the best possible looking images in camera.
Best,
Dan
very nice
Thanks a lot!!
Thank you Dan. A very crisp article for the biginner photographer.
Thank you, Dinesh!
I found that very interesting as no one ever showed me what you can do with your camera.
Thank You
So glad it helped you, David. Really appreciate your words 🙂
Hi Dan,
Amazingly great read!!! Thanks a ton. I found the information very helpful. I am using a Nikon D500 with 300mm – 500mm lens for last couple of years and mostly shoot in Aperture Priority mode mostly for Bird photography. I am hoping I will get better shots from the knowledge gained from this article. I have encountered one problem many times during birding and hoping you can suggest some options. When a small bird is sitting inside a tree and there is noise (other branches, shrubs etc.) in front of the bird. While we can see the bird clearly, the camera is unable to focus on the bird and ends up focusing on the noise. Of course, one option is find a different location to avoid noise, but many times its not possible as the bird will fly off during that time. Can anything be done about this? Thanks again for your brilliant and easy to understand articles.
Hi Freddy, these kind of moments are very frustrating. There’s not much to do since the auto focus will directly go to the most contrasty areas, so best option is setting up the option of focusing the eye or try manual focus.
Aloha Dan—Thank you so much for this —I am still a novice but I totally enjoy photography! Just don’t always know what I’m supposed to do with the settings- a bit daunting for sure. I have the creative eye so to speak but wanted to take my technically sound pics. And this was a tremendous start for my Oberammergau Passion Play 2023 experience! Cheers!
Thanks Miko! Glad to see our Camera Settings guide helped!
Dan
Thank you! Thank you! Thank you!
My pleasure! 😉
Dan I’m trying to go fully manual I have always been a point and click guy but on manual my pictures are darker or lighter than what I want I try turning up my iso or even changing my shutter speed lower or a smaller f number but can’t get the right mix
Andrew,
I recommend downloading our Free ebook about the photography basics; it’ll help you go off-auto 😉
Thank you so much I am struggling with setting for a while now and really need these guidelines. Is there a book that we can get with theses in it
Happy to see that this helped Scott! Your camera manual is boring but it’s the best book that you can read on camera settings 😉
Thank you sir
❤️
you’re welcome! happy shooting 😉
Hi Dan,
Thank you so much for your intro into camera settings.
For someone such as myself, rekindling my interest in photography, it is a welcome guide. Especially as you not only explain what each setting does, but you helpfully provide examples of how each setting works best in a particular genre, such as landscapes or portraiture.
Malcolm – UK
Thanks Malcolm! I’m glad to see you found our guide useful!
It’s always nice to rekindle the interest for a passion like photography 😉
Best,
Dan