Long exposure photography is one of the most fascinating genres and it will get you forever hooked on photography.
Imagine you could keep your eyes open for a certain amount of time and capture everything you’re seeing in just one image – wouldn’t that be nice? That’s exactly how long exposure photography works; instead of “freezing” time, the idea is to capture everything that happens while the shutter is open.
Did you know that long exposure photography is also a super versatile technique? From incredible daytime long exposure photos to dreamy long exposure night skies, it’ll help you create the magical and ethereal photos you’ve always imagined.
However, long exposure photography can be a complex technique that is difficult to master. Do you have the right equipment to do long exposure photography? Do you know the basic settings to start with? Not sure? Let’s get into it!

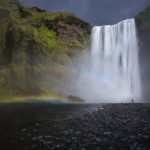
Long exposure photograph at Skogafoss Waterfall, Iceland – 0.5 sec, f/16, ISO 100
In this Ultimate Guide to Long Exposure Photography, we’ll talk about:
- What is long exposure photography?
- How to take long exposure shots
- Nighttime long exposure photography
- Daytime long exposure photography
- Long exposure cameras, lenses, and accessories
- Long exposure photography examples
What is long exposure photography?
Long exposure photography can be explained as a technique based on keeping the camera shutter open for a determined length of time.
If you’re shooting handheld, your shutter speed should be somewhere between 1/5000 and 1/40 of a second to get sharp images. However, using a slow shutter speed, starting from half of a second and upwards, and placing your camera on a steady tripod, you’ll be able to capture motion in clouds, water, cars, animals, etc. Wherever there’s movement, there’s an opportunity to be creative using the long exposure technique.
Keep in mind that when you’re shooting daylight long exposure, if there is too much light hitting the sensor, you may need a Neutral Density filter to subtract some exposure stops and get a well-exposed image.

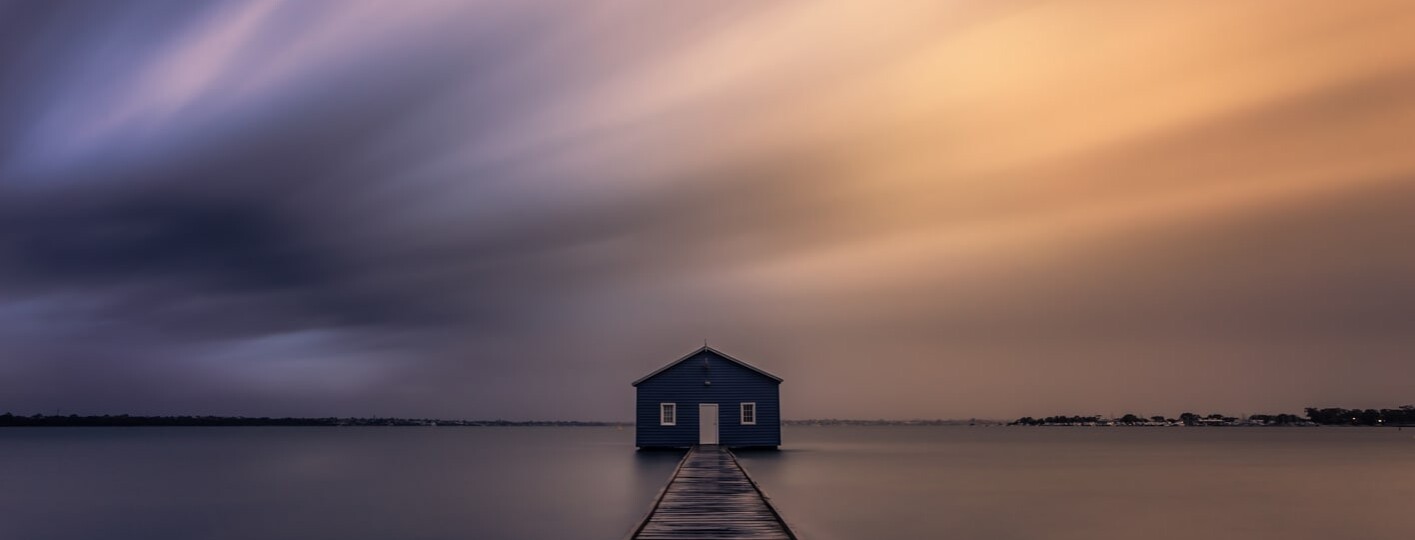
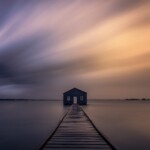
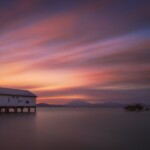
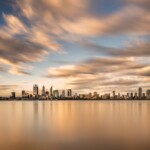
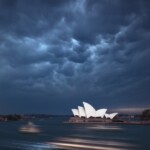
Simply put, long exposure photography consists of keeping the camera shutter open for a determined length of time – Perth, Australia. 240 sec. f/11, ISO 50
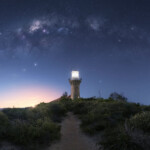
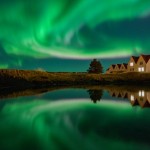
Long exposure at night allows us to capture more information from the sky than what we can see with our naked eyes. By keeping the shutter open for a longer time, we’ll capture details of the Milky Way or colors of the Northern Lights that we wouldn’t be able to see with the naked eye.

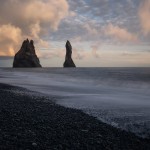
Long exposure at night allows us to capture more information than the one we see with our naked eyes – Iceland. 3 sec, f/2.8, ISO 5000
The final result of either nighttime or daytime long exposure images is magical because it can’t be perceived by your eyes. In fact, if they’re unfamiliar with the final image, many people think that long exposure photos have been “Photoshopped”. However, to take long-exposure photographs, all you need is your camera and a tripod (and ND filters sometimes).
How to take long exposure shots
Long exposure photography has a lot of technical aspects that you should know beforehand. The most important one is the best long exposure camera settings.
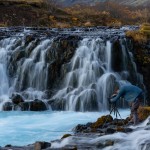
Let’s dive into how to do long exposure photography with your camera and how to create the unbelievable long exposure photos you dream of producing.

The camera settings and technique are the keys for doing long exposure photography. Bruarfoss Waterfall, Iceland – 1/6 sec. f/22, ISO 50
Step-By-Step Guide to Long exposure photography
There isn’t a single rule of thumb for doing long exposure photography. With practice and time, you will develop your own workflow. However, it’s good to have some references.
In general, this is the best way to do long exposure photography step by step:
- Scout and open your eyes: It sounds pretty obvious, but this step is at the heart of long exposure photography. Try to arrive at least one hour before the time you want to shoot, so you can pick your spot and, at the same time, analyze the direction of the clouds, see if the tide is rising, if there’ll be people walking in front of your camera, etc.
- Set up the camera on a tripod in a safe place: Set your camera on a sturdy tripod; remember that no photo is worth risking your equipment or your own safety.
- Get your composition: Once you’ve analyzed and predicted all the surrounding elements, it’s time to compose your photo. You can check here the best photography composition techniques.
- Change the camera settings: Turn your camera to Manual or Bulb mode and change the settings according to the explanation below. Also, turn the image stabilization (IS) off.
- Focus: Make sure you have the right focus to take sharp and neat photos.
- Meter: Adjust the shutter speed, aperture, and ISO to get an exposure value equal to zero by using the light meter of your camera. Use a long shutter speed to capture the motion you want.
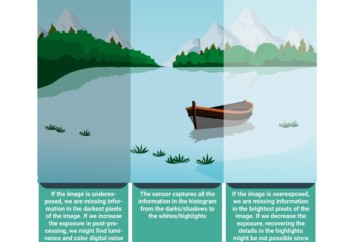
- Take a test shot and check the Histogram and focus: Once you’ve taken your test photo, double-check the exposure, through the histogram, and the focus to make sure everything is OK.
- If you need to use ND filters, calculate the shutter speed: Adjust the shutter speed depending on the filter you are using. You can check out our section below to find some helpful apps to calculate the exposure time.
- Mount the filter/s carefully: If you’re using lens filters, place them on carefully. Don’t touch the focus ring or the camera.
- Cover the viewfinder to avoid any light leaking in your sensor: In order to avoid any light leaking, cover the viewfinder and your filter holder if needed.
- Take the shot: Use the shutter release or the shutter delay to avoid any unwanted vibrations in your camera. Don’t forget about rechecking your histogram and focus.
- Start again!

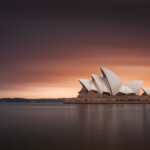
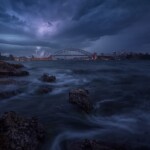
Following a series of steps is the easiest way to do long exposure photography. Sydney, Australia – 1/2 sec. f/11, ISO 250
One of the tips for learning to photograph is testing your creativity with the long exposure technique. Let’s look at the best settings to use.
Long exposure photography settings and techniques
Understanding the long exposure photography settings and changing them according to the conditions you’re shooting in is vital for getting the photos you want.
Before you take long exposure photos, there are a couple of suggested settings you must consider:
- Manual Mode: The first, fundamental setting is switching your camera to Manual mode (“M”) or Bulb mode (“B”). Please note that some cameras automatically change from Manual to Bulb mode when you go over 30″ of shutter speed.
Some smartphones normally incorporate this option; it’s called Pro Mode, where you can play with the basic settings and then take long exposure photos on your iPhone.
- Shoot in RAW: To get the highest-quality files and edit your photo after the session.
- Metering mode: The Matrix mode (Evaluative mode in Canon) is the most common metering mode, as it references the whole scene with an emphasis on where the camera is focusing.
- Turn off the image stabilization (IS): Otherwise, your lens will try to compensate for any movement and, consequently, will add blur to your photos.

Some of the basic settings for doing long exposure photography are shooting in Manual mode and in Raw, using the matrix metering mode, and turning off the Image stabilization – Reynisfjara beach, Iceland – 3 sec, f/22, ISO 200
Now let’s get into the basic settings for long exposure photography and how you should adjust them.
Focus for long exposure
Focusing is one of the basics while doing long exposure photography. There is no way to fix a photo that is out of focus in post-production; it’s one of the most common mistakes.
Even though it seems easy to take sharp images, there are some points you need to consider:
- Focus before placing any filter. If you’re using ND Filters, keep in mind that they block the light, so most cameras struggle to focus when you set a lens filter. The first step is to focus without any filter, take a test shot, and double-check the focus before setting up any filters. This is one of the most useful tips for focusing in photography.
- Focusing at nighttime is always challenging. Check the focus section of this article to nail how to photograph the Milky Way.
- Regardless of the focus mode you use, either manually or using the autofocus, use the zoom in the Live View Mode to find the sharpest point.
- Using focusing techniques, such as focusing to the Hyperfocal distance or focusing on the first third of your photo, are simple and easy ways to get the right focus in most situations.
- Once you’ve focused correctly, switch to Manual Focus. Otherwise, your camera will try to focus again.

Make sure your focus is correct in your long exposure images – Sydney, Australia. 1sec. f/11, ISO 320
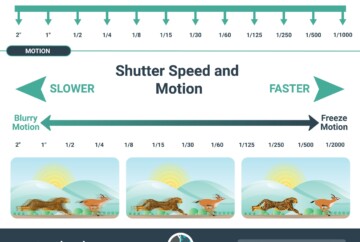
Long exposure and shutter speed
Shutter speed is one of the essentials of long exposure photography, and it will have a drastic impact on your final photos.
So, what is the best shutter speed for long exposure photography? The best shutter speed is the one that fits the light situation and your intention. Understanding the final effects of using a shorter or longer shutter speed is the key to getting the photo you have in mind:
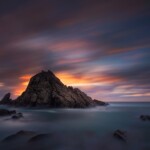
- Ultra-long exposure photography creates ethereal, abstract, and dreamy atmospheres because you’re softening all the motion in your photo. The exposure time will be over 5 minutes, and to get this long exposure, you have to use the Bulb mode. (Most cameras don’t allow you to take more than 30 second long exposure photos without using this mode.)

Use super long exposures to create minimalist images and dreamy atmospheres. Sugarloaf Rock, Australia – 105 sec. f/13, ISO 100
- A shorter exposure time maintains the details of the components that are moving in your photo, creating a vibrant and dynamic impression while capturing the motion. The shutter speed will be around 1 minute or less.

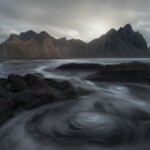
Use a shorter long exposure to capture details in moving elements like water. Stokksnes, Iceland – 8 sec, f/11, ISO 100
These exposure times are just a mere approximation and will vary based on your conditions and environment. There are lots of factors that may influence the exposure time, so we’ve created the ultimate cheat sheet for long exposure photography so you can calculate your shutter speed!
| Type of long exposure | Shutter Speed |
|---|---|
Sharp stars & Milky Way | 12 - 25 sec. |
Star trails | From 30 sec. - |
Meteors | 3 - 25 sec. |
Static Northern Lights | 8 - 25 sec |
Dynamic Northern Lights | 0.5 - 8 sec. |
City Lights | 15 - 60 sec. |
Car trails | 30 - 120 sec. |
Fireworks | 5 - 30 sec. |
Lightpainting | From 5 sec. - |
Water with texture | 0.5 - 3 sec. |
Smooth water-Silky effect | From 5 sec. - |
Slow-moving clouds | From 120 sec. - |
Fast-moving clouds | From 15 sec. - |
Removing people | 30 - 180 sec. |
Best shutter speed for Long Exposure |
|
Also, you can learn more in-depth information in our shutter speed photography guide!
Long exposure and aperture
If you’re shooting during the daytime, you should set the f-stop for long exposure photography around the sweet spot of your lens to capture the highest quality. Wait a second! Sweet? My lens? No, your lens is not a candy; the sweet spot refers to the aperture that gives you the best quality and sharpest image.
You should test your lens to determine this sweet spot, but it’ll normally be between f/8 and f/11 in wide-angle lenses. You can learn more about how to calculate the sweet spot in our guide to aperture in photography.
This basic rule for daylight long exposure can make it a little tricky to get a well-exposed photo. If so, you’ll need to use ND filters to decrease a couple of exposure stops in your picture.
If you don’t have any filters to play with, you can choose a smaller aperture like f22 to take long exposure photography. However, the smaller the aperture you adjust to, the more “optical diffraction” you will get, which reduces the overall sharpness and quality of the photo.
For long exposure photography at night, choosing your aperture is easier. Just pick a wider aperture on your lens, like f/1.4 or f/2.8, to capture more light.

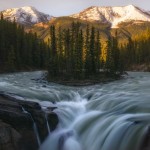
Set the aperture to the sweet spot of your lens. Sunwapta Falls, Canada – 0.4 sec, f/9, ISO 100
Long exposure and ISO
What is the best ISO to avoid noise in Long Exposure Photography? Let’s cut to the chase. To get the best quality when you take long exposures, use the base ISO of your camera whenever it’s possible. That means using the lowest native ISO on your camera when you’re shooting in daylight. Nice and simple.
Why? Using the base ISO on your camera, around ISO 100, will reduce digital noise and increase the quality of your images. However, for nighttime long exposure, you’ll need to use a higher ISO.
Another thing to consider is the heat of the sensor when taking long exposures, which increases the chance of some artifacts such as hot pixels and color noise.
There’s always a little room to play. Increasing the ISO a couple of stops won’t drastically affect the final image in most cameras, so knowing the limits of your gear is essential. You can find more detailed information in our guide to understanding ISO in photography.
I also highly recommend our guide on best settings for noise-free photos and, if noise does appear (especially in night long exposure photographs), have a look at the best noise reduction software.

Use the base ISO whenever you can for taking long exposures. ISO 3200. Image by Uros Fink
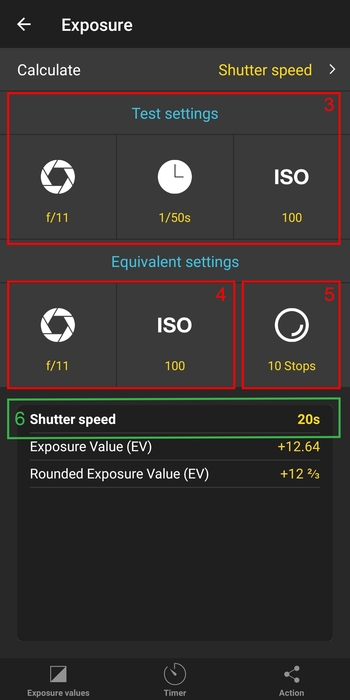
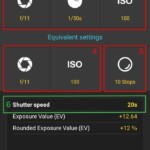
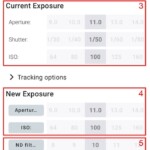
Long exposure Calculator in a long exposure app
One of the best tips for long exposure photography is to use apps to calculate the shutter speed that you need. These apps are specifically for long exposure photography and will help you determine the right exposure time/shutter speed depending on the Neutral Density Filters that you’re using.
There are hundreds of apps to help you calculate your long exposure shot, but probably the most used are Photopills and Exposure Calculator. Let’s see how to use them:
- Take a test shoot and set your light meter in 0.
- Check the histogram to ensure everything is well exposed.
- Enter your test settings in your app.
- Change the aperture or ISOif you want to.
- Select the filter you want to use.
- Done! The long exposure app has done the numbers for you and will show you the shutter speed that you need.

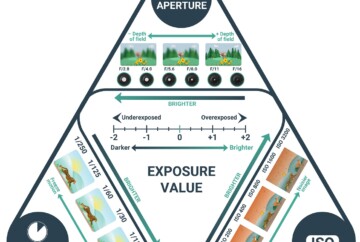
Last but not least, before using any long exposure calculator app, make sure that you understand how exposure in photography works and how to strike a balance using the exposure triangle.
Now you have all the information you need to shoot long exposure photos. If you don’t know where to start, here are the main types of long exposure photography.
Nighttime long exposure photography
Most of the time you’re photographing at night, you’re shooting a long exposure. The lack of light forces you to have the shutter open for a longer length of time so the camera’s sensor can receive more light. Therefore, you’ll use long exposure for capturing the Milky Way, Northern Lights, star trails, and other night sky elements.

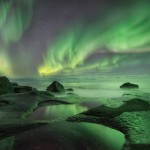
Long exposure shot to capture the Northern Lights. Lofoten Islands, Norway – 4 sec, f/2.8, ISO 6400
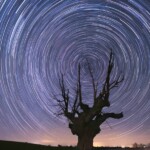
Long exposure star photography
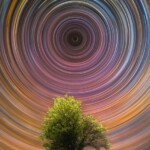
Taking a long exposure of stars allows many creative possibilities. In this genre, the shutter speed will depend on the scene. Using a long exposure to photograph star trails will take at any time from 15 minutes to several hours, but it’ll allow you to capture mesmerizing images,

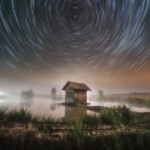
long exposure circumpolar star trails. Image by Uros Fink
However, if you shoot a long exposure for the Milky Way because you want to capture the stars as we perceive them with the naked eye, you shouldn’t use a shutter speed longer than 20 seconds as I explain in my Milky Way photography guide.
Whatever your aim is while using long exposure at night, I recommend checking my night-long exposure photography guide to get more ideas.

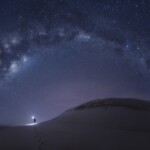
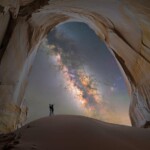
You can use a long exposure to shoot the stars and the Milky Way. Utah, USA
Long exposure and Urban photography
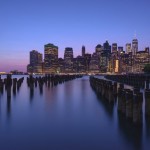
There is something unique and delightful about when a city shifts to the nighttime version of itself. The diversity of lights, the skyscrapers, and the everlasting movement of the metropolis can create the most enchanting atmosphere.
The use of long exposure in a city or town will transform the view of it dramatically. If there’s some light, there’s always a chance to do something amazing. Looking at, analyzing, and experimenting with the environment (cars, ferries, wheels, boats, etc.) will expand your imagination and the way you approach photography at nighttime.

Long exposure in a city. NYC, USA – 30 sec, f/9, ISO 1250
Long exposure car light trails
Sometimes, even the most boring streets can change dramatically when you use a long exposure. In this case, you can use the light of cars with long exposure to create a bright and colorful flow of light trails that you can use as leading lines to guide you across the photo.
Look for busy intersections and streets so you can incorporate the light trails into your long exposure photos and enhance your composition.

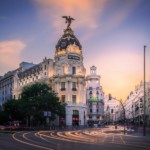
Long exposure and car trails. Madrid, Spain – 55 sec. f/8 ISO 100
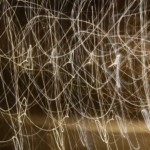
Long exposure and light painting
Light painting is probably the most enjoyable and creative way to use long exposure in low-light conditions. It consists of using lights as brushes and painting around your photo to illuminate and create light patterns.

Daytime long exposure photography
Using a long exposure during the daytime can seem quite challenging due to the high amount of light, which can result in overexposed images. However, there are some ways to do this type of photography during the day. The use of Neutral Density filters for long exposure has increased rapidly in the last few years, making them a must-have accessory in your bag.
Mastering your skills in long exposure photography in daylight will allow you to create interesting perspectives and effects even if it’s a sunny day.
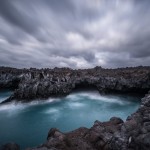
Long Exposure water shots and silky effect
The use of long exposure in landscape photography has a noticeable impact, but if you add water to the formula, the combination is mind-blowing. The ways water changes depending on your shutter speed are limitless, and it can be either beneficial or detrimental to your results.
Let’s say you use a long exposure on a waterfall, using a shutter speed between half of a second and one second; this will keep the details of the streams and, at the same time, capture the movement of the water, making your photo more attractive. However, using a longer shutter speed can cause the loss of detail on the water, which may make your photo less interesting.

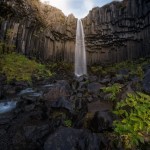
Long exposure and waterfall. Svartifoss, Iceland – 1/10sec, f/11, ISO 100
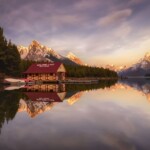
Long exposure in lakes is a bit different, since most of the time you want longer exposures to get reflections.

Long exposure and lakes. Maligne Lake, Canada – 0.6 sec, f/11, ISO 100
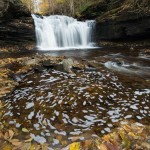
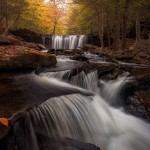
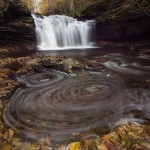
If, on the other hand, you’re shooting a small river or creek, it might be better to take a shorter long exposure to capture more detail in the water.

Long exposure photography in rivers and creeks. Pennsylvania, USA – 0,5 sec, f/11, ISO 100
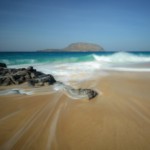
Also, there are different ways to approach long exposure photography while shooting at the beach. You may want to show the movement of a wave, with shutter speeds around 1 second, or create a more minimalist scene with longer shutter speeds, as we explain in our coastal photography guide.

Use the long exposure technique to capture the movement of waves. The Canary Islands, Spain – 1.3 sec, f/8, ISO 500

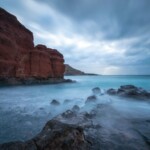
Use a longer long exposure to create a more minimalist image. The Canary Islands, Spain – 20 sec, f/9, ISO 400
Long exposure and clouds
Without a doubt, if there’s an element that changes drastically with a long exposure, it’s the sky. Clouds are super important in my photography, and the long exposure technique allows me to capture their movement.

The movement of clouds is one of the most fascinating things to capture using the long exposure technique. Perth, Australia -232 sec. f/10, ISO 100
Choosing the right conditions is crucial, as well as predicting the cloud’s movements. Stormy and windy days, preferably during sunrise or sunset, are what you should be looking for. If there isn’t much movement in the sky but there are still some clouds, you can do ultra-long exposure photography using ND Filters.
With long exposure times over 5 minutes, you will be able to make the most out of the slow-moving clouds.

The long exposure time will depend on the movement of the clouds, but usually, you’ll have to take ultra-long exposures. Port Douglas, Australia – 180 sec, f/100, ISO 100
long exposure black and white photography
Speaking about black and white photography is speaking about light in its purest form. By combining B&W with long exposure photography, you can obtain images that are out of this world.
Using ND Filters as the 10-stop filter in long exposure for black and white photography, you’ll be able to create a minimalistic and abstract scene that will attract the viewer’s eye to your photo.

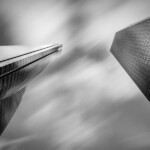
Black & White combined with long exposure photography create spectacular results. 30 sec. f/16, ISO 100
Long exposure cameras, lenses, and accessories
We have touched on all the settings and steps to do long exposure photography, but do you have the right equipment to take the photos you’ve imagined?
Today, most cameras and even the latest smartphones will allow you to do this technique, and, to be honest, you can achieve great results just with basic long exposure photography equipment.
Generally, your budget and your photographic goals will dictate the equipment that you should use. Even so, having an idea of your needs will save you precious time and some money. Let me give you an idea of the ideal gear for long exposure photography.
cameras for long exposure photography
If you’re considering buying a good camera to shoot long exposure photography, make sure that it meets these basic requirements:
- It shoots in manual mode or bulb mode: This is a must in order to adjust the proper shutter speed for long exposure photography.
- It keeps Digital Noise under control: The best cameras to avoid digital noise are full-frame cameras. If you want to shoot something more specific, you can check our articles on the best cameras for shooting the Milky Way and the best cameras for Northern Lights photography.
- Shoot in RAW: As discussed before, shooting in Raw will allow you to collect much more data in your image and to achieve the best final quality.

Make sure your camera offers the basics for doing long exposure photography. Sydney, Australia – 3.2 sec. f/11, ISO 250
Lenses for long exposure photography
The best lens to take long exposure shots is the one that best adapts to your needs and the type of the photography you want to do:
- Wide-angle lenses: Ideal for landscape photography, in particular for astrophotography, but they’re also good lenses for architectural and cityscape photos.
- Mid-range lenses: Good for light painting and focusing on details on the subject you’re shooting.
- Telephotos: The best for capturing details such as mountain peaks and rocks
I highly recommend you read this article about the best lenses to shoot the Milky Way and the best lenses for Northern lights photography if you’re looking for a lens to do long exposure photography at nighttime.

The best lens to take long exposure shots is the one that best adapts better to your needs
Filters for long exposure photography
Using ND Filters in long exposure photography is beneficial and sometimes completely necessary. To put it simply, these filters allow you to control the light that hits your sensor. This will help you, for example, to take long exposures during the day without getting overexposed images.

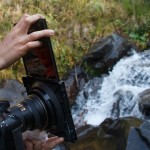
Lens filters are sometimes fundamental for doing daytime long exposure photography. Lucroit 10-stop filter attached to the Nikkor 14-24 mm
Depending on the light and your goals, you can choose between different opacities to adjust the shutter speed that you need. There are many types of photography lens filters. The most common ND filters for long exposure photography are:
- 3-stop ND filter (ND 0.9): It decreases 3 exposure stops. It’s commonly used when a shorter exposure is needed, such as for shooting waterfalls or seascapes.
- 6-stop ND filter (ND 1.8): The best filter when the light isn’t too harsh. It’s commonly used for sunrises and sunsets.
- 10-stop ND filter (ND 3): This filter is the way to go when you have to deal with hard and bright light, especially while doing daytime long exposure photography.


Long exposure 0.4 sec. f/11, ISO 100 (Left), and 30 sec. f/11, ISO 100 and ND filter 6 stops (Right)
One of the benefits of using a Neutral Density Filter is removing people with long exposure photography. This is a good tip when shooting in crowded and touristy spots, so the longer your exposure, the fewer the people in your photo.


Long exposure to remove people from the image 1/250 sec. f/2.8, ISO 2000 (Left) 30 sec. f/22, ISO 100 and 10-stop ND filter (Right)
Long exposure photography accessories
A sturdy tripod is probably the most important piece among long exposure photography gear. Investing in a good, solid tripod is essential and will help you get sharp long exposure photos. If you want to know the different types of tripods available, check our article on the best travel photography gear.
Another element that could be helpful is a shutter release. They are very cheap and will allow you to trigger your camera remotely, with the end goal of avoiding any vibration. An Intervalometer is the evolution of the basic shutter release, and it allows you to set up the shutter speed as well as other helpful settings for long exposure photography. Please bear in mind that some of the latest cameras have a built-in intervalometer, so maybe you won’t need one.

Sometimes, even if we use a stable tripod and an intervalometer, our camera may suffer vibrations, due to the wind, waves, or wet sand on the beach, or photographing in a city with a subway or from a bridge. In these cases, it will be difficult for you to get sharp photos, but luckily, there is a lot of software to fix blurry images. I use Topaz Sharpen AI.
Long exposure photography examples
Having success with long exposure photography is all about changing the way you see things and having a vision of the photo you want. Being creative and experimenting will help you develop an outstanding portfolio of long exposure pictures.
However, remember that one of the best ways to improve your long exposure photography is by looking at other photography examples, so let me show you some long exposure photography ideas to inspire you.
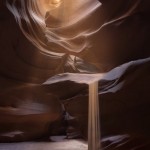
Long Exposure photography idea: capturing the movement of the elements
With this long exposure photography idea, you can capture the movement not only of the water but also of other elements, such as lava or sand.

Sandfall. Antelope Canyon, USA – 2.5 sec, f/8, ISO 200
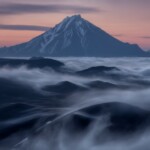
Long exposure photography example: Capturing a sea of clouds
One of the most exciting long exposure examples is photographing a sea of clouds. The longer the exposure, the dreamier the atmosphere will be.

Sea of clouds in the Kamchatka peninsula, Rusia – 15 sec. f/32, ISO 100
Long Exposure original idea: photographing the movement of the fish
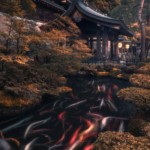
An original long exposure photography idea is to photograph the movement of colorful fish in a pond.

Koi fish long exposure photograph. Takayama, Japan – 2 sec. f/11, ISO 200
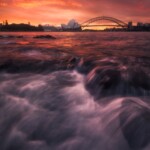
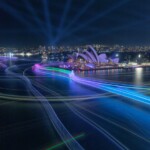
Long Exposure photography example: Shooting city light shows
Cities like Sydney, New York, Singapore, Paris, and London offer big light shows that are good long exposure photography examples waiting to be captured.

Long exposure and city light show in Sydney, Australia – 540 sec. f/8, ISO 400
long Exposure photography idea: photographing fireworks
Another long exposure idea is to leave your shutter open for a longer period of time to capture fireworks.

Long exposure and fireworks. Niagara Falls, Canada – 1.6 sec, f/2.8, ISO 100
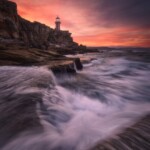
Long Exposure photography example: capture drama on the cliffs
On rocky cliffs with fast-moving clouds, a good long exposure example is to shoot the movement of the clouds and water to create more drama in your image.

Long exposure to capture more drama. Canary Islands, Spain – 25 sec. f/9, ISO 400
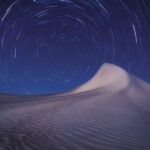
Long exposure photography example: Star Trails
A mesmerizing long exposure example is to capture the movement of the stars using an ultra-long exposure.
You can learn more about how to create these images in our star trails photography guide.

Star trail captured using the long exposure technique. Spain
Long Exposure photography idea: create a minimalist scene
One of the most popular long exposure photography ideas is to take a super long exposure to create a minimalist scene.

Long exposure to create a more minimalist scene. Sydney, Australia – 240 sec. f/11, ISO 125
Long exposure FAQ
Conclusion
Understanding long exposure photography is a combination of learning the theory and basics and putting into practice every aspect that you’ve seen in this guide.
Remember that long exposure photography is also about “learning to see” things differently. It’s a genre that takes some time and practice to master, but long exposure photography opens a new world of possibilities.

Welcome to the magical world of long exposure photography!
I really hope this tutorial on long exposure photography increases your interest in this beautiful and creative type of photography and shows you how to take the long exposure photos you’ve dreamed of.
Please let us know in the comments below if you have any questions related to long exposure photography!


What a fine article, thank you so much!
Thank you so much, Guy! 😀
Great help, enjoyed reading a lot
Thanks a lot Janet 😀
great site loads of info and awesome photography, okay i’m sucking up, seriously tho i am curious why camera apps and metadata for long exposure photos don’t show the time the shutter was open, i see you list it on your photos, is this camera or phone camera/software specific? i often take multiple images at different rates to compare which works best, your thoughts
Hi, Photopills is a great app where you can check which settings you need according to the histogram. You can read the metadata with softwares like Lightroom and there you’ll see the shutter speed you used. The experience and practice will tell you better which shutter speed you need, for example, around 1 second for water, around 20 seconds for clouds, 30 or more seconds for people, etc.
Happy shooting,
Dan
thank you and you are very outstanding
I appreciate your philanthropic approach photography. Sharing your expertise contributes to keeping the hobby alive and vibrant. Being somewhat experienced I can fully appreciate the enormous amount of work necessary to produce a guide that is well edited and supported by high-quality photographs. I look forward to browsing your other publications. Keep up the good work!
Thank you Jim! Creating articles like this requires a lot of effort so I really appreciate your feedback.
Happy shooting!
Dan
EXCELLENT ARTICLE,VERY INFORMATIVE,THANKS…
Thanks Bernard!
Glad to see you enjoyed our long exposure photography guide!
Take care,
Dan
Thank you for this fantastic guide to long exposure!!
Thanks so much Ana! I’m happy to see that you enjoyed our long exposure guide!
Best,
Dan
Excellent guide, thanks Dan.
Thanks Joaquim!
Glad you liked our long exposure guide 😉
Happy shooting,
Dan
Outstanding images and excellent tutorials.
Thanks Bill! Glad to see you liked our long exposure guide and articles! 😉
Dan