Daytime long exposure photography may seem complex and challenging, but this guide will take you through all the basics for taking long exposures in daylight.
Understanding how to shoot daytime long exposure is essential for avoiding mistakes since the beginning. Do you know the basic settings for daytime long exposure? Have you heard yet about the best ND filters for daytime long exposure? There are many things to consider before getting started!
Long exposure photography in daylight gives you the opportunity to capture scenes differently from the way we see things with our eyes, making them, on many occasions, more visually attractive.

Daytime long exposure photography tips – 1/2 sec. f11, ISO 50
Although taking daytime long exposures isn’t difficult, you must know the steps to follow to get the pictures you want. To help you out, in addition to our comprehensive guide to long exposure photography, want to share some handy tips for taking long exposures in daylight.
I’ve done all the trial and error for you already, so you can save precious time by reading this guide and getting the best daytime long exposure tips! Let’s get started!
How to take daytime long exposures
Let’s be clear; there is not a fixed method for how to do daytime long exposure photography. Every photographer has their own workflow and routine that they have developed cautiously through time and practice. You will find your way eventually, but this step by step for daytime long exposure photography is a good starting point that will help you learn and develop your own workflow faster.
Specifically, here is the step by step for daytime long exposure photography:
- Scout, observe and analyze your surroundings: In daytime long exposure photography, it’s super important to observe the elements you want in your composition, like the movement of the clouds, streams of water, waves, cars, etc.
- Place your camera on a tripod in a safe place: Make sure your tripod is stable and that it’ll be safe for the time you’ll be shooting. Pay attention to any element that could harm your equipment, like water, wind, or people hitting your tripod legs by mistake.
- Choose your composition: Predict the movement of the elements you want to incorporate into your photo and compose accordingly. You can learn here the best tips for photography composition.
- Change your camera settings: Shoot in Raw, turn off the image stabilization, and attach the shutter release or turn on the delay mode in your camera. Set the base ISO of your camera (normally ISO 100) and use an aperture that ensures the best sharpness and a wide depth of field if you are shooting long exposure landscape photography (I usually start with an f/8, f/11).
- Focus: Make sure your focus is correct before attaching any filters to make it easier to focus on your camera and get sharp images. You can focus in manual or automatic mode, but once you have the perfect focus, leave the camera in manual focus mode.

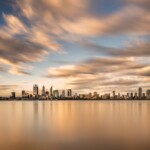
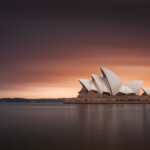
How to take daytime long exposures. Sydney, Australia. – 1 sec. f/11, ISO 800
- Take a test shot: Adjust the shutter speed setting so the light meter is 0, as explained in our guide on the exposure triangle. Then, take a test shoot to double-check your focus and the histogram of your photo. If everything is in focus and you aren’t clipping any darks or lights, take note and remember the shutter speed.
- Set up your ND Filter: Do it carefully so you don’t move your camera or the focus ring of your lens while placing your filters.
- Cover the viewfinder: To avoid any light leaks, cover your camera viewfinder using the cover or a black cloth.
- Calculate the exposure time: Use a long exposure calculator app to calculate the shutter speed needed depending on the filter you are using and the shutter speed from your test shot. This way, you will ensure you have the right exposure from the first time. If the result is longer than 30 seconds, you’ll have to change your camera to Bulb Mode and use a shutter release to trigger your shutter.
- Take the shot: Take the photo using the remote or the delay mode. Be patient; it’s easy to rush to see the final photo, and one of the main mistakes is stopping the shutter before the required time, resulting in underexposed images. Double-check the focus and the histogram. If the daytime long exposure photo is too bright or too dark, go back, adjust, and repeat!
This is a flexible workflow. Depending on your long exposure photography gear and skills, you may skip some steps or add more. It’s just a matter of time and practice until you develop your own workflow.
Best settings for daytime long exposure
The camera settings for daytime long exposure don’t differ much from the generic photography basic settings, so a properly exposed photograph will be determined by the aperture, shutter speed, and ISO.
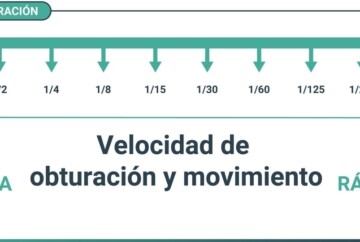
However, the most important setting in long exposure photography is the shutter speed, which is usually longer than usual.

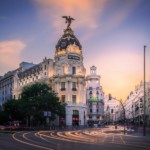
Best settings for daytime long exposure. Madrid, Spain – 55 sec. f/8, ISO 100
The basic parameters you must consider when shooting daytime long exposure photography are:
- ISO: To get the best quality image, avoiding digital noise, and have the best dynamic range, you should use the native ISO in your camera. The native ISO is usually 100 or 200, but it can change depending on the model.
- Aperture: Choose an aperture between f8-f13. Working within these aperture values around the sweet spot of your lens, you’ll see the best quality and sharpest photos. I highly recommend not using apertures over f16 to avoid optical diffraction.
- Shutter speed: the core of daytime long exposure photography. You will have to adapt this setting depending on the shooting conditions and the ND filters that you are using. Don’t forget that if the exposure time that you need is longer than 30 sec., you’ll need to change your camera mode to Bulb and use a shutter release.
These settings are the basics to shoot daytime long exposure photography, but I also suggest reading this long exposure photography guide if you want to dive deeper into this topic.
Best ND filter for daytime long exposure
Using an ND filter for daytime long exposure photography is (almost) mandatory. Unlike the long exposure night photography, the main challenge of this photography genre is the large amount of light that reaches your camera’s sensor. Neutral Density filters block the harsh light that reaches your camera’s sensor, which may require you to use a longer shutter speed.
The best filter for a daytime long exposure is the one that adapts better to the circumstances you are shooting in, and it will depend on your subject, light and the final result you have in mind.

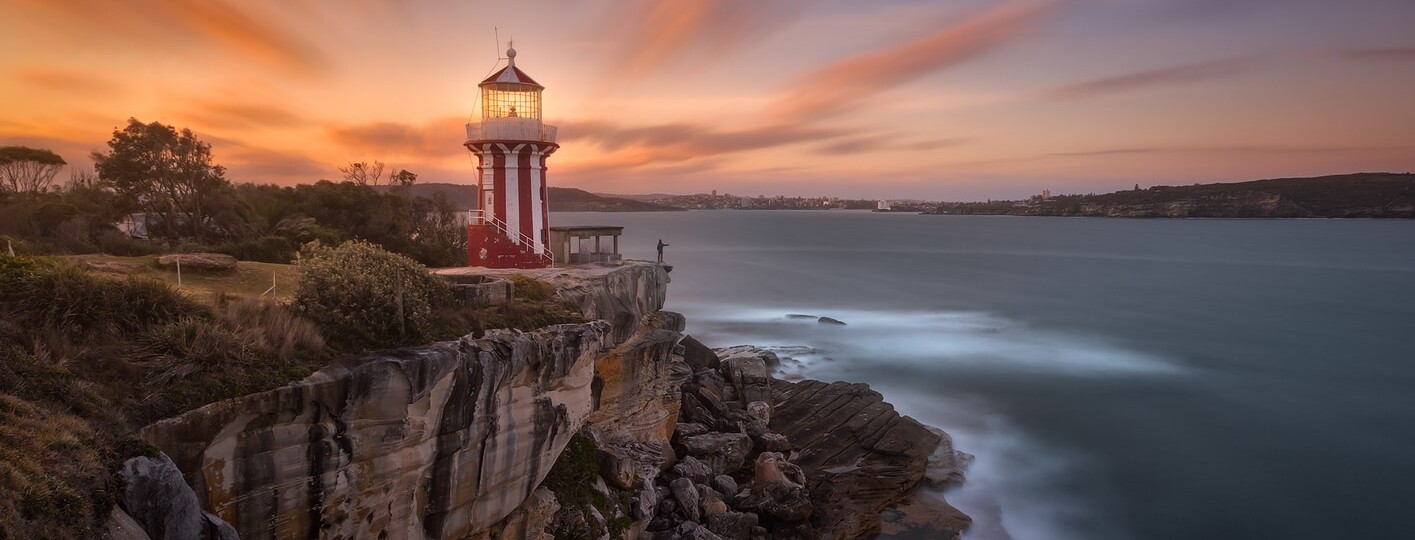
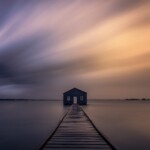
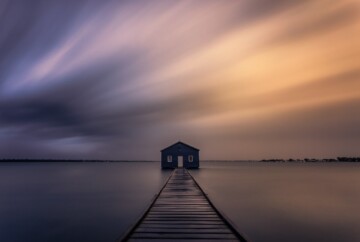
Best ND filter for daytime long exposure. Perth, Australia – 240 sec. f/11, ISO 50
The most common daytime long exposure ND filters are:
- 10-stop ND filter (ND 3): This is the most common ND filter in daytime long exposure photography. Thanks to this filter, you can take long exposures even in harsh light at noon, and it has a big visual impact on the images. It’s the perfect filter to create the minimalist and dreamlike atmospheres typical of long exposure photography.
- 6-stop ND filter (ND 1.8): If your goal is to maintain some detail of the moving elements, then this is the lens filter for daytime long exposure to go for. Ideal when shooting seascapes or waterfalls.
- 15-stop ND filter (ND 4.5): Generally used to capture daytime ultra-long exposure photographs, with exposure times over 5 minutes in daylight.
Some filter holders allow you to use 2 or 3 filters at the same time, so you can achieve a similar result using a 10 + 6-stop ND filters instead of a 15-stop ND filter. (Just make sure there are no light leaks between the filter gaps).
ND Filters are usually expensive, but even though you can find cheap filters, my recommendation is to invest in a good quality 10-stop ND filter for long exposure photography in daylight. If you want to know more about different types and brands, you can take a look in our in-depth guide to lens filters in photography.
Daytime long exposure photography tips
We have gone through the main basics of shooting long exposure photography in daylight, but we are not done yet. Daytime long exposure photography requires a lot of trial and error, and it can be frustrating when you first try it.

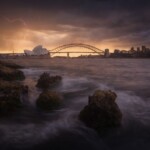
Daytime long exposure photography tips. Sydney, Australia – 240 sec. f/11, ISO 50
To help you succeed and enjoy it, below you’ll find some of the best daytime long exposure photography tips:
- Open your eyes: Before setting the tripod or taking any pictures, observe and analyze your surroundings in advance to look for the best composition. It’s also helpful to avoid people walking in front of your camera when shooting very long exposures in daylight.
- Use a sturdy tripod: The most important gear for daytime long exposure photography. Check this article out to understand how important it is to use a tripod while taking long exposure photos in daylight.
- Shoot in Raw: To get the best quality files. That way you’ll have more data to play with in post-processing.
- Turn off the Image Stabilization (IS): Otherwise, your lens will try to counteract any movement, adding blur to your final photos.
- Look for any light leaks: Light leaks are very common in daytime long exposure photography. To avoid any unwanted flare in your photos, cover the viewfinder and the space between the ND filters.
- Focus before setting up the ND filters: Focusing with the filters on will be quite difficult, as they block the light. So, first of all, focus, then take a test shot to double-check the focus, and, lastly, turn the autofocus off.

Tips for long exposure photography in daylight. Perth, Australia – 232 seg. f/10, ISO 100
- Use a shutter release cable or the Exposure delay mode: To prevent any vibrations in your camera and blur in your photos. An intervalometer is another helpful accessory for daytime long exposure in order to set up more parameters besides the shutter speed.
- Use a long exposure calculator: There are a lot of helpful apps to calculate the shutter speed for your long exposure photos during the day. You can check how to use them and see a couple of examples here.
- Reduce the noise in post-production: Taking daytime long exposure photographs with exposures over 5 minutes could create some noise in your photos because of the heat of the sensor. To minimize the noise, use low ISOs. If your photos have some noise, don’t worry; just take a look at the best noise reduction software here. Currently, I’m using Topaz DeNoise AI.


Daytime long exposure photography without nd filter
Taking long exposure photography in daylight with no filters is challenging, and you won’t get the same results as using an ND filter. However, if, for any reason, you are not able to use any filters, you can try these daytime long exposure settings without filter:
- Push down your ISO to your camera’s minimum (ISO 50 in Canon or ISO 32 with Nikon)
- Close your aperture to the minimum of your lens, like f22 or f36
With these settings, you can use a longer shutter speed, but keep in mind that it’ll result in lower-quality images due to optical diffraction and smaller dynamic range in your photos.
Another alternative to doing long exposure during the day without ND filter is taking a certain amount of photos of the same scene and merging them in Photoshop as a smart object with the blend mode “Median” or “Mean”.
Daytime long exposure photography ideas
Daytime long exposure photography is not just about knowing the right settings and having the proper gear. To succeed in taking long exposure photographs in daylight, you have to go a step forward, visualizing and creating the photo you want in advance.
Having an idea of the final photo by considering all the elements that you want to include in your photos is crucial. Being creative and trying new things will make your photos stand out from the rest of the daytime long exposure pictures.
Being creative isn’t always easy, so a good source of inspiration always helps.
To give you some inspiration, below you’ll find some daytime long exposure ideas:

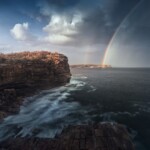
1. Daytime Long Exposure Photography Ideas – Cliffs. 2sec. f/11, ISO 100

2. Daytime long exposure photography ideas – Calm Sea (Minimalist). Sydney, Australia – 240 sec. f/11, ISO 125

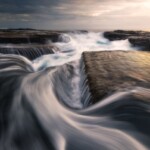
3. Daytime long exposure photography ideas – Textures in water with movement. North Narrabeen, Australia – 1/3 sec. f/13, ISO 100

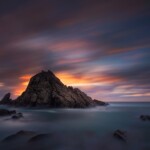
4. Daytime long exposure photography example – Clouds moving fast. Sugarloaf Rock, Australia – 105 sec. f/13, ISO 100

5. Example daytime long exposure photography – Thunderstorms. Sydney, Australia – 1.6 sec. f/11, ISO 50

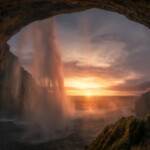
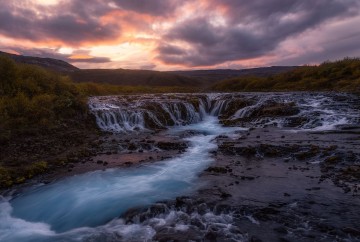
6. Daytime long exposure photography example – Waterfalls. Iceland – 1/15 sec. f/13, ISO 100

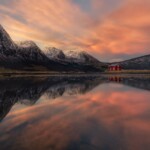
7. Daytime long exposure photography examples – Reflections. Lofoten Islands, Norway – 25 sec. f/11, ISO 100
Conclusion
Daytime long exposure photography can help open a new world of photographic possibilities from a different point of view, plus the best thing: capturing something that our eyes can’t see.
The creative opportunities using this technique are limitless, and even though it can seem like a challenging type of photography, knowing the basics, such as the camera settings for daytime long exposure or the best ND filters to take long exposures in daylight, will help you take any image you can imagine.
I really hope this daytime long exposure photography tutorial helps you and encourages you to go out and try this fascinating genre.
Let us know if you have any questions in the comments below, and don’t hesitate to share this guide if you think it could help other photographers who are interested in daytime long exposure photography!


Mr Dan
Am using a 1300d canon camera, so my question is :
Will my images be the same as yours?
By the way am still young on this game,
Peter,
Regardless of your camera, you can capture great daytime long exposures, so I highly recomment to learn and practice as much as you can 😉
Amazing .. the editing also looks so beautiful, it’s as important as how you compose the shot .. I wonder if there’s a workflow in YouTube or somewhere else on how the photographer edit these wonderful images .. thanks
you used a 10 stop filter on the pictures .
Josef,
In some images, yes. I only use the 10 stop filter when it’s midday or when I need a very long exposure (20 seconds or more).
Best,
Dan
“I was wondering what ND filter was used for these amazing clicks.I tried but it has blue-ish effect.
If you can suggest one good ND filter for Day (Canon 70D)”
Most ND filters will alter your white balance a bit, usually toward the blue. I use a color meter (which are $$$) and adjust the color temperature on the camera. This is the most precise method. An alternative method is just to set your WB on auto.
You’re right Scott! 😉
I was wondering what ND filter was used for these amazing clicks.I tried but it has blue-ish effect.
If you can suggest one good ND filter for Day (Canon 70D)
I use Lucroit filters for the main reason that they are high-quality don’t have any horrible cast like other filters. You can find more information about the filters I use here.
Great article and the pictures are beautiful. When you say “daytime long exposure” is it around sunrise/sunset for these pictures?
Thanks Erin!
With Daytime we refer to all the images taken from sunrise to sunset 😉
Happy shooting!
Dan