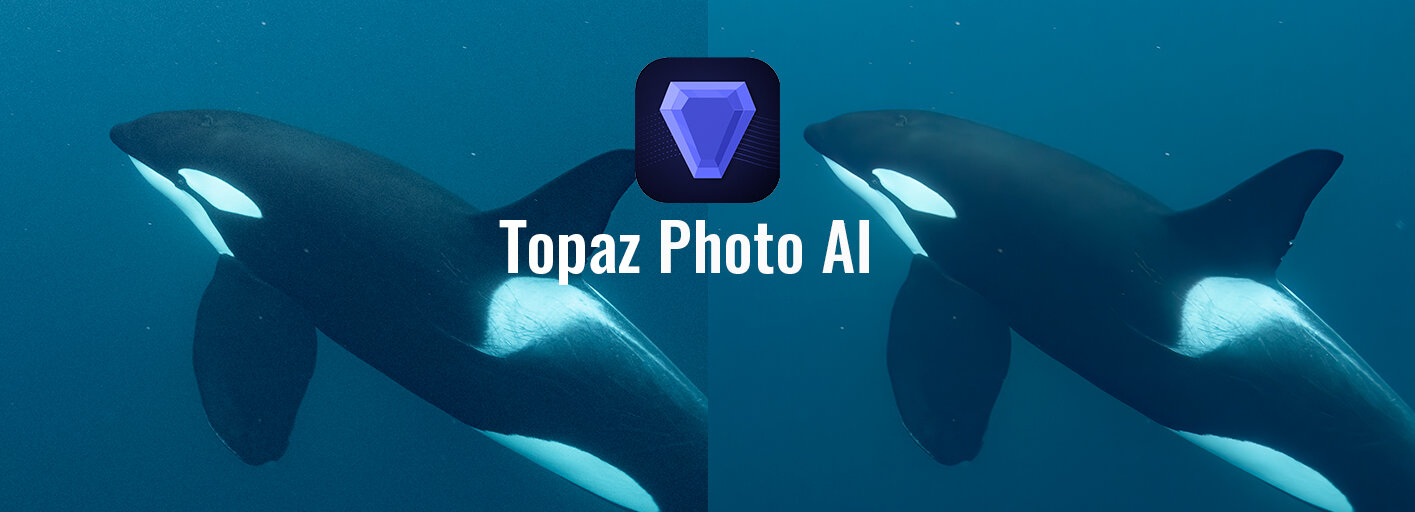


Topaz Photo AI is the newest addition to Topaz Labs’ lineup of photography-enhancing software. Topaz Photo AI combines all of Topaz Labs’ best image enhancer tools to automatically detect and fix quality issues using artificial intelligence.
This new piece of software also incorporates some new features, such as Autopilot, to make the process easier. In this Topaz Photo AI review, you’ll find an in-depth analysis and tutorial on how to use Topaz Photo AI to fine-tune your images!
I’ve been using Topaz Labs’ software for years and my experience has been great so far, but there are a few quirks that I’ll get into in this article. From the day I got my hands on Topaz Photo AI, I’ve been running multiple tests and using it on my workflow over the last few months and I must say it’s an amazing piece of software, but it has a few flaws that I’ll get into during this article.
Is Topaz Photo AI the ultimate photo enhance AI software to rule them all? Keep reading to learn more!
What is Topaz Photo AI?
Topaz Photo AI is an all-in-one tool to reduce noise, sharpen, and enlarge your photos by using artificial intelligence. It achieves this by using an easy-to-use and intuitive interface and with the addition of a new feature Topaz Labs is calling Autopilot, which I explain in more detail later in the article.

Topaz Labs has brought together some features from Denoise AI, Sharpen AI, and Gigapixel AI into one powerful tool to make your workflow quicker and easier. The key aspect of all these pieces of software is the algorithms based on artificial intelligence which allows all the benefits of reducing noise, sharpening, and enlarging your photos, without the traditional caveats, such as loss of image quality.
All these features make Topaz Photo AI an advanced piece of software; however, there are a few things worth mentioning if you are planning on purchasing this software.
Let’s find out more about Topaz Photo AI!
How to use Topaz Photo AI – Full Tutorial
Topaz Photo AI is intuitive and easy to work with. In this Topaz Photo AI tutorial, I’ll break down how to use Topaz Photo AI in a few simple steps.
Topaz Photo AI Download and Installation
-
- Download and install Topaz Photo AI: you can either download Topaz Photo AI for free and try it for a limited period of time or download the full version of Topaz Photo AI right away. Topaz Photo AI is compatible with both Windows and macOS. In both cases, download the installation file and follow the instructions on the screen to complete the installation successfully.
- Once the installation is complete, Topaz Photo AI will be installed both as a standalone program and as a plugin for Lightroom, Photoshop, and Capture One.
- Run Topaz Photo AI: if you’ve purchased the software, you can log in to your Topaz account to apply the license. Otherwise, you can start the trial period.
After you’ve successfully completed the installation process, it’s time to learn how to use Topaz Photo AI!
Topaz Photo AI Autopilot
Autopilot is a brand-new feature added to Topaz Photo AI. Autopilot will automatically detect, with artificial intelligence, which aspects of your image need improvement and will apply the best adjustments. Autopilot is enabled by default and will run automatically as soon as you import an image. It is the first element you’ll see in Topaz Photo AI’s interface.
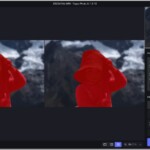
Autopilot can also detect many kinds of subjects and faces and apply automatic local adjustments.

Autopilot in Photo AI can help make your workflow quicker
Autopilot is really useful if you want a quick fix; however, you can still fine-tune each adjustment to your liking.
How to remove noise with Topaz Photo AI
One of the many things you can do with Topaz Photo AI is to reduce the digital noise in your images, similar to the way you’d do it with Topaz Denoise AI. Follow these simple steps to effectively reduce noise in your images using Topaz Photo AI:

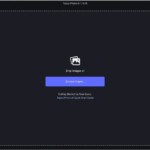
Import your images into Topaz Photo AI to start editing
-
- Open Topaz Photo AI.
- Drag and drop or browse to find your image.
- Autopilot will automatically apply basic adjustments.
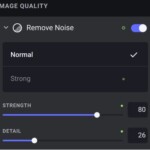
- Extend the noise module and choose between normal noise reduction or strong noise reduction. I generally recommend normal, but that depends on the image. You’ll then find two sliders:
- Strength: adjusts the amount of noise reduction to be applied.
- Detail: adjusts the amount of detail to be recovered.
-

Noise reduction module
- Adjust these settings until you’ve reached the desired result.

Note: the “Normal” and “Strong” options for noise reduction won’t show if you are using a RAW file.
Topaz Photo AI uses a simplified version of Denoise AI, which only gives you two AI models five models offered in Topaz Denoise AI. These AI models usually get the job done; however, I personally prefer having the flexibility that comes from having multiple options. Later in this article, I compare Topaz Ph0to AI and Denoise AI noise reduction capabilities to see which one delivers the best results. To learn more about this software, check out my Topaz Denoise AI Review where I also included a complete tutorial. If you are looking for a more advanced workflow, this might be the best software for you.
How to Sharpen Images with Topaz Photo AI
Topaz Photo AI also allows you to sharpen images that are slightly blurry or out of focus. Once again, this module is very easy and intuitive. Here is how to sharpen an image with Topaz Photo AI:
-
- If you already have an image open, then scroll down to the “Sharpen” module, otherwise, import an image and then scroll down to the “Sharpen” module.
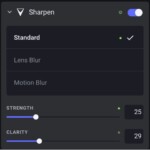
- Extend the “Sharpen” module and you’ll find three different sharpening options:
- Standard: this option is best in most cases where you just need to improve the overall sharpness of an image.
- Lens blur: this is the best option for images that are blurry due to a lack of sharpness of the lens.
- Motion blur: you should choose this option if the blurriness on your image is caused by movement.
- Adjust the strength and clarity sliders to obtain the desired result:
- Strength: targets the overall sharpness of the image.
- Clarity: targets and fixes fine details.

Sharpen your image in Topaz Photo AI
Note: If your image contains a face, Photo AI will recognize it and then you’ll be able to select the “Recover Faces” option to enhance the detail in faces, otherwise this setting will be locked.

Topaz Photo AI allows you to recover detail in faces
If you are looking for a more advanced tool to sharpen your images, you should check out my Topaz Sharpen AI review. This software provides multiple tools and AI models to achieve the best results in your images.
How to Enlarge Images with Topaz Photo AI
Finally, you can upscale your images and enhance the resolution using Topaz Photo AI. There are two separate sections in Photo AI that will help with your image size. Let’s see how they work.
-
- Continue on the same image you’ve been working on or import a new image.
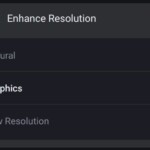
- Scroll down to the “Enhance Resolution” section.
- Choose the kind of input image between:
- Natural
- Graphics
- Low Resolution
- Topaz will then generate new pixels by using artificial intelligence. This step should be done before upscaling the image.
-

Topaz Photo AI uses AI to generate pixels and enhance image resolution
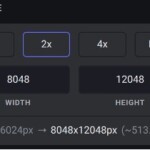
- To upscale the image, scroll to the final section of the software, “Upscale”.
- Choose the upscale size between the four available options.


Just like in Gigapixel AI, you can upscale your images in Topaz Photo AI
This is a much more simplified version of Topaz Gigapixel AI. Read my review on Gigapixel AI to find out more about its features. Topaz Gigapixel AI provides a much wider array of options to upscale your images.
Using Topaz Photo AI Plugin for Lightroom
After installing the software, you’ll have the option of running the Topaz Photo AI plugin for Lightroom. This plugin makes it easier to implement this software into your current editing workflow.
Follow these simple steps to run Topaz Photo AI from Lightroom:
-
- Open Lightroom.
- In the Develop module, select the photo you’d like to improve.
- Right-click on the image > Edit in > Topaz Photo AI.
- In the pop-up window, choose “Edit a copy with Lightroom adjustments”, then click “Edit”.
- Adjust the image to reduce noise, sharpen, or upscale in Topaz Photo AI.
- Once you’ve finished in Topaz Photo AI, click on “Save to Adobe Lightroom Classic” to return to Lightroom.

You can run Topaz Photo AI directly from Lightroom Classic
Note: I recommend editing a copy with Lightroom adjustments. The difference between editing the original RAW file and a Lightroom copy is negligible. However, Lightroom is a RAW editor and will always treat RAW files better than Photo AI.
Using Topaz Photo AI Plugin for Photoshop
If you are a Photoshop user, instead of Lightroom, there is also an alternative for you. Topaz Photo AI also incorporates a Photoshop plugin which comes in very handy. Topaz Photo AI becomes even more powerful when combined with Photoshop layers and masking.
The steps to run Topaz Photo AI in Photoshop are very simple:
-
- Open your image in Photoshop.
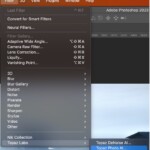
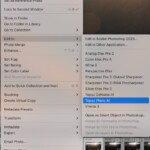
- Click on Filter > Topaz Labs > Topaz Photo AI.
- Adjust the image in Photo AI.
- When you’ve finished, click on “Save to Adobe Photoshop”.
- Photo AI will save the adjustments to your layer in Photoshop.

You can also run Topaz Photo AI as a filter in Adobe Photoshop
Note: I suggest creating a duplicate of the pixel layer before applying the Topaz Photo AI filter. This will ensure your workflow stays non-destructive.
Note 2: Both with Photoshop and Lightroom, if you want to run your image through Photo AI, don’t apply any previous noise reduction or sharpening settings. This will ensure Photo AI delivers the best results possible.
Topaz Photo AI Before and After Review
In this Topaz Photo AI review, I’ll be showing you some before and after examples so you can see by yourself some results that I got by using this software.
So far, I’m really pleased with the results, even just using the default settings. Topaz Photo AI doesn’t give you as many options as the separate programs, but if you are looking to speed up your editing workflow with a couple of easy clicks, this might be a great option for you.
Let’s see how it does in different photography genres and enhancing modes:
Topaz Photo AI for Noise Reduction
Despite having a very limited set of AI models, Topaz Photo AI is capable of delivering excellent results when it comes to noise reduction in your images. After extensive testing, I consider Topaz Photo AI to be among the best noise reduction software in the market. It is still behind competitors like DxO PureRaw or Topaz Denoise AI, but it is also much younger, and with future software updates, it’ll definitely catch up.


Original image (left) – Topaz Photo AI (right)
Topaz Photo AI for Sharpening Images
Using Topaz Photo AI to sharpen your images is definitely worth it. Once again, since Topaz Photo AI offers a simplified version of Topaz Sharpen AI’s tools, you won’t have all the AI models and flexibility to adjust your image; however, the results are generally very good. I noticed that sometimes it tends to oversharpen and creates strange artifacts, but that can be adjusted with the strength sliders.


Original image (left) – Topaz Photo AI (right)
Topaz Photo AI for Upscaling Images
Topaz Photo AI upscale feature also works great. The look Topaz Photo AI delivers after enlarging the image is very natural, without any oversharpening. After testing multiple images from different genres, I realized that it does a remarkable job regardless of the type of image. It excels at wildlife and portraits mainly, and it works better with RAW files than other formats.


Original image (left) – Topaz Photo AI (right)
Topaz Photo AI in Portrait Photography
Topaz Photo AI in portrait photography does an exceptional job. Autopilot effectively detects the subject and the face in the photograph, and even the default settings make a great difference.
It also has a feature to recover faces which will improve the overall sharpness and details of facial features. I’ve found that this last feature tends to overdo both sharpness and softness a little too much so I haven’t used it too often.


Original image (left) – Topaz Photo AI (right)
Topaz Photo AI in Wildlife Photography
Throughout my tests, I’ve noticed that Topaz Photo AI delivers the best results when applied to wildlife photography. However, in this case, I recommend turning on the sharpening and choosing the best sharpening model for your image.


Original image (left) – Topaz Photo AI (right)
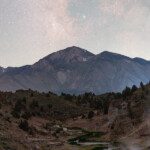
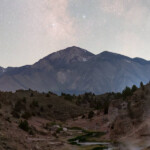
Topaz Photo AI in Astrophotography
The results I’ve obtained from using Topaz Photo AI in astrophotography are very consistent with the quality I’ve enjoyed over the years with Denoise AI. Denoise AI has been an integral part of my workflow over the past few years, and my expectations for noise reduction in Photo AI were very high.
Denoise AI still provides more options and is more versatile, but if you are looking for a quick fix for the noise in your images, Topaz Photo AI does a pretty good job.


Original image (left) – Topaz Photo AI (right)
If you are into astrophotography and like photographing the Milky Way, I encourage you to download our free Milky Way calendars which will help you to plan your next epic photo!
GET THE CALENDAR WITH THE BEST DATES TO PHOTOGRAPH THE MILKY WAY IN 2026
You'll also receive our PDF guide to photographing the Milky Way!

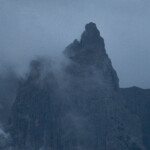
Topaz Photo AI in Landscape Photography
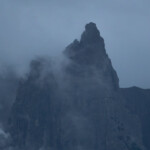
Topaz Photo AI does a good job in landscape photography. However, I’ve found the lack of more settings a bit problematic because I didn’t always like the results. I’ve noticed Photo AI struggles mostly with photos with clouds where the artificial intelligence has a hard time retaining the detail.


Original image (left) – Topaz Photo AI (right)
Topaz Photo AI vs. Denoise AI, Sharpen AI and Gigapixel AI
After thoroughly testing Topaz Photo AI and using Denoise, Sharpen and Gigapixel AI for years, the results I’ve seen with these programs are very consistent. When using default settings, I could notice the difference between the results shown by each software, this came as a surprise since I was expecting little to no difference; after all, all these programs were developed by the same company. Keep reading and compare the results by yourself!

Topaz Photo AI vs. Topaz Denoise AI
When it comes to noise reduction Topaz Denoise AI still delivers better results; however, not by much and you also have to fiddle with the sliders a bit more. While comparing default settings, Topaz Photo AI offers better results, which is ideal for photographers who don’t want to, or have the time to refine each detail.

Topaz Photo AI (left) vs. Topaz Denoise AI (right)
Topaz Photo AI vs. Topaz Sharpen AI
Once again, Topaz Photo AI puts up a decent fight against Sharpen AI. Despite having fewer adjustments to work with, the results from Topaz Photo AI when it comes to sharpening images are very close to what Sharpen AI can offer; however, the results delivered by Sharpen AI look more natural; Topaz Photo AI tends to oversharpen sometimes, and the subject detection isn’t always that reliable.
Topaz Photo AI (left) vs. Topaz Sharpen AI (right)
Topaz Photo AI vs. Topaz Gigapixel AI
When comparing Topaz Photo AI to Gigapixel AI I found that Gigapixel AI delivers sharper results, which you can tone down with the adjustment sliders. Topaz Photo AI features four different AI models (standard, high fidelity, graphics, low resolution) which will cover most of the scenarios you’ll encounter. Gigapixel AI has the same models, plus two more (lines, very compressed) which I don’t find myself using that often. Apart from that, everything else is very similar between the two.
Topaz Photo AI (left) vs. Topaz Gigapixel AI (right)
The biggest difference when comparing Topaz Photo AI vs. Denoise AI, Sharpen AI and Gigapixel AI, is the simplicity of Photo AI and the possibility to do all the enhancements from one single place instead of having to open multiple programs, this is great when it comes to speeding up the editing workflow; however, the lack of settings is a downside if you want to be more detailed and achieve the best possible results.
Topaz Photo AI Discount and Price
Topaz Photo AI retails for $199 for a lifetime license, but Topaz runs regular sales, so you can find it discounted.
The price might seem high at a first glance, but when you consider that you are getting the key features of Denoise AI, Sharpen AI and Gigapixel AI all in one simplified suite, it’s more than worth it. If you decided to buy Denoise AI, Sharpen AI and Gigapixel AI separately, it would cost $260.
If you want to learn more about Topaz Labs’ software, I encourage you to read the reviews I’ve written:
Conclusion – Is Topaz Photo AI Worth it?
| Topaz Photo AI does an exceptional job at improving the quality of your photos in most cases. It has a user-friendly interface with simple and intuitive settings and plenty of automated functions. However, Topaz Photo AI incorporates simplified versions of DeNoise, Sharpen, and Gigapixel AI, and you won’t have as many tools as in the standalone versions of this software. |
My experience with Topaz Photo AI has been great, just what I was expecting. As a landscape astrophotographer, I’m always looking for ways to make my editing workflow more efficient and Topaz Photo AI helps me in that aspect.
So, who is Topaz Photo AI for? Topaz Photo AI is for any photographer who wants to spend less time fiddling around with settings and wants a tool that will deliver quality results quickly. If you fit into that category, then Topaz Photo AI is completely worth it. On the other hand, if you want to have complete control over every setting, then Denoise AI, Sharpen AI and Gigapixel AI as individual programs might be better for you.
I hope you found this Topaz Photo AI review helpful and, If you have any questions about Topaz Photo AI, feel free to leave them in the comments!


Is Topaz Photo AI 2 more versatile than the original Photo AI?
It has more advanced algorithms and it’s a more well-rounded software. I think it’s the main reason why Topaz has discontinued DeNoise and Shapen AI.
Dear Dan:
I have enjoyed your photo tour images. You are a photographer after my own heart. Thanks for sending your brochures.
I use GIMP, Darktable, Lightroom part of Darktable, and Canon Photo Professional to do my photo editing. Is Topaz compatible with any of those editors?
Joseph
Thank you, Joseph! I’m afraid Topaz Photo AI is just available as a standalone sofware or as a plugin for Lightroom and Photoshop.
Best,
Dan
Hi Dan, Can I save my photos after processing without losing the original Raw photo?
Dave, Cornwall, UK.
Hi Dave,
Yes, you’ll always have your RAW file available. This is true for Topaz Photo AI or any other editing software for that matter, they always save the adjustments either as metadata or in a separate file different from the RAW file.
Thanks for your comment!
I agree with you, Dan. I shoot a lot of my Canon R3 full frame RAW images with a wide variety of subject matter in low light — sometimes very low light. I also shoot almost exclusively hand-held and with natural light. I used to use Topaz DeNoise AI plugin to Adobe’s Lightroom Classic to tweak and remove the ever-present noise, ranging from Standard all the way down to the two lowest light presets, but lately I’ve been using Topaz Photo AI more and more. With every update, that program is getting better and better, greatly reducing my need to use the manual tools in Topaz DeNoise AI and the other plugins. Right now I am editing a group of photos that I took at night for my review of SUPER NINTENDO WORLD at Universal Studios Hollywood. If you and your readers would like to see those low-light photos, here is a link to where they will be posted on my AutoMatters & More website at (AutoMatters.net). If you wait a day or do and then enter SUPER NINTENDO WORLD in the search bar in the middle of my Home Page , that column should come up as a choice.
Jan
Jan,
Thanks for sharing this about your experience with Topaz!
Does Topaz Photo AI work offline? What is the privacy related to my photos? Do they get uploaded for processing? Thanks!
Bob,
Yes, it works offline and your photos are safe; you can decide if they can be used for improving the software or not, but they won’t be stolen 😉