
| IMPORTANT NOTE: Topaz Shrapen AI is now part of Topaz Photo AI and can no longer be purchased as standalone software. You can use this article to learn how to use Topaz Sharpen AI if you already own it. Note that Topaz Labs is not going to release any new updates for this software. Read our Topaz Photo AI review article to learn more about this software. |
In this 2022 Topaz Sharpen AI review, I will show you how to fix your blurred photos quickly and effectively with this sharpening software from Topaz Labs.
Topaz Sharpen AI is a powerful tool that sharpens and enhances the original details of your photographs by using the most advanced AI technology. It is a simple piece of software that achieves stunning results from fixing and recovering out-of-focus images. However, the new update is not as intuitive due to the different AI Models, so it requires some knowledge and experimenting to understand how it works.
My experience after using Sharpen AI for many years has been superb and today, it is a must in my post-processing workflow. In my opinion, it is by far the best software to fix out-of-focus images. In this Topaz Sharpen AI tutorial, you’ll see a step-by-step guide so you can get the best results from this software on its latest version 4.0.2 (released in March 2022).
Ready to learn all the pros and cons of using Topaz Sharpen AI?![]()
- What is Topaz Sharpen AI?
- How to use Sharpen AI? Sharpen AI Tutorial
- Using Sharpen AI as a plugin for Lightroom
- Using Sharpen AI as a plugin for Photoshop
- Topaz Sharpen AI Before & After Review
- Sharpen AI review – Pros and Cons
- Topaz Sharpen AI Discount
What is Topaz Sharpen AI?
Topaz Sharpen AI is an excellent sharpening tool and an effective shake reduction software created by Topaz Labs. This well-known company implements the latest artificial intelligence technology to fix post-processing issues like digital noise or blurriness.
The main difference between Topaz Sharpen AI and other sharpening tools is the continuously updated AI technology that targets three different types of blur: motion, focus, and softness. While traditional methods detect and brighten edges, which creates halos, fringing, and an unnatural look, Sharpen AI can deblur images without increasing digital artifacts.
I tried to fix my blurred photos with many different editing tools, as you can see in this Deblur software comparison, and Topaz Sharpen AI is, without a doubt, the best blur reduction software on the market. You can use the standalone version or the Sharpen AI plugin for Photoshop or Lightroom.
You can watch a great, short video by Topaz here that explains what Sharpen AI is and what the main tools of this software are.
How to use Topaz Sharpen AI – Sharpen AI Tutorial
Topaz Sharpen AI might look daunting but, trust me, it is easy to use. In this section, you’ll see, in a few simple steps, how to use Topaz Sharpen AI:
Sharpen AI download & installation
- Download and install Topaz Sharpen AI: go to Topaz Labs and choose your Operating System; Topaz Sharpen AI supports Windows and Macintosh OS. Download the installation file and run the installation process. This procedure could take a while due to some automatic downloads that are needed to complete the installation.
- Once the process above is finished, Topaz Sharpen AI (standalone version) will be added to your applications. The Sharpen AI plugins for Photoshop and Lightroom will also be added automatically. If not, you will have to add them manually. If not, click on Help > Install Photoshop Plugin.
- Log into your Topaz Labs account or try the Sharpen AI 30-day free trial.
Now, let’s get into more detail on how to use the Topaz Sharpen AI in its different versions:
How to deblur images with Sharpen AI
This is a summary of how to fix blurred photos using Topaz Sharpen AI:
- Run Topaz Sharpen AI (standalone version).
- Open or drag your image.
- Select a sharpen model or use the suggested model.
- Adjust the Model settings.
- Apply selective adjustments.
- Add grain to make your images look natural.
- Save your new image with your preferred output options.
Note: Topaz recommends using Topaz Sharpen AI just after Topaz DeNoise Ai in case your photos have some digital noise that you want to eliminate. If you don’t need to reduce any noise, run Topaz Sharpen AI after your usual basic adjustments (color profile, white balance and lens profile correction).
Topaz Labs is constantly improving their software, making it faster and better with continuous AI updates. A good example of this constant progression is the latest Sharpen AI update, V.4.0.2, which includes a redesigned interface, a new Standard AI model, native support for Apple M1 devices, and overall performance upgrades.
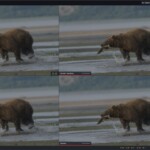
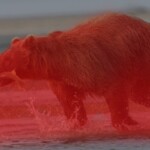
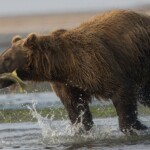
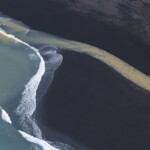
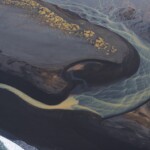
For this Sharpen AI review, I’m using a test shot and the latest version of Sharpen AI (v.4.0.2, released in March 2022). The image of the brown bear was taken in Alaska with a Sony A1 at 600mm using the following settings: f/8, ISO 640, 1/640s.

Sony A1 – 600 mm f/8, ISO 640, 1/640s
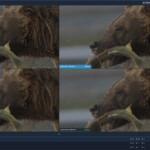
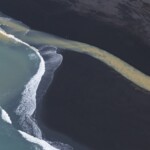
At this size, the image might look ok, but if we zoom in, we can see that it’s soft and slightly out of focus since I didn’t use a fast enough shutter speed. Here you can see a 100% crop:

100% crop
To fix blurry photos with Sharpen AI, it’s crucial to analyze your image to see the type of blurriness you have in your picture and apply the correct Topaz AI sharpen mode.
In this example, the bear has some motion blur due to a low shutter speed in relation to the focal length used and the movement of the subject. Also, there is a bit of noise, so I’d highly recommend reducing the noise first with Topaz Denoise AI. Now that we know where the blur is coming from, let’s see how to fix it:
This is the new Topaz Sharpen AI standalone interface:

Topaz Sharpen AI interface
To get started, open or drag your photos into Sharpen AI. The updated version comes with Batch Processing, so you can open multiple images and apply the same settings to a group of pictures with similar settings and blurry issues.
In the upper right-hand corner, you will find a toolbar with these options:
PREVIEW OPTIONS
To switch the view mode of your photos, you can choose any of the following options:

Top Toolbar view in Sharpen AI
- Original (original photo preview)
- Single (photo preview adjusted by Sharpen AI).
- Split (Original and sharpened photo preview with a split slider)
- Side by Side (Original and processed photo preview)
- Comparison (Check how the different Sharpen Models work in your photos).
ZOOM
To analyze the processed image more precisely, zoom in on your images.
On the right side, you’ll find the following Sharpen AI tools:
- A navigator with the chosen zoom box
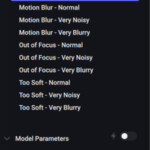
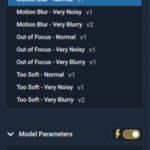
- The different AI-powered Sharpen Models:
- Standard
- Motion Blur – Normal
- Motion Blur – Very Noisy
- Motion Blur – Very Blurry
- Out of Focus – Normal
- Out of Focus – Very Noisy
- Out of Focus – Very Blurry
- Too Soft – Normal
- Too Soft – Very Noisy
- Too Soft – Very Blurry
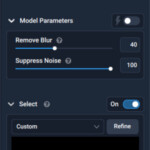
- Model Parameters, to fine-tune the adjustments.
- Select, to apply the adjustments locally.
- Post-processing slider to add grain to recover the natural look of your images.
- Save Image with your selected output settings.

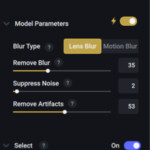
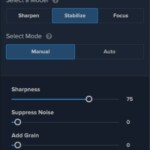
Sharpen AI Models and settings panel in Sharpen AI
Sharpen AI workflow recommendation
The key to using Sharpen AI is to choose a sharpening mode according to the type of blur you have in your photo. A good starting point is to use the suggested mode to determine the best AI Model for your image automatically. My recommendation to get the best results with Topaz Sharpen AI is to use the new comparison view, to check and compare different Sharpen AI models or even the same Sharpen model with different adjustments.

Use the comparison view to check which Sharpen AI Model works best
The Sharpen AI Models are divided into three main categories and one Sharpen AI Standard mode to rule them all:
- Too Soft: Sometimes, your photos are not blurry or out of focus, but they are soft out of camera. This mode helps sharpen your images naturally without adding any artifacts or halos while enhancing the overall detail in your photos.
- Motion Blur: When blur is caused by a moving subject or camera shake. It is essential to understand the shutter speed you need for each photography genre to avoid these issues.
- Out of Focus: Missing focus is probably the most common problem in photography. Even though it is impossible to fix 100% of your images with this issue, this mode will improve the overall look significantly.
These Sharpen AI models also have three sub-modes:
- Normal: for photos without digital noise or extreme blur.
- Very Noisy: for pictures with severe digital noise.
- Very Blurry: for photos with extreme blur.
Quick Tip: I can’t stress enough the importance of trying all the sharpening modes, checking the results, and seeing which one works best in your image. In my tests and experience, I saw some cases of motion blur where the focus mode worked better and vice versa.
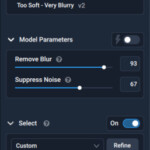
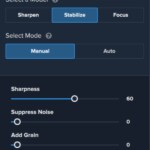
Once you have chosen the Sharpen Model that best fixes your image, you can adjust the following settings:
- Remove Blur: this tool reduces blurriness in your photos using the Sharpen Mode selected above. Try to keep values below 50 to avoid unwanted artifacts or halos.
- Suppress Noise: As I mentioned before, if the noise is severe, use Topaz DeNoise AI first. Nonetheless, Topaz Sharpen AI is also effective in reducing noise.
Regardless of the model you choose, in most situations, your goal is to apply these adjustments locally, and that’s when the updated Sharpen AI masking tool comes in handy.
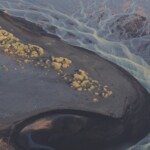
In this example, I want to recover detail in the bear and some of the water splashes, so I’ll create a mask to apply the adjustment in just those areas.
Sharpen AI masking tool
Masking in Sharpen AI is an important step to avoid refocusing unwanted areas in the image and to prevent artifacts and halos. This way, you’ll be applying the Sharpen AI adjustments locally to the areas selected with the mask.
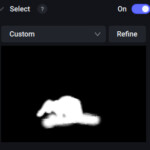
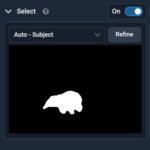
To activate this tool, click on the Select switch to turn this option ON:

Turn on the Masking option and select your subject
Masking is easy to understand: White=shows, Black=hides. Sharpen AI automatically detects the subject in the photo thanks to the new auto-selection tool, and you can even help the software choose to detect a subject, portrait, or landscape automatically.
You will see your subject in white after the automatic selection. If you are not happy with the results of this automatic selection, you can also fine-tune this mask by clicking on Refine.
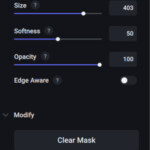
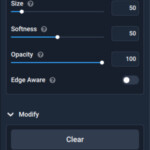
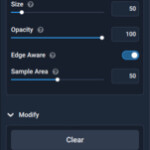
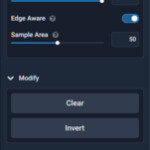
These are the options to refine your mask:

Masking tool adjustments in Sharpen AI
- Select: to automatically choose from the options explained above.
- Brush: to add or subtract painting on your mask.
- Size: to change the size of the brush.
- Softness: to change the hardness of your brush. (0 hardest – 100 softest).
- Opacity: to adjust your adjustments locally, varying the opacity.
- Edge Aware: by turning ON this option, you can help the software detect the edges better. The Sample Area slider changes the radius of the edge-aware tool.
- Modify: to clear or invert the mask.
- Overlay: to show where the mask is being applied in red or another color of your choice.
Once you finish fine-tuning your mask, click on the “update mask” button. This is the mask I created for this example, with the overlay option ON. I modified the opacity in the areas where the adjustments created some artifacts. (Notice how the red intensity varies depending on the opacity of the mask applied.)

Overlay mask in the image
And these are the settings I used for this particular scenario:

Sharpen Standard AI Model
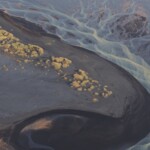
Now, let’s see if Topaz Sharpen AI is worth it or not with this before and after for the above settings :


All the details in the bear and the water have been improved after applying the correct Sharpen AI settings
Using Topaz Sharpen AI plugin for Lightroom
Fixing blurred photos in Lightroom with Topaz Sharpen AI is the fastest and easiest way to improve your blurry images. Lightroom has its limitations and, even though it allows some sharpening, without an external plugin, you won’t be able to remove the blur and recover out-of-focus images.
To use Sharpen AI in Lightroom, follow these steps:
- Right-click on the image you want to fix > Edit In > Topaz Sharpen AI. If asked, always use a copy with the Lightroom Adjustments.
- Apply the adjustments as explained previously.
- Click on Save and wait until the image is processed and imported into Lightroom.

Using Topaz Sharpen AI plugin for Photoshop
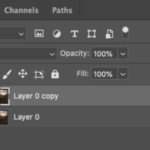
I think fixing your blurry pictures in Photoshop with Topaz Sharpen AI is the best method. You can implement Sharpen AI quickly into your workflow and benefit from several advantages, including creating layer masks to apply the adjustments locally with better results than with the Sharpen AI masking.
To fix blurry pictures in Photoshop with Sharpen AI, follow the steps below:
- Duplicate the layer or create a Smart Object layer to apply non-destructive adjustments.
- Go to Filter > Topaz Labs > Topaz Sharpen AI.
- Make the required adjustments as described above.
- Apply and wait until the photo is processed and imported into Photoshop.

Topaz Sharpen AI before & after review
In this Topaz Sharpen AI review, I’ve covered the process of using this powerful tool, but, is Topaz Sharpen AI worth it? Let’s look at a few more examples of Sharpen AI before and after so you can decide for yourself:
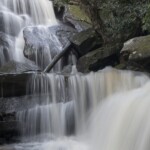
Topaz sharpen AI for landscape photography
When shooting landscapes in low-light conditions or at wide apertures, it’s common to capture soft images. Sharpen AI performs well in understanding the different textures and layers in landscape photos. The new auto-selection landscape mode makes sharpening landscape images with Sharpen AI even easier!


Sharpened details in the landscape after using the “Motion Blur” Sharpen Model
Topaz Sharpen AI for wildlife photography
Sharpen AI is a must for any wildlife photographer. It doesn’t matter what gear or skills you have; sooner or later, you’ll end up with blurred images. The “Motion Blur” and “Out-of-Focus” modes work best when you apply Sharpen AI to wildlife shots.


Refocused wildlife image after using the “Out of Focus” Sharpen Model
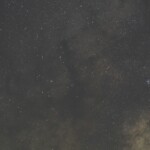
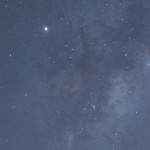
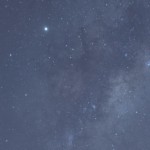
Topaz Sharpen AI for Astrophotography
As I explain in our Milky Way photography guide, you need to use some specific settings to capture pinpoint stars. However, capturing blurry stars is common, and we can use Topaz Sharpen AI to fix Astro photographs. Also, I always use Sharpen AI when I shoot nightscapes with a wide aperture like f/1.8 or f/2.8 so my stars are extra sharp.


Sharpened stars with less noise after using the “Too Soft” Sharpen Model
Topaz Sharpen AI for portraits
Topaz Sharpen AI is the best tool to fix blurry portraits. It allows you to recover and enhance original detail, and, in my experience, this genre is where Topaz Sharpen AI works best.


Refocused portrait after using the “Motion Blur” Sharpen Model
TOPAZ Sharpen AI Pros and cons
In short, these are the main pros and cons of using Topaz Sharpen AI:
| DENOISE AI PROS | DENOISE AI CONS |
|
Topaz Sharpen AI discount and PRICE
Since early 2024, Topaz Sharpen AI has been integrated with Topaz Photo AI. The price of Topaz Photo AI is $199 for a lifetime license, a fair price considering it’s among the best deblur software on the market.
| IMPORTANT NOTE: Topaz Shrapen AI is now part of Topaz Photo AI and can no longer be purchased as standalone software. You can use this article to learn how to use Topaz Sharpen AI if you already own it. Note that Topaz Labs is not going to release any new updates for this software. Read our Topaz Photo AI review article to learn more about this software. |
If you’re a passionate photographer, getting Topaz Photo AI is a great investment. It includes Denoise AI, Sharpen AI, and Gigapixel AI. This is the best software package with Artificial intelligence and will take your post-processing to the next level.

Topaz Labs runs several promotions throughout the year. You can check if there is an offer available here.
If you want to get more info about the other software that’s included in the Topaz Bundle, you should also take a look at my other Topaz Reviews:
The new Topaz Photo AI includes a lite version of Sharpen AI with some deblurring features + other denoising and enlarging adjustments to enhance the quality of your images in autopilot.
Conclusion
Topaz Sharpen AI eliminates blur and fixes out-of-focus images with impressive results in most situations. It’s a very effective software with a user-friendly interface, and the connections as a plugin for Lightroom and Photoshop make its integration into any workflow easier. However, Sharpen AI is not perfect; you need to experiment with the different AI models and masking to avoid unwanted artifacts.
My experience using Sharpen AI for many years has been phenomenal. I usually shoot at wide apertures and capture soft images, and also, some of my wildlife and portrait images have some motion blur. Sharpen AI is a vital tool in my post-processing that I use almost daily, along with Denoise AI.
Topaz Sharpen AI is the best deblur software at the moment, and, if you don’t believe me, just take a look at this blur reduction software comparison, where I tested the 9 most important anti-blur programs on the market.
I hope you found this Topaz Sharpen AI review helpful, and don’t forget that you can get a free 30-day trial!

Please don’t hesitate to leave any questions about Sharpen AI in the comments below!


Utilicé Windows 11 Pro gratis, pero se bloqueó después de una semana, luego busqué y encontré la odosta store, que creo que es un sitio legítimo de Microsoft debido a su servicio posventa.
Sí, ODosta es legítimo, solo tenga cuidado porque algunas de las claves de producto de Microsoft requieren activación dentro de un período de tiempo específico y pueden no ser transferibles.
Добрый день,Дэн.
Великолепно изложено руководство.
У вас талант учителя.Спасибо.
Я фотограф-любитель.
Может я и не прав,но Sharpen лучший редактор
в этой области обработки фото.
Успехов ,Вам.
Thanks a lot Slava 🙂
Why does the image size reduce after using Sharpen A1 ?
I have both denoise and sharpen
How do I use ?
First denoise -save image
Use this saved image on Sharpen
Is this workflow ok ?
Varsha,
The image size is not reduced by using Sharpen AI, if you use this as a plugin in Lightroom, the image will no longer be a RAW file, so I recommend doing this at the end of the editing, applying first DeNoise AI and then Sharpen AI to the resulting image.
Hi! Can I use the license on 2 computer? Thank you.
Hi Lidia,
Yes, you can use the Sharpen AI license on up to two computers! 😉
I have a folder of old film scans to which I batch-applied DeNoise AI with good results.
I’m thinking of upgrading Sharpen AI to v. 4.1 and running them through, also as a batch, unattended as there are hundreds of images.
Will Sharpen AI look at each image, as it presents, and select the most appropriate model for each one (as opposed to the same pre-selected model for all?)
Don,
That sounds like a good use of Topaz Sharpen AI.
I wish I could help here, but I’ve never used the Topaz batch function. I’ll try it and see what the software does!
Dan
Ai Focus is excellent, I can only concur and add as already been said that sometimes you need to try different settings to reach your goal.
Now I’m less enthusiastic about AI Denoise (still a good program) but I largely prefer the incredible DxO PureRaw for that purpose. This latter program also increases sharpness and improves focus a bit too making it perfect to use AI Focus afterwards.
Thanks for sharing this, Percy.
It’s incredible how AI is helping to fix these issues today. I run a comparison with the best noise reduction software and still prefer Denoise AI over DXO Pureraw. We will see in the future 😉
Best,
Dan
one thing i want to mention is the sharpen AI can be quite effective for improving sharpness on cheap zoom lenses with lower optical quality – sharp in center but usually weak in corner
my workflow is mask the soft corner parts and applying gentle amount “very blurry mode”! 😉
That’s a very good piece of advice!
I also find the same issue even with high-quality telephoto when you do a considerable crop.
Masking, however, is a must to avoid the Haloes and other side effects. Sharpen AI is a must! 😉
Which version of Sharpen AI did you review? Have you taken a look at the latest release? Many people have reported worse results with newer releases and as a result I’ve been hesitating about updating.
Julian,
We always update this review with the latest version. Right now this is related to version 3.3.5 released in January 2022 and we didn’t notice any issue in this release.
I’m not sure if you referred to a previous version but if there was an issue, I’m sure it was fixed 😉
Hi Dan,
I am looking at Sharpen AI and DeNoise AI. Am playing around with pics and know that Sharpen will be in my toolkit and am deciding on DeNoise.
A question about Sharpen—If I want to apply Sharpen, Stabilize and Focus to an image, do I need to:
—Apply Sharpen and save the file
—then import the file and Apply Stabilize and save the file
—then import the file and Apply Focus and save the file??? If so, what is the best file format to save the file between stages?
And If I include DeNoise, would I use the same file format as the first step in the process?
Thanks—Dave Markey
Hi David,
Normally you don’t want to apply all the three settings (focus, stabilize, and sharpen) to your image or it’ll show too many artifacts. Sharpen is the less effective method and the one I use just for refocusing simple Raw files occasionally. Following this, for fixing blurred images I always apply either focus or stabilize first, see the preview, and then try with the other. Lastly, I apply the setting which provides the best results, but never several modes over the same image (hope it makes sense!)
If you want to apply Denoise, I’d do it first in the workflow as the guys from Topaz recommend. That way, you can reduce the noise and later refocus only the important areas of the image and not just the noise. You can do this easily working with layers on Photoshop or using the TIFF files if you use Denoise/Sharpen as a plugin for Lightroom.
Hope this helps and please, don’t hesitate to ask any other questions!
Best,
Dan
Thanks for this great comparison and tutorial. It is very helpful in one’s learning how best to apply Topaz software in different situations.
Thanks Richard,
There are many situations where Sharpen AI comes in handy, not only for just fixing out of focus images. Glad you like it 😉
Dan
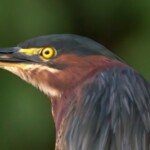
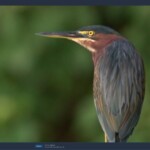
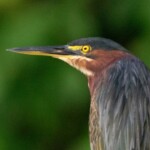
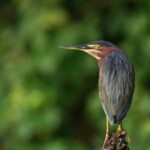
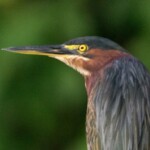
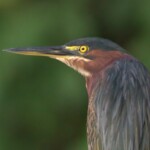
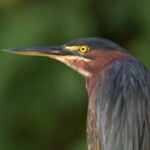
To be honest I tried to sharpen a bird yesterday with Topaz Sharpen AI and it didn’t get the image all the way there.
Hi Alton,
I don’t know how blurred is the image you were trying to amend, but if it’s fixable, I recommend you to try all the different modes included in the software as we explain above.
Hope you can fix it!
Best,
Dan