In this Topaz Gigapixel AI review, you’ll find how to use Gigapixel AI to enlarge photographs in a very easy and efficient way thanks to the Artificial Intelligence used by Topaz Labs.
Topaz Gigapixel AI is a powerful software that allows you to upscale your photos while maintaining and improving the detail in your images. This program is very intuitive and offers different enlargement options depending on your goals. However, making the most of Gigapixel AI takes some time and practice and the software is graphically demanding. Although Gigapixel AI is not perfect. It’s one of the best photo enlargement software on the market.
My experience using Gigapixel AI to enlarge images has always been positive, allowing me to develop high-resolution images from low-resolution files. To get the best results, in this Gigapixel AI tutorial, I’m going to walk you through the process of upscaling images using the latest version of this software v6.1.0 released in May 2022, including the new Face Recovery model and significant faster process.
Keep reading to know all the secrets of enlarging images with Gigapixel AI and take a peek at our special Topaz Gigapixel AI discount below!
![]()
What is Topaz Gigapixel AI?
Topaz Gigapixel AI is a photo enlargement software that uses Artificial Intelligence to create quality and more detailed upscaled images. Whether you need to create a large print out of a lower resolution file or to crop files without losing quality, this software will help. Today, Gigapixel AI is generally considered as the best upscaling software in the market.
While traditional enlargement software render images with a considerable lack of detail, Gigapixel AI’s enlarging algorithm can recognize detail and structures in low-resolution files and turn them into sharper and clearer upscaled images. Thanks to its AI, this Topaz software not only preserves but also enhances the original detail allowing you to resize your images up to 6x.
The new update of Topaz Gigapixel AI offers different advanced enlargement AI models depending on your image and the upscaling that you need, including a new face recovery AI model perfect for enlarging portraits.
This is a great short video by Topaz where they explain what Gigapixel AI is and the main tools of this software:
How to use Topaz Gigapixel AI?
Although this software could seem complex, Topaz Gigapixel AI is super simple and easy to use. In this section, I’m going to show you how to use Topaz Gigapixel AI by following some basic steps.
Gigapixel AI download and installation
-
- Download and install Topaz Gigapixel AI: Go to the Topaz Labs and choose your Operating System; Topaz Gigapixel AI is available both for Windows and Mac OS. Download the installation file and run the installation procedure. This process could take some time due to some automatic downloads and updates needed to complete the installation.
- Once the previous process is finished, Topaz Gigapixel AI Standalone will be installed in your applications. The Gigapixel AI plugin for Photoshop and Lightroom should be added automatically, otherwise go to Help > Install Photoshop Plugin after quitting Photoshop and/or Lightroom.
- Run Topaz Gigapixel AI, log into your Topaz Labs account or try the Gigapixel AI free trial for 30 days.
Now, let’s see in more detail how to use the Gigapixel AI:
HOW TO ENLARGE IMAGES WITH GIGAPIXEL AI
Before getting into the specifics, this is a brief summary of how to resize images using Topaz Gigapixel AI:
-
- Run Topaz Gigapixel AI.
- Drag or open your files.
- Choose the scale for your resized image.
- Select the best AI model.
- Fine-Tune the AI Model settings.
- Choose the output format and save your new image.
*Important note: As recommended by Topaz Labs, use Gigapixel AI after finishing the post-processing to avoid any extra editing after upscaling your images. Also, keep in mind the high Gigapixel AI graphic requirements to run this software in case you’re using an old PC/laptop.
For this Gigapixel AI review, I am using a test shot and the latest version of Topaz Gigapixel AI (v6.1.0 released in May 2022). The image I selected is a photo of the Sydney skyline. The file I’m going to work with is only 2048×1152 and I need to enlarge it to make a large print.
I’ll use this image of the Sydney Skyline for this tutorial
This is the new Topaz Gigapixel AI interface:
Topaz Gigapixel AI interface
The first step is to open or drag your file/s into Topaz Gigapixel AI. Gigapixel AI includes a Batch Processing function so you can enlarge multiple images at the same time to simplify the process.
TIP: I personally don’t enlarge photos from Raw files as Gigapixel AI doesn’t preserve your Camera profiles. Instead, use edited files like .TIFF or .JPEG.
PREVIEW OPTIONS
In the upper right corner, you will see a toolbar with the following options:
Preview toolbar in Gigapixel AI
To change the way to preview your images, you can select between the following options:
-
- Original (original photo preview)
- Single (photo preview processed by Gigapixel AI).
- Split (Original and sharpened photo preview with a split slider)
- Side by Side (Original and processed photo preview)
- Comparison (Check how the different AI Models work in your photos)
You can also zoom in to check detail in your images carefully.
MAIN RESIZING OPTIONS
On the right side of the interface, you’ll find the main tools to resize your images:
Settings menu in Gigapixel AI
- A Navigator with the selected zoom to analyze how the image is processed in different areas.
- Crop your images if necessary.
- The next step is to select resize mode to upscale your photos to the desired size. There are three different options to input the desired dimensions:
-
-
- Scale: choose the desired scale up to 600%
- Width: Choose the desired width of your upscaled image
- Height: Select the required height of your upscaled photo
-
-
- AI Models: There are five different Gigapixel AI models to get the best results depending on your photos:
-
-
- Standard performs better with landscapes, animals, nature, and portraits
- Lines works better with strong lines such as cityscapes, building photos or typography.
- Art & CG achieves better results with drawings, paintings, CGI’s.
- Low Resolution for low-resolution images keeping original detail.
- Very Compressed is aimed at old and small size images.
-
Note: The first time using Gigapixel AI, the software will have to download the optimized model files for the Model AI selected, so keep in mind that you won’t be able to use Gigapixel AI offline unless you download these files.
-
- Gigapixel AI Settings. A nice starting point is to leave the Auto-detect settings enabled and to adjust the below settings manually to obtain better results:
- Suppress Noise: Use this to reduce the digital noise in the scaled photo. Don’t overdo it to avoid digital artefacts and other unnatural results. (*For better results, I recommend denoising the image first using Denoise AI as explained in our Denoise AI review.)
- Remove Blur: reduces the blur created by enlarging the files.
- Additional Settings. To fine-tune your images, use the following settings:
- Reduce Color Bleed: reduces possible color bleed due to the enlargement.
- Face Recovery: this is the new face refinement tool and it works wonders. Gigapixel’s AI will detect faces and fix them. It can soften some of the face details so adjust the slider according to your needs. It works perfectly in pixelated and blurry images.
- Click on Save Image to save the upscaled image with the chosen output settings:
- Gigapixel AI Settings. A nice starting point is to leave the Auto-detect settings enabled and to adjust the below settings manually to obtain better results:
Save options in Gigapixel AI
Let’s check out the results:
The upscaled image looks much sharper and detailed
Using Topaz Gigapixel AI as a plugin for Photoshop
Resizing photos in Photoshop with Gigapixel AI is possible thanks to the included Gigapixel AI Photoshop Plugin. You can incorporate it easily into your workflow with multiple advantages.
However, the main question is: who is the winner comparing Gigapixel AI vs. Photoshop? Photoshop already includes a tool to upscale images, so why do we need another piece of software? The answer is simple: the method used by Photoshop to enlarge photos is a traditional process that falls behind compared with the Artificial Intelligence used by Gigapixel AI.
To enlarge your photos using Gigapixel AI as a plugin for Photoshop, follow these simple steps:
To enlarge your photos in Photoshop using Gigapixel AI, follow these simple steps:
-
- Duplicate the layer or create a Smart Object layer to apply non-destructive adjustments.
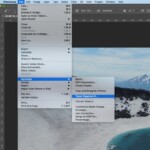
- Go to File > Automate > Topaz Gigapixel AI.
- Make the required adjustments as described above.
- Save and wait until the photo is processed and imported into Photoshop.
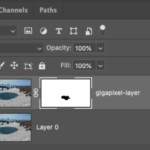
File>Automate>Topaz Gigapixel AI
The advantage of using the Gigapixel AI Photoshop Plugin is that the software automatically creates another layer with the upscaled photo. This is helpful to mask out any possible artefact created by the software after the enlargement process.
USING TOPAZ GIGAPIXEL AI AS A PLUGIN FOR LIGHTROOM
With the latest update, you can now enlarge your photos in Lightroom with Gigapixel AI. Unlike Photoshop, Lightroom doesn’t include a tool to enlarge your images, so using Gigapixel AI in your Lightroom workflow will be extremely helpful to achieve high-resolution images.
To upscale your images in Lightroom using Gigapixel AI, follow these simple steps:
-
- Right-click on the image you want to enlarge > Edit In > Topaz Gigapixel AI. If asked, always use a copy with the Lightroom Adjustments.
- Apply the adjustments as explained before.
- Click on Save and wait until the enlarged photo is processed and imported into Lightroom.
Topaz Gigapixel AI before & after review
So far, I’ve covered how this software works, but the question is, is Topaz Gigapixel AI worth it? To see it by yourself, below you can find 3 different types of photos upscaled with Gigapixel AI:
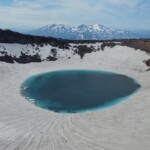
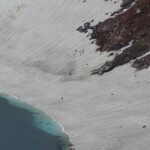
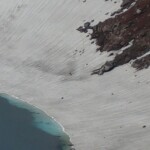
TOPAZ GIGAPIXEL AI FOR LANDSCAPE PHOTOGRAPHY
Topaz Gigapixel AI enlarges your landscape photos without breaking a sweat, sharpening original detail and with minimum artefacts or halos. Without a doubt, Gigapixel AI is the best tool to upscale your drone or cropped landscape photos.
Gigapixel AI proves to be very effective in landscape photography
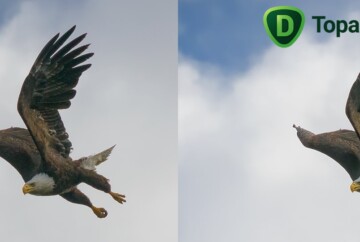
TOPAZ GIGAPIXEL AI FOR PORTRAIT PHOTOGRAPHY
The new Gigapixel AI face recovery works really well enhancing the face of your low-resolution and pixelated portrait photos. It also reduces digital noise while keeping the original detail in your photos with very natural results. In this example, I adjusted the slider at 100 and the results are mesmerizing. Hat’s off to Topaz Labs for this upgraded tool.
Gigapixel AI Face recovery tool
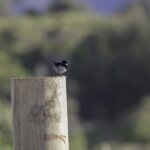
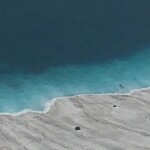
TOPAZ GIGAPIXEL AI FOR WILDLIFE PHOTOGRAPHY
Cropping is a must when shooting Wildlife Photography, and Gigapixel AI enlarges your wildlife photos enhancing the original details. To get even better results, I recommend using Topaz Sharpen AI after using Gigapixel AI to add an extra layer of detail and sharpness. If you want to know more about this other magical piece of software, check our Topaz Sharpen AI review!
Comparing low resolution and enlarged wildlife photography with Topaz Gigapixel AI
We are almost done, but before wrapping up, let’s see, briefly, the Pros and Cons of Gigapixel AI:
Topaz Gigapixel AI review: What are the pros?
To sum up, these are the advantages of using Gigapixel AI to enlarge your images:
-
- Effective photo upscaling
- User Friendly
- Impressive Face Recovery tool
- New Gigapixel AI plugin for Lightroom
- Possibility of previewing the enlarged image
- Batch function
- Fair price, especially when buying the Utility Bundle
- 30-day free trial.
Topaz Gigapixel AI opinion: What are the cons?
In my opinion, Gigapixel AI works fantastic, but there are somethings that Topaz Labs could focus on to improve the user experience:
GIGAPIXEL AI DISCOUNT & PRICING
The price of Gigapixel AI is $99.99 for a lifetime license, which is fair considering all the tools and one-year updates provided by Topaz Labs.
However, if you’re a serious photographer, my recommendation is to get the Image quality bundle. This includes, in addition to Gigapixel AI, Sharpen AI, Denoise AI, and the new Topaz Photo AI.

As of the time of writing this article, the Utility bundle is priced at a high discount. You can check if the offer is still available here.
If you want to get more info about the other software included in the Topaz Bundle, you can also check my other Topaz Reviews:
The new Topaz Photo AI includes a lite version of Gigapixel AI with some enlarging features + other denoising and sharpening adjustments to enhance the quality of your images in autopilot.
Conclusion
Topaz Gigapixel AI is capable of enlarging images while maintaining detail in most situations. It’s a very simple and effective software with an intuitive interface and possible connections as a plugin for Photoshop and Lightroom. However, Gigapixel AI is not perfect; it requires some experimenting with the different AI models and a powerful computer to work fast.
My experience after using Topaz Gigapixel AI for many years has been superb. I often need to crop landscape images or upscale drone photographs for large printing and this software makes my life much easier. The difference between Photoshop vs. Gigapixel AI for upscaling images is night and day, particularly after the new added Face Recovery tool.
I hope you find this Gigapixel AI review helpful and don’t forget that you can try Gigapixel AI for free with the 30-day free trial.
If you still have any questions about Gigapixel AI, please feel free to leave them in the comments!