Digital noise reduction is most effective if you start doing it the moment you’re taking the photograph.
It’s true that it can be very useful to know about all the different noise reduction software on the market (or even the best apps to reduce noise in your cell phone photos). However, if you can prevent noise from the get-go, it’ll be much easier to get clean and sharp photographs.
If you use the best techniques to reduce digital noise and you still get noise, you can learn how to reduce noise in Lightroom or how to reduce noise in Photoshop.

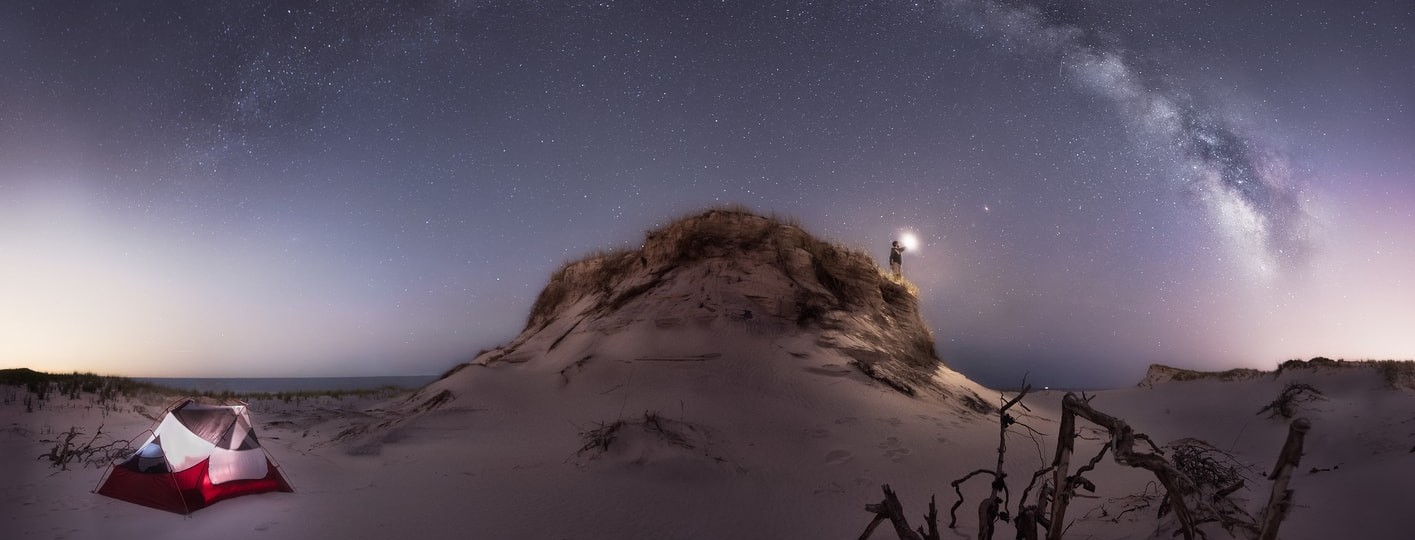
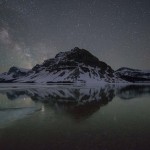
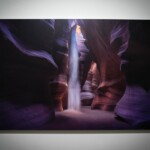
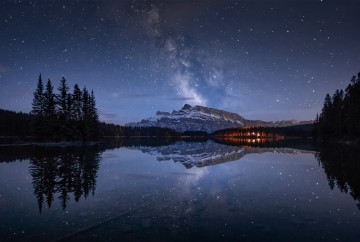
Digital Noise Reduction using 2,5 seg, f/2.8 , ISO 4000
However, in this article from our series “Noise in Photography“, we will focus on how to reduce digital noise during shooting and how to prevent it from occurring when printing your images:
- How to reduce digital noise in your photographs
- Camera settings for digital noise reduction
- Tips for printing noise-free photos
HOW TO REDUCE DIGITAL NOISE IN YOUR PHOTOGRAPHS
There are many techniques you can use to reduce and remove digital noise, both while you’re shooting and afterward, and when you’re editing and processing.
Throughout the following section, we will show you the best way to get rid of digital noise using the best camera settings. However, keep in mind that if the lighting is bad, noise will probably keep appearing, so you might need to use noise reduction software after you’ve taken your photos.
BEST WAYS TO REMOVE THE DIGITAL NOISE
In general, this is the best way to capture noise-free images
- Take photos with full-frame sensor cameras, since they can capture more light.
- Shoot in Raw. This is the best way to capture as much information as possible.
- Set the ISO as low as possible, since sensitivity increases the noise.
- Expose your images correctly, the golden rule to avoiding noise when shooting.
- Don’t take super long exposures, since that can heat the sensor and lead to color noise.
- Use large apertures and large aperture lenses.
- Use Lightroom or Photoshop, the most effective and simple ways to reduce digital noise.
- Use a good noise reduction software, such as “Denoise AI” or “DXOPureRAW2“.
Also, If you are an advanced photographer and you like night photography, I recommend doing tracked astrophotography by using one of the best star trackers on the market. The difference in quality that you’ll see in your images will be huge!
BEST CAMERA SETTINGS for digital noise reduction
If your goal is to avoid digital noise, the first and most basic thing you can do is use the right camera settings so that your camera does not generate noise.
The best and most important advice would be to know your camera. Each camera is different and knowing the limitations of your equipment is essential.
In order to prevent digital noise, in addition to reading your camera instructions, you should practice as much as you can, especially taking photos in all kinds of situations and lighting conditions.
Best camera settings to reduce DIGITAL NOISE
Briefly, these are the best camera settings for digital noise reduction:
- Shoot in Raw.
- Get a correct exposure.
- Keep the ISO under control.
- Be careful when taking long exposures.
- Use large apertures.
- Turn on your camera noise reduction.
- Take advantage of your camera high ISO noise reduction (if you shoot in Jpeg).
- Use cameras with full frame sensors.

Digital noise reduction by using the right camera settings. 3 sec, f/9, ISO 1000
Shoot in RAW to reduce the noise
To avoid digital noise in your photos, the first and most basic step is to shoot in Raw.
Jpegs files can’t capture as much information as Raw files, and the Jpeg compression will make the noise more obvious and more difficult to remove during editing.
GET A CORRECT EXPOSURE
Always try to expose your photos correctly. Avoid shadows and black areas lacking information, since your camera will generate noise when it processes these areas.
To make sure your exposure is correct when shooting, don’t use the camera light meter; instead, use the histogram, where you can see the image’s blacks and highlights that will be difficult to process. You can learn how to read the histogram here.
“Exposing to the right” (ETTR) is widely considered a basic digital noise reduction technique and has created an endless amount of debate in the photography world. This technique uses parameters that cause the histogram to be as exposed to the right as possible, without reaching the pure whites.


ISO and Digital Noise – Keep it under control
Three parameters make up the exposure triangle: Aperture, shutter speed, and ISO; the latter is the most significant in terms of digital noise reduction.
The higher the ISO you use, the more noise will be generated by your camera.
As you increase the ISO, you will increase the sensitivity of your sensor to the light. This will make your camera processor create random information and, in the process, create more digital noise.
To avoid this, you should try to use a low ISO whenever it is possible.
There are indeed circumstances where lighting conditions might require you to raise the ISO, for example, in long exposure night photography so it is crucial to know your camera well and try to control the ISO as much as possible. Also, please check our guide on ISO in photography.


* ISO INVARIANCE/ISO LESS sensors and Noise:
While the aforementioned Exposure to the Right technique has traditionally been seen as one of the best shooting techniques to avoid digital noise, nowadays some new cameras use sensors called ISO invariance (“ISO-Less”). In short, these types of sensors give you the same image quality in terms of noise when you shoot at a lower ISO and overexpose the image later in the post-processing as if you were shooting at a high ISO.
This way of shooting has advantages, especially when you have highlights in the image that run the risk of being blown out if you raise the ISO, such as in photos of the Northern Lights, lampposts, or any other source of strong light.
Some examples of cameras that use an ISO invariant sensor are:
- Sony A7RIII / Sony A7RII
- Nikon D810 / Nikon D750 / Nikon D 7100 / Nikon D7100 / Nikon D5500
- Fuji XT1 / Fuji X100 / Fuji XE1
- Pentax K5
If your camera is not on the list, test it so you know if your sensor is ISO-less.
For more information, I recommend checking our ISO invariance guide where you’ll find plenty of examples and an updated ISO invariant camera list!
Be careful with long exposures and avoid chromatic noise
As we have already explained, taking long exposures is one of the most common causes of noise in digital photography.
Since the sensor temperature heats up after being used for a long time, the amount of noise increases, especially the chromatic noise.
To reduce this effect, try to avoid ultra-long exposure photography, or takeing many shots without stopping.
Long exposures are inevitable in certain types of photography, such as star trails or time-lapse, but you should take this into account and keep it under control whenever you can. You can learn more about long exposure photography in our guide.

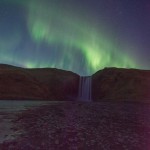
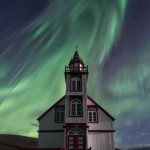
Band of color noise resulting from a long Northern Lights session at high ISOs 2.5 sec, f / 2.8 ISO 5000
Use large aperture AND LARGE APERTURE LENSES
One of the best tips to reduce digital noise is to use large apertures for your lens in low light conditions.
Although the aperture does not directly affect the amount of noise, a small aperture in low light situations will force you to take photos with longer shutter speed or a higher ISO, both factors that will make your photography grainier.
Use as large aperture lenses as possible, with low f values. You can find here the best cameras and lenses for Northern Lights Photography and the best cameras and lenses for Milky Way Photography.

Photograph taken with an aperture of f/2.8 to capture more details in the sky and avoid noise. 2 sec, f / 2.8, ISO 3200
Turn on your camera noise reduction
In order to avoid digital noise, today’s cameras have a built-in automatic noise reduction system.
With this system, after you’ve captured the image, your camera will carry out an automatic process where it captures an exposure the same length of time as the original photograph.
Pros of the automatic noise reduction
It allows you to reduce digital noise automatically in the RAW file, without having to use any software later.
Cons of the automatic noise reduction
You can’t use the camera for the entire duration of the process (always the same length of time as the original shot).
So, if you take a 30-second shot, your camera will be busy with the NR process for another 30 seconds.
In my case, I don’t use this process, since I prefer to apply digital noise reduction more selectively through different noise reduction software.

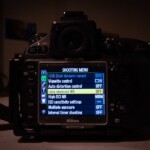
Nikon D800 menu: Long exposure Noise Reduction (NR)
Take advantage of your camera’s high ISO noise reduction (If you shoot in Jpeg )
If you’re not going to edit or process your photos, and you prefer to shoot in Jpeg format, you can use the automatic noise reduction on your camera to reduce the digital noise of your images.
In my case, I always shoot in RAW, so this option is disabled on my camera.
Use cameras with full-frame sensors
Your camera sensor size plays a key role in avoiding digital noise.
One of the main differences between cameras that use crop sensors (APS-C) and cameras that use full-frame sensors, is the amount of noise they generate.
The large size of the full-frame sensor captures more light and collects more information. In other words, cameras with full-frame sensors will generate much less noise than cameras with APS-c sensors.
In some types of photos such as Milky Way Photography or Northern Lights photography, the difference from one camera to another will be very significant. You can learn more about how camera sensor size affects your photos here.

Photography taken with Nikon D800 full-frame camera and Nikkor 14-24 f / 2.8 lens. Panoramic of 5 vertical photographs at 15 sec, f / 2.8, ISO 4000
If your camera has a crop sensor and you are planning to take night sky photos or you are taking a trip where you expect to shoot at high ISOs, my advice is to get a full frame camera if quality is something that matters to you.
Full-frame sensor cameras are not particularly cheap, but you can also rent camera gear for a photo shoot or a trip. In my case, I always rent cameras and large aperture lenses through Lensrentals. You’ll have a 15% discount when using our Lensrental promo code: CTA15.
TIPS FOR reducing the digital noise in your prints
Printing images without noise is one of our main goals so viewers are not distracted from the main elements of our image.
How to print photos without noise
In order to avoid noise in your photography prints, follow the tips below:
- Use techniques to prevent noise while shooting, as this is the best way to have a sharp and clean print.
- Remove the noise in your photos before making the print through one of the different options of noise reduction software on the market.
- Keep a close eye on the homogeneous areas of the image that take up a large space and have a uniform tone or color, such as clouds or water, as the noise will be more visible.
- Keep the size of the print in mind, since the bigger the print, the more obvious the errors, such as noise, will be.
- Consider the viewing distance; even if the print is large, if it’s going to be seen from a long distance, the noise will not be noticeable.
- Print on paper of the best quality and use the surface that best suits the particular type of photography in order to avoid digital noise. On bright surfaces, noise often goes unnoticed.
- Check with your lab. They can advise you on the right size print based on the image’s digital noise.

Antelope Canyon print on aluminum dibond without noise
Conclusions about digital noise reduction
As you have seen, the key to avoiding noise is knowing the best digital noise reduction techniques on camera, always shooting with the right settings, and making sure that you get an image that’s as clean and sharp as possible.
However, there are cases where, due to circumstances such as low light or lack of time, you can’t get the best conditions for the shot, and your picture shows noise in one or several areas.
In these cases, you should read up on anti-noise software and plugins and, especially, how to reduce noise in Lightroom and how to remove noise in Photoshop, since they are the most effective tools to remove noise in your images.
Finally, if the noise is likely to be due to a technical limitation, get photography equipment designed to avoid noise, such as large aperture lenses and full-frame cameras.
If budget is a problem for you, you can always rent a camera/lens for your photo shoot or trip through a photography rental company such as Lensrentals, or buy second-hand gear through MPB.com (in the US, UK or Europe), since they offer a 6-month warranty.
My last tip is: don’t zoom in and actively look for noise because, in the end, all photos have noise. Worry about fighting it when it’s visible to the naked eye, but don’t get obsessed with digital noise reduction.


I try to keep the ISO low when possible , or if required I use OnOne niose reduction doftware
Yes, absolutely. I mention On1 NoNoise AI in my guide to the best noise reduction software. 😊