
In this DxO PureRaw review, you’ll find how to use DxO PureRaw 2 to easily improve the quality of your RAW files.
DxO PureRaw 2 uses Deep Learning AI to find the best way to reduce the noise and enhance the detail of any RAW file. DxO PureRaw offers a user-friendly interface and It’s considered one of the best noise reduction software in the market. However, DxO PureRaw is not perfect; it requires a relatively fast computer and there are fundamental features lacking which should be implemented in future versions.
In this article, I’ll cover DxO PureRaw 2, the latest version of the software, and I’ll walk you through three different workflows with DxO PureRaw 2.
Without further ado, let’s dive into this DxO PureRaw 2 tutorial!
What is DxO PureRaw 2?
DxO PureRaw is a photo editing software that uses Artificial Intelligence to improve RAW files by reducing digital noise, improving sharpness, and correcting lens distortion before the post-processing. Most photo editors include noise reduction and sharpness recovery tools to enhance the RAW image before applying edits. However, these popular editors use traditional algorithms that improve one aspect at the expense of another. For example, if you reduce noise, it’s common to lose detail.
By using a proprietary Deep Learning Artificial Intelligence algorithm (which DxO calls DeepPRIME), DxO PureRaw 2 enhances the RAW file automatically without compromising any kind of quality.

In this tutorial, I’ll show you in-depth how to use DxO PureRaw 2, and the best DxO PureRaw 2 workflow using the program’s own interface, Lightroom, and the File Explorer in Windows or the Finder on a Mac.
How to use DxO PureRaw 2
This software could sound intimidating, but as you’ll see in this DxO PureRaw tutorial, it’s much simpler than it seems. Let me show you how to use DxO PureRaw by following a few simple steps:
DxO PureRaw 2 Download and Installation
-
- Download and install DxO PureRaw 2: you can either download the free version of DxO PureRaw 2 and try it for free for 30 days, or you can download the full version of DxO PureRaw 2 right away. DxO PureRaw 2 is compatible with both Windows and Mac. In both cases, download the installation file and follow the instructions to complete the installation successfully. Learn more about Dxo PureRaw 2 system requirements.
-
- Once the installation is complete, DxO PureRaw will be installed as a standalone program on your computer and as a plugin for Lightroom and for Windows File Explorer, and Mac’s Finder.
-
- Run DxO PureRaw 2: if you purchase the software, you can enter the product key and start enjoying the program. If you chose the free trial, your 30-day trial period starts from the moment you installed the software.

Now, let’s see how to use DxO PureRaw 2 more in detail!
DxO PureRaw 2 Workflow
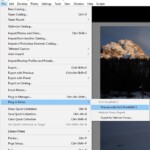
In this section, I’ll process multiple images to show you DxO PureRaw 2 performance with different pictures. DxO PureRaw is very intuitive to use and the interface is incredibly simple:

DxO PureRaw 2 has a very simple and intuitive interface
-
- Open DxO PureRaw 2.
- Import your RAW files or drag and drop them.
- Process photos.
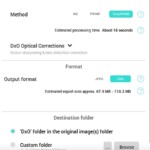
- Choose between three processing modes: HQ, PRIME, and DeepPrime. Select DeepPrime for the best results.
- Decide if you want to apply optical corrections like sharpening or distortion correction.
- Select the output format. Choose DNG if you plan on further editing the RAW file.
- Choose the destination folder.
- Compare the before and after.

Output settings in DxO PureRaw 2
DxO PureRaw 2 Lightroom Plugin
This is a new feature in DxO PureRaw 2. You can now use the DxO PureRaw 2 plugin for Lightroom and seamlessly blend it into your current workflow. DxO PureRaw 2 Lightroom plugin is added during the initial installation of DxO PureRaw 2 and it’s the perfect companion for those photographers who use Lightroom as their main photo editor.
This is how to use DxO PureRaw in Lightroom:
-
- Import your RAW files into Lightroom.
- Select the pictures you want to run through Dxo PureRaw 2
- Click on File > Plug-in Extras > Process with DxO PureRaw 2
- Wait for DxO PureRaw to finish processing the image

Run DxO PureRaw from Lightroom with the PureRaw plugin
DxO PureRaw 2 from Mac Finder or Windows File Explorer
This is another new feature in DxO PureRaw 2. You can now process your RAW files directly from the Finder on Mac or File Explorer on Windows. This might save you some time in the DxO PureRaw workflow.
-
- Locate your picture in the Finder (Mac) or File Explorer (Windows).
- Right-click on the photo you want to process
- Select DxO PureRaw 2: Process to…
- Choose the option you want to use, then PureRaw 2 will start processing the image.

DxO PureRaw 2 Review: Before and After
After thoroughly using DxO PureRaw 2, the results I’ve seen are exceptional. The images look much cleaner and sharp without affecting dynamic range, and I haven’t noticed any notable loss of data. However, I’ve noticed a few examples where PureRaw 2 slightly increased the exposure and added a color cast. When it happens, it’s very subtle, but it’s worth mentioning.
Keep reading to find out more:
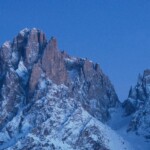
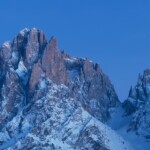
DxO PureRaw 2 in Landscape Photography
After learning how to use DxO PureRaw, I applied it to my landscape images, where I noticed a great increase in the RAW quality getting cleaner and sharper images.


Before and after comparison of DxO PureRaw 2 applied to landscape photography
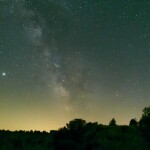
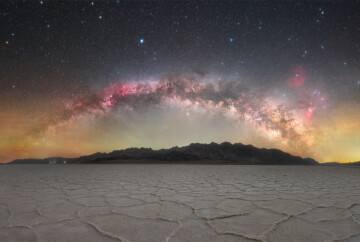
DxO PureRaw 2 in Astrophotography
When talking about DxO PureRaw 2 for astrophotography, the software does a fantastic job at reducing noise and retaining detail in the night sky. However, the noise reduction sometimes is too strong and, since it’s not possible to control the amount of noise reduction, I consider it’s best to use a layer mask to apply this effect selectively or fall back on traditional noise reduction techniques.


Apply DxO PureRaw noise reduction with care in astrophotography
You shouldn’t worry about stars disappearing. I’ve processed multiple images and carefully reviewed them at 100% zoom, and I haven’t seen any “star eater” issues, not even with the smallest stars.
DxO PureRaw 2 has been fundamental in my Milky Way photography, mostly when I used high ISO values and also in all those low-light situations t like when photographing the Northern Lights.
If you are into astrophotography, I highly recommend downloading my Milky Way Calendar to plan your night sessions this year!

DxO PureRaw 2 in Wildlife Photography
DxO PureRaw 2 thrives in wildlife photography where it’s common to shoot with higher ISO values to freeze the subject in place. The sharpening is also very natural and doesn’t feel overdone. I think this tool will be a great addition to any wildlife photographer’s workflow.


DxO PureRaw 2 is exceptional in wildlife photography
DxO PureRaw 2 with Fujifilm Cameras
One of the main features of this new DxO PureRaw 2 update is that it now supports Fujifilm’s RAW files. This is great news for Fujifilm users. I’ve seen the same level of quality processing when it comes to Fujifilm RAW files as to other file formats. Without a doubt, DxO PureRAW 2 is the best noise reduction software for Fujifilm shooters.


DxO PureRaw 2 is compatible with Fujifilm RAW files
DxO PureRaw 2 in Portrait Photography
Low light portrait photography greatly benefits from the AI used by DxO PureRaw 2. When processing portraits, I’ve noticed that it even recovers fine details in the faces such as wrinkles in a very natural and pleasing way.


The AI in DxO PureRaw 2 recovers detail in faces in a very natural way
DxO PureRaw 2 in Architecture Photography
In this DxO PureRaw 2 review, I’ve also processed some architecture images. In this case, I was expecting the software to fix the distortion as well as the perspective. DxO PureRaw fixed the lens distortion correctly and recovered some detail, however, I’d like to see some perspective correction tool added in the future.


Before and after comparison of DxO PureRaw 2 applied to architecture photography.
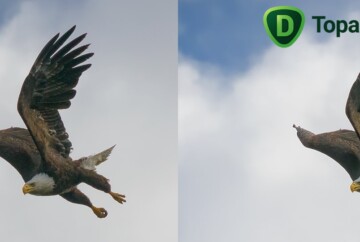
DxO PureRaw vs. Topaz Denoise AI
DxO PureRaw performs better at reducing noise than Topaz Denoise AI. After processing the same images with both programs, the results delivered by DxO PureRaw were slightly better than the ones I got from using Topaz Denoise AI. Even though this is a DxO PureRaw review, I didn’t want to miss the opportunity to compare these two amazing programs.
However, this doesn’t mean that Topaz Denoise AI isn’t good at reducing digital noise in pictures. It still outperforms traditional editing software such as Lightroom or Capture One by a big stretch, but the machine learning models DxO uses in PureRaw 2 seem to be more advanced.
In this example, you can see the same image processed with Topaz Denoise AI vs. DxO PureRaw 2.


Topaz Denoise AI (left) and DxO PureRaw 2 (right)
As you see, the image processed with DxO PureRaw has more detail and less noise.
But not all that shines is gold. It’s true the results obtained from PureRaw are better than the results from Denoise AI; however, Topaz Denoise AI offers a wider range of options to fine-tune the result, and DxO PureRaw won’t let you customize any parameter other than output options. Denoise AI also offers a Photoshop plugin, receives more updates, and you can get it for half of the price of PureRaw 2.
My recommendation is to consider your budget and goals, download the free trial of both pieces of software, and test them before deciding on DxO PureRaw 2 vs. Denoise AI.
You can take a look at our Topaz Denoise AI review to learn more about this outstanding software.
DxO PureRaw Pricing and Packages
The price of DxO PureRaw is $129 for a lifetime license. It’s the most expensive noise reduction software on the market, but it’s a fair price considering that it includes a lifetime license and how outstanding is the noise reduction process.

However, if you are looking for the best bang for your buck, my recommendation is to get the Nik Creative Bundle, which includes DxO Nik Collection 5 and Dxo PureRaw 2 for $248. This is the package I purchased myself since I use both programs very regularly in my workflow.
![]()
![]()
Nik Collection is one of the best photo editing software out there and if you want to learn more about it, you can read the Nik Collection 5 review article I recently wrote.
Conclusion
| DxO PureRaw 2 is one of the best noise reduction software in the market. Its workflow is simple and fast, and learning how to use DxO PureRaw 2 is easy. However, the interface doesn’t offer many options to customize the effects, and the software is also missing a plugin version for Photoshop. I’ve also noticed a slight change in exposure and color cast in some images. All in all, DxO PureRaw 2 delivers superb results when it comes to advanced noise reduction. |
My experience after using DxO PureRaw 2 has been very positive. I do a lot of landscape astrophotography where I shoot at high ISO values, and I’ve been able to bring some old pictures back to life thanks to DxO PureRaw’s stunning noise reduction.
In future updates, I’d like DxO PureRaw to include more settings to fine-tune the output, and more importantly, a Photoshop plugin.
Download DxO PureRaw or try it for free. I guarantee that it won’t disappoint you!

If you still have questions about DxO PureRaw 2, please feel free to leave them in the comment section below!


I did some hdr processing in lightroom which produced dng files as the result plus some photo editing, when I tried to import those dng files into DoX PureRaw 2, I got error message “the file is either not supported or have already been processed or may be corrupted”. I could do the PureRAW process first, but for the already processed photos, I would lose a lot of efforts done before. Do you have any advice on that? Thank you.
DxO PureRaw only takes RAW files, as far as I know, for that reason, I recommended processing your photos with PureRaw first, to reduce noise, and then doing the edits in Lightroom.
I don’t understand this comment in regards to Night Image processing:
“However, the noise reduction sometimes is too strong and, since it’s not possible to control the amount of noise reduction, I consider it’s best to use a layer mask to apply this effect selectively or fall back on traditional noise reduction techniques.”
I can’t run Pureraw as a PS plugin, so I do not understand how you can create mask to lessen the Pureraw NR impact. Can you describe the exact steps to accomplish as you see them?
Hi Rick,
That is correct, there is no Photoshop plugin for PureRaw yet. What I meant is that after processing the image in PureRaw, you then import it in Photoshop and you also import the original RAW (without noise reduction). Place the original RAW in the bottom layer, then use a black layer mask on the top layer (the one you processed with PureRaw). Then with a brush, playing with the opacity, you can reveal and hide the noise reduction selectively.
I hope that helped!