

Reducing noise in Lightroom is one of the easiest ways to get rid of noise in your photos, and it recently got even better thanks to the addition of AI noise reduction in Lightroom.
If you already use this software, you’ll know that you can use Lightroom to apply noise reduction to your RAW files, but you might be wondering: what are the best settings to reduce noise in Lightroom? Or, how to use Lightroom’s new AI denoise feature?
Stick around, and I’ll go through the process of noise reduction in Lightroom with you.

In today’s photography market, there is a wide variety of noise reduction software, but Lightroom is the most used for a simple reason: It’s quick and easy.
As you may know, noise is one of the most undesired effects in digital photography, so it is very important to know what noise is and what types exist, as well as how to reduce digital noise using the right camera settings.
In this article, we will focus on how to reduce noise in Lightroom:
How to reduce noise in Lightroom Step by Step
In a nutshell, you can reduce the noise in Lightroom by following the steps below:
-
- Import your image into Lightroom.
- Open the Develop tab.
- Go to the Detail module.
- Expand the Manual Noise Reduction option.
- Increase the Luminance slider until the luminance noise is reduced.
- Increase the Luminance Detail slightly and progressively to recover part of the sharpness you might have lost.
- Increase the Contrast to recover part of the contrast you might have lost with the initial luminance noise reduction.
- Adjust the Color slider if your picture has color noise until you get rid of the noise.
- Adjust the Color Detail to fine-tune the previous setting.
- Adjust the Smoothness to finish the Lightroom color noise reduction.

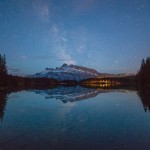
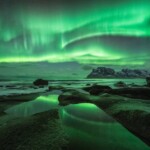
It’s very important to know how to effectively reduce noise in your night photos to achieve the best results
This is the traditional way to reduce noise in Lightroom; however, Adobe recently added AI Denoise to Lightroom, which makes noise reduction in Lightroom a lot easier and better. Let’s take a look at how to use Lightroom Denoise AI feature.
How to Use Lightroom Denoise AI
Lightroom Denoise AI is the most recent feature added to Lightroom’s toolbox. This is a game changer because now, apart from traditional noise reduction, you can also use AI capabilities to reduce noise in your RAW files. Using Lightroom Denoise AI will allow you to reduce noise while maintaining detail and sharpness. This tool becomes very useful since you can now use Lightroom for high ISO noise reduction, where traditional noise reduction algorithms fall short.
NOTE: To use this function, you must at least have Lightroom Classic v12.3.
In this section, you’ll learn how to use Lightroom Denoise AI step by step:
-
- Import your image into Lightroom.
- Open the “Develop” tab.
- Scroll down to the “Detail” module.
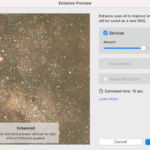
- Click on “Denoise.”
- Adjust the amount of denoise with the slider in the popup window.
- Click “Enhance” and wait until Lightroom finishes processing the image.

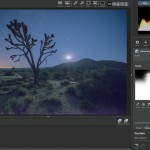
Lightroom’s new Denoise AI interface
NOTE: Depending on your computer’s processing power, it might take anywhere from a few seconds to a few minutes to process the noise reduction.
I’ve tested Lightroom’s new AI Denoise feature, and I’ve made a comparison with Topaz Denoise AI and DxO PureRAW to see which one delivers better results. Keep reading to find out more!
Best Noise Reduction Settings in Lightroom
In this section, I’ll show you the best workflow to reduce noise in Lightroom by using the traditional noise reduction sliders. These settings will improve the quality of your images and help make your RAW files look cleaner.
The basic option is to use the sliders found in the Detail panel, but there are other Lightroom noise reduction tools, such as noise reduction plugins for Lightroom, Lightroom noise reduction presets, and the recently added Lightroom Denoise AI.
Follow these simple steps, and your images will be noise-free in no time!
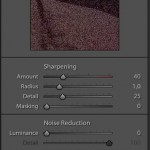
Detail Panel to Reduce Noise in Lightroom
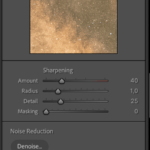
This is the main tool to eliminate noise in the latest version of Lightroom. You’ll find it in the detail panel, where you’ll see different sliders to balance both the noise reduction and the detail.

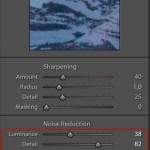
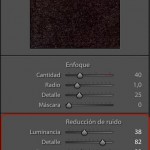
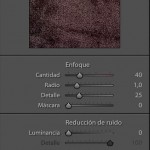
Detail panel in Lightroom
How to reduce Luminance Noise in Lightroom
If you want to reduce luminance noise in Lightroom, there are three settings:
-
- Luminance: Used to eliminate luminance noise in Lightroom. This adjustment works over the general RAW file. The more you move to the right, the more noise you reduce, but with a downside: you also sacrifice sharpness and contrast. In general, it’s more convenient to use lower values.
-
- Detail: After applying the luminance noise reduction, you can recover part of the detail lost with this slider.
-
- Contrast: After recovering the detail, you can recover part of the contrast you had before the first luminance adjustment.
How to reduce Color Noise in Lightroom
To reduce color noise in Lightroom, we can adjust the following sliders:
-
- Color: With this setting, you can reduce chroma noise in Lightroom. It’s a very effective setting, but it does have possible side effects, such as color shifts in areas that were previously fine.
-
- Detail: This slider helps to recover detail, but without adding noise as you would with the detail adjustment for luminance noise.
-
- Smoothness: This adjustment allows you to smooth all the areas where you’ve applied the color noise reduction in Lightroom.
With all these sliders, you can adjust the Lightroom noise reduction for each of your pictures.
It is also important to:
-
- Identifying if the digital noise in your image is luminance noise or color noise to know which settings you need to adjust. You’ll be able to see the noise with your naked eye when you zoom in and out.
- Balancing the different sliders to reduce noise in Lightroom, keeping as many details of the image as possible.
Local Noise reduction in Lightroom
As you can see, reducing noise in Lightroom is relatively simple and effective. The main disadvantage is the inability to apply noise reduction in Lightroom to some areas of the image selectively, as you can, for instance, when reducing noise in Photoshop.
Even so, if your workflow is based solely on Lightroom, you have the option to reduce noise selectively through local noise reduction Lightroom settings.
In order to reduce noise locally in Lightroom, you have the following options:
-
- Noise reduction in Lightroom through the graduated filter
- Lightroom noise reduction through the radial filter
- Lightroom noise reduction with the brush

Local noise reduction in Lightroom through a gradient filter
How to reduce Noise in Lightroom with Local Adjustments
Reducing noise in Lightroom through selective adjustments has the great advantage of removing noise in specific areas of your image. However, there are limitations, since there’s only a single slider to reduce noise, and you can’t adjust the luminance or color noise reduction as you can in the detail tab.
You can apply selective noise reduction in Lightroom through local settings by following these steps:
- Analyze the noise in the image and assess whether it’s better to reduce the noise in a general way or a specific way, especially if the noise only appears in one area of the image.
- If the noise is in a specific area, check this area in order to decide the type of filter:
- In night photographs, noise commonly appears in the lower part of the image. If this is the case, we can try using a graduated filter.
- If noise appears in a specific and significant area of the image, such as a shaded area on the right side, try drawing a radial filter.
- If the grainy area is a small irregular section, try to paint the whole area with the Lightroom brush using a medium-lower opacity.
- Slide the noise slider to the right until the noise vanishes.
- Finally, you won’t be able to make any further adjustments on the noise reduction slider, but you can still adjust other local settings, so if you lose detail or contrast, you can recover it through the clarity and contrast settings.
Before talking in depth about noise reduction with plugins in Lightroom, I wanted to answer a question that many photographers often ask:
WHEN SHOULD I REMOVE NOISE IN LIGHTROOM?
When working non-destructively with Raw files, it doesn’t matter when or at what step you reduce noise in Lightroom, since you can undo this step at any time without affecting the file.
In my case, I like to do it at the end of the process, after having applied all the basic and color adjustments, although, as we said, there’d be no problem if you did it at the beginning.
Best plugins to reduce noise in Lightroom
In addition to the Lightroom noise reduction through the default Lightroom tools, you can also use plugins to remove noise in Lightroom.
These third-party plugins will allow you to use different ways to remove noise in Lightroom, and, in some cases, to compensate for Lightroom downsides, such as with more advanced noise reduction algorithms and models.
There is a wide variety, but these are the best noise reduction plugins in Lightroom:
 Topaz Denoise AI plugin for Lightroom
After having performed many tests, in my opinion, Topaz Denoise AI is the best plugin to reduce noise in Lightroom.
Topaz uses an advanced algorithm to reduce noise in Lightroom while preserving great quality details.
As you can see in the best noise reduction software comparison, Topaz includes Artificial Intelligence algorithms that keep the detail when canceling the digital noise. This is especially effective for starry skies since it doesn’t remove stars like other plugins.
In addition, Topaz allows you to work with an advanced system of layers, masks, and opacity, which helps to adjust noise reduction in Lightroom in a very selective way.
You can download the Topaz Denoise AI plugin for Lightroom here.
Update: After this review, I have started using Topaz DeNoise AI to reduce noise in all my photos. Also, we have written a Topaz DeNoise AI review here.
 DxO PureRAW Plugin for Lightroom
DxO PureRAW is one of the best noise reduction software in the market, and it also comes with a handy noise reduction plugin for Lightroom. If you are looking for an effective denoise plugin to pair with Lightroom, you can’t go wrong with PureRAW.
Additionally, DxO PureRAW can also be used as standalone software. Download DxO PureRAW and try it for free.
Don’t forget to read the full review I wrote on DxO PureRAW.
 ON1 NoNoise AI Plugin for Lightroom
ON1 NoNoise is another great software with a plugin for Lightroom. Sometimes it’s overshadowed by its competition; however, this AI noise reduction software is one of the best in the market. It comes with a wide variety of tools to enhance your images and get the most out of your raw files. Download ON1 NoNoise AI and try a fully functional version for free!
Read the full ON1 NoNoise review to learn more.
 Luminar Noise Reduction in Lightroom
Luminar is a great plugin to reduce noise in Lightroom, since, in addition to reducing the luminance and color noise like in Lightroom does, it allows you to use masks and filters to apply the settings more selectively.
The main side effect I saw when reducing noise in Lightroom with Luminar was some star-removal after applying the luminance noise reduction. To avoid this, simply mask the starry area with a medium level of opacity.
You can install Luminar in Lightroom through this link. You also have the option to download the trial version.
 Nik Collection Dfine Plugin for Lightroom
Another option is to reduce noise in Lightroom using Dfine 2, a plugin included in the Nik Collection package.
In Dfine 2, you have the option to use an automatic noise reduction and, also, the option to select the noisy areas of the image yourself so the software can adjust the noise reduction.
Although you can use it for extra noise reduction in Lightroom, I find it too slow and I always end up selecting the noisy areas by myself. The local settings are not as selective as those of Topaz or Luminar.
You can get this plugin on the DXO website.

Lightroom has a very complete set of plugins to enhance its features.
On the other hand, if you’ve already decided to get a plugin, you may be asking yourself:
WHAT NOISE REDUCTION PLUGIN FOR LIGHTROOM SHOULD I USE?
The answer isn’t easy, since all the plugins on the list are effective and good options to reduce noise in Lightroom.
In my opinion, if I had to choose a noise reduction plugin for Lightroom, I would opt for one that allowed me to apply noise reduction more selectively in order to compensate for the great disadvantage of Lightroom. Furthermore, I’d look for a plugin with more functions besides noise reduction.
Topaz DeNoise AI is my plugin of choice when it comes to reducing noise. It preserves details, especially in terms of skies, thanks to its Artificial Intelligence algorithms. In addition, Topaz DeNoise AI offers an edge localization function, a tool that’s really useful for applying adjustments even more selectively.

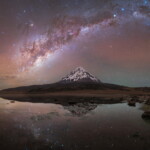
These are some of the best noise reduction software available for photographers
Other great options are DxO PureRAW and ON1 NoNoise AI. PureRAW has no match when it comes to noise reduction and preserving details; however, I don’t find myself using it that often because of the lack of adjustment tools within the interface. ON1 NoNoise offers great tools not only to remove noise but also to clone or mask adjustments.
If you’re still in doubt about which plugin is best for you, I recommend you download the free trial versions, so you can perform your own tests and see which one best suits your processing needs.
Lightroom Denoise AI vs. Topaz Denoise AI & DxO PureRAW
The latest update to Adobe Lightroom has made it a big competitor for other AI noise reduction software such as Topaz DeNoise AI and DxO PureRAW. I’ve been using these tools for a long time, and naturally, I wanted to know how Lightroom’s new AI Denoise feature compared against the best AI noise reduction software in the market.
Lightroom Denoise AI:
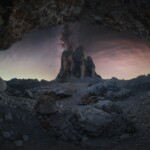
Lightroom’s AI Denoise feature has everyone in the photography community talking. I’ve run tests with multiple images, and the results are great; however, it is still not at the same level as software like Topaz Denoise AI or DxO PureRAW. Lightroom Denoise AI has a very simple interface with very few options; there are no models to choose from, and it offers very few customization options. Processing time is also an issue. Lightroom takes longer to process images when compared to Topaz Denoise AI or DxO PureRAW.
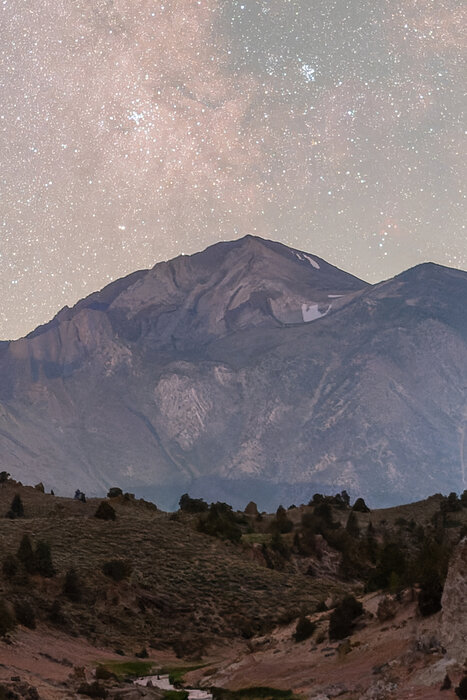
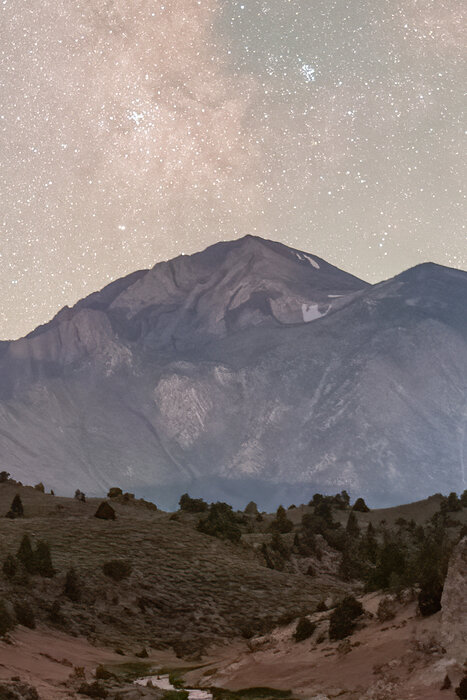
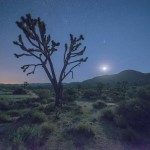
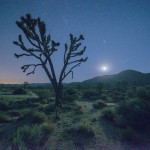
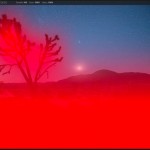
In this example, you can see a before and after of an image processed with Lightroom’s new AI Denoise tool, the results are good, and I’m sure it will improve over time.


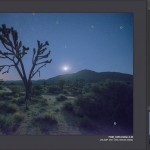
Comparison Between Lightroom Denoise AI, Topaz Denoise AI & DxO PureRAW
Lightroom AI noise reduction capabilities are very impressive, mostly taking into account this is the first version; however, Topaz Denoise AI and DxO PureRAW are still ahead when it comes to retaining detail. So, which one of these three noise reduction tools is better for you?
-
- Lightroom: Lightroom Denoise AI is better suited for those users looking for a simple AI noise reduction workflow without sacrificing any of the benefits. Also, if you already own a Lightroom Classic license and don’t want to spend the extra money on a third-party plugin, this is your best option.
-
- Topaz Denoise AI: Topaz Denoise AI is the best noise reduction software in the market. If you want exceptional results along with plenty of AI models and tools to enhance your image, you should definitely consider Topaz Denoise AI. This is the AI noise reduction software that I use in all of my night images. Topaz Denoise AI plugin for Lightroom makes it very easy to implement in my editing workflow.
Reduce Noise in Adobe Lightroom Mobile
In addition to the desktop version, Lightroom also has a mobile application, which includes the option to reduce noise in the Adobe Lightroom mobile app.

The Lightroom app offers a great variety of adjustments, and one of them is the noise reduction for phone images, since it’s one of the best noise reduction mobile apps for Android and iOS.
These are the steps to reduce noise in your mobile photos with the Lightroom mobile app:
-
- Download the Adobe Photoshop Lightroom Mobile app. ($4.99/month)
- Load the picture you took with your smartphone that you want to apply the noise reduction to.
- Create a local adjustment in the noisy area, like a gradient or radial filter.
- Click the triangle in the central part.
- Adjust the necessary noise reduction to remove the noise from the image.
- Close the local adjustment and consider if the image requires you to increase the detail. If so, just add some clarity.
As you can see, reducing noise in your smartphone photos in Lightroom mobile is possible. It’s true that the application doesn’t include advanced noise reduction, but it’s useful for removing noise quickly.
Noise Reduction in Lightroom FAQ
In this Lightroom noise reduction tutorial, I’ve covered most of the key points you need to know when it comes to reducing noise in Lightroom and using Lightroom Denoise AI. As a summary, I’ve put together this list with the most asked questions about noise reduction in Lightroom.
Conclusion: Is Lightroom worth it for noise reduction?
| Lightroom is one of the best photo editing software on the market, and the addition of AI noise reduction makes it completely worth it for noise reduction as well. The noise reduction workflow in Lightroom is easy and effective, and it’s the best option if you already own a license of Lightroom Classic and don’t want to spend extra on a third-party plugin. However, if you are looking for the best results, you might want to consider Topaz Denoise AI or DxO PureRAW. |
My experience using Lightroom to reduce noise is very positive, and it has gotten better with the new AI tools. These new tools will keep improving over time, making Lightroom even better for noise reduction in future updates.
I hope this tutorial helps you achieve better quality in your images, and let me know if the comments below if you have any questions. Also, what are your thoughts on the new AI Denoise feature for Lightroom?
Happy captures!


I agree with your conclusions that Topaz DeNoise AI is a better tool to reduce or remove noise. I’ve used all the plugins you mentioned in this article and I’ve always gone back to using Topaz.
I was extremely happy to read and watch video reviews of the new Lightroom DeNoise controls and results. But again, back to Topaz I went!
However, it seems Topaz has decided to no longer improve DeNoise AI, Sharpen AI, etc in favor of their semi-new stand-alone and plug-in, Photo AI.
Though Photo AI is a fine tool, and one that will surely improve over time, I don’t like it’s interface or selection process. I also don’t care for the results. And that has forced me to again use Topaz DeNoise, a plug-in that unfortunately is no longer on their R&D plate.
I do update DeNoise weekly and am always hopeful that the next version will bring some normalcy back to my workflow.
Hi Caskey, good point is they have a lot of updates very frequently. 🙂
A friend showed me the new addition and because my computer is slow each photo takes between 30 and 35 mins. Looks like I will be sticking to the Luminance sliders….
Haha yes, this feature requieres a powerful computer.
Question:
How does the best of these noise reduction techniques compare to stacking 10 images in a star stacker to reduce noise? Good enough so I can avoid the star stacking process and the star movement over the 10-15 framess (1-2 minutes)? This would be a big time saver in the field and in posst.
Barry,
The AI softwares nowadays make great results with just a couple clicks, but if you want to extract all the details of your Milky Way then it’s way better to use the star tracker.