ISO in photography is one of the essentials to know along with aperture and shutter speed. It plays a key role in the Exposure Triangle and in deciding what your photography settings will be.
In photography, ISO is a very simple tool to increase the brightness of your image in low light conditions or when you need a faster shutter speed, but you need to be careful since using a high ISO sensitivity in photography will be detrimental to the final quality of your images.
For this reason, in this ISO photography guide, you’ll get everything you need to know about ISO explained, like what ISO stands for in photography, how ISO works and affects your images, and in which cases you should use a higher ISO to get the correct exposure in your images. Ready to go?
- ISO in photography definition
- How ISO is measured in digital cameras?
- How to use camera ISO for correcting the exposure
- How to choose the right ISO setting
- How ISO and digital noise are related
- ISO photography examples

GET OUR FREE EBOOK TO
MASTER THE PHOTOGRAPHY BASICS
20 LESSONS AND 80+ PAGES WITH EXAMPLES, INFOGRAPHICS, TIPS, AND MORE!
What is ISO? ISO in photography definition
ISO in photography can be explained as a way to increase the light information captured by the camera sensor.
Too techy? No worries – keep reading and I promise that by the end of this article, you’ll understand what is ISO in photography.
The important thing before diving deeper is to eliminate two misconceptions:
- Historically, ISO in photography comes from the acronym “International Organization of Standardization” and a time when camera manufacturers needed to homogenize the sensitivity ratios in film cameras. Today, ISO in digital cameras doesn’t follow the standards of the ISO organization.
- Despite what many people still think, ISO in digital photography has nothing to do with increasing the light sensitivity in the camera sensor. However, there are still photographers who wrongly refer to this term as ISO Sensitivity in digital photography.
One of the best photography tips for beginners is to understand what ISO is through practical exercises in which you vary this setting in manual mode.
How ISO in photography works
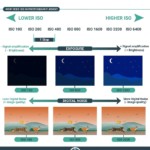
The main effect of ISO in photography is to “artificially” increase the light captured by the camera sensor, resulting in a brighter final image.
In simple terms, ISO in photography works the following way:
- The camera sensor collects an amount of light that depends on the aperture of the lens and the time that the sensor is exposed (shutter speed). This light information is also known as “Signal” in photography.
- When this light (or signal) is received, ISO plays a role in making an interpretation of it. This interpretation is related to the amplification of this light.
- When ISO amplifies this signal/light, the final image will be brighter, but it will progressively start generating more digital noise as you increase the ISO, compromising the final quality of the image.
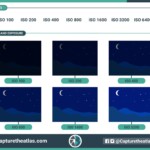
ISO levels in photography: How ISO is measured in digital cameras?
ISO levels in photography are standard in most digital cameras, and the most common ISO scales today follow this progression:

As you can see, each ISO stop in photography is double the previous number, which translates to doubling the amount of light in your image as you increase an ISO stop.
This ISO level range is known as “Native” ISO in photography, but, today, some digital cameras allow you to set higher ISO values, such as, for example, ISO 25600 or even ISO 51200. They are also built to set lower ISOs below 100, such as ISO 50 or ISO 25. These ISO numbers outside the standard or “Native” ISO are called “Extended” ISO.
How to use camera ISO in photography
Considering the previous explanation of how ISO affects photography, you’ll use the ISO to decide the final settings in your image.
ISO should always be used in photography in relation to the aperture and shutter speed. All three form the exposure triangle and you must aim at striking a balance among the three by keeping in mind the light of the scene and your photographic goals.

For example, considering a fixed aperture value, if you want to increase the shutter speed from 1/2000th of a second to its double, 1/4000th, you should increase your ISO one stop to maintain a constant exposure.
Below you’ll see which cases to use a determined ISO in photography.
When to use a low ISO in photography?
To capture quality images, the main goal is to set a Native ISO as low as possible.
As mentioned before, as you start increasing the ISO, you’ll progressively push the capacity of your camera sensor to “create” a brighter image, and this will translate into digital noise.
Base ISO is the lowest Native ISO level, and it’s the ISO that you should try to use when conditions are possible. In most cameras, Base ISO is ISO 100.
ISO values like ISO 200 and ISO 400 are also considered low ISO values in photography.
Examples where you should set a low ISO in photography are all scenes with enough light and where you don’t need a fast shutter speed.
When to use a high ISO in photography?
However, it’s not all rainbows and butterflies, and you’ll often find challenging light situations where you’ll be forced to use a high ISO in photography.
High ISO values in photography are mostly used in low light conditions or situations where you need a fast shutter speed.
Using a high ISO in night photography is one of the most common situations for using high ISO, since some scenes like photographing the Milky Way will require you to push the limits of your camera to capture a dark scene in a relatively short exposure of time.
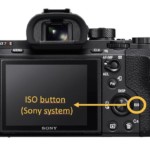
How to set the ISO on your camera
As we said in our camera settings guide, each camera has a different configuration for ISO, so you need to check how to change the ISO on your camera according to your model.
All cameras offer a quick button to change it, since ISO is one of the most important photography basics and a setting that you need to adjust constantly.

ISO button in Sony system
In fact, most camera modes, even semi-auto modes, don’t set the ISO for you. However, you can configure the Auto ISO so that the camera itself chooses the best ISO.
If you select this option, I advise you to set a maximum ISO to avoid digital noise problems and in case you are shooting a subject that moves quickly, set a minimum shutter speed to make sure you get sharp photos.
What’s the best ISO? How to choose the right ISO settings
As with the aperture and shutter speed, there is no best ISO to set on your camera, since it’ll completely depend on the light situation and the motion that you want to capture.
The only situation in which what is the best ISO is clear is when there’s plenty of light at a still scene (with no objects that move quickly). In these cases, you’ll use the Base ISO (100 or 200 depending on your camera) to get the best quality results.

To give you a rough idea, below you’ll find the best ISO settings in different photography genres:
Best ISO for night photography
The best ISO for night photography depends on the scene that you’re shooting:
Best ISO for Milky Way photography
Given the short exposure you need to capture sharp stars, the best ISO for shooting the Milky Way will generally be between 3200 and 6400 in full-frame cameras and no further than 3200 in APS-C cameras.

ISO 3200, f/2.8, 30 sec.
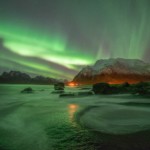
Best ISO for Northern Lights photography
Active Northern Lights require a very short exposure time to freeze the movement of the Aurora, so you’ll need a high ISO similar to the ISO for photographing the Milky Way.

ISO 5000, f/2.8, 6 sec.
Best ISO for Star Trails
If you’re shooting star trails, the exposure time is not a problem so you can shoot using an ISO below 3200 and setting a longer exposure time.
Best ISO for landscape photography
In landscape photography, when there is plenty of light, the best ISO is always the lowest Native ISO on your camera, which will most likely be ISO 100 or ISO 200.
In windy conditions and situations where you need to use a fast shutter speed, you’ll need to increase the ISO, using ISO values of ISO 400, 800 and even 1600 if necessary.

ISO 100, f/11, 1/60 sec.
Best ISO for wildlife photography
In wildlife photography, the best ISO depends on the animal and the motion that you want to shoot.
For instance, in bird photography, you need a high ISO when you want to freeze a bird flying. There is no way to provide an estimated ISO level since this will depend on the light. However, if you’re going to photograph an animal that is still or moves very slowly, you can decrease the ISO.

ISO 640, f/5.6, 1/2000 sec.
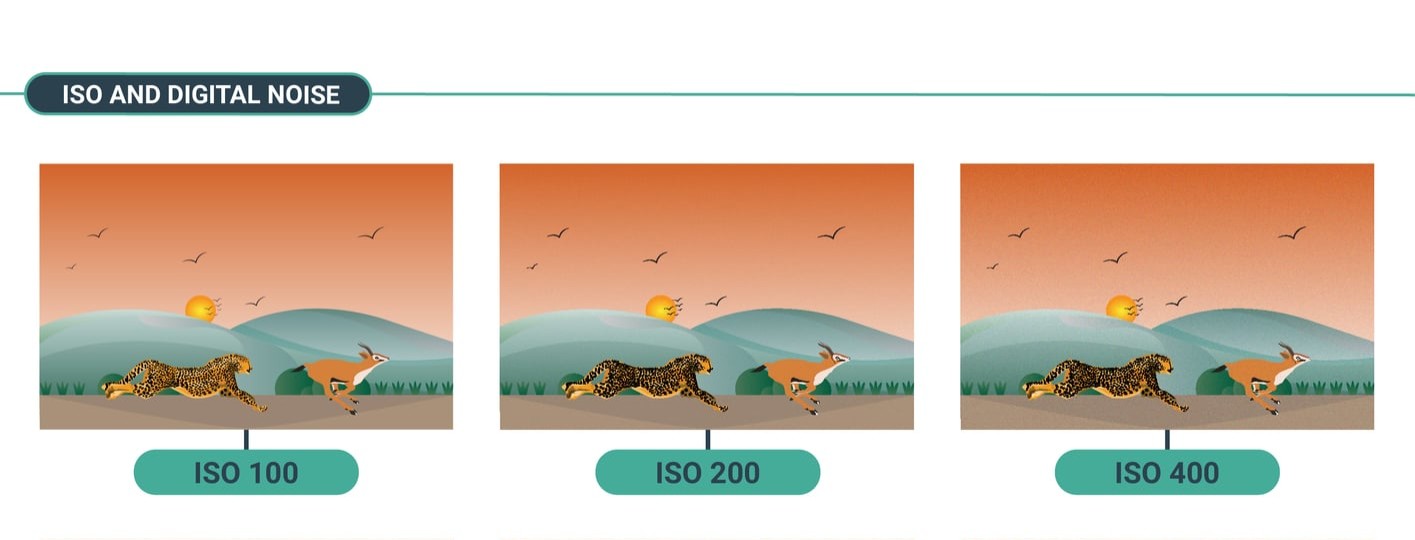
How ISO and digital noise are related
ISO and digital noise are completely related, and this is the most important thing to consider when you need to raise this setting.
As I mentioned in the section on how ISO in photography works, when you raise the ISO, your camera is “artificially” increasing the light in the photograph, and this light amplification increases the quantity of grain and noise in your photographs.

It’s crucial to understand not only what ISO is in photography but also how ISO affects your images according to your camera, since the sensor size and model will also play a key role in the final quality and sharpness of the image.
To dive deeper, I also recommend reading our articles on how to reduce digital noise by using the proper settings and which is the best noise reduction software.
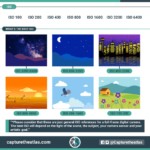
ISO photography examples
To complete this ISO photography guide and help you understand what ISO is in photography, below you’ll find some ISO photography examples where you’ll see ISO settings used in different light situations and the reasons for setting that particular ISO.
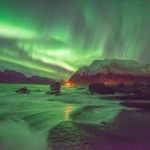
- To capture the movement when shooting Northern Lights, you need to use a higher ISO. The side effect is having more digital noise. The goal is to strike a balance between detail in the Aurora and an acceptable amount of noise:


ISO examples shooting Northern Lights.
ISO 2500 f/2.8, 4 sec. (Left) ISO 5000, f/2.8, 1.3 sec (Right)
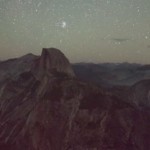
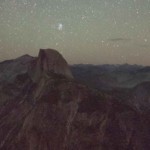
- To shoot sharp stars in a dark landscape, you’ll have to raise the ISO to avoid a long shutter speed and star trails. Again, digital noise will be a byproduct of raising the ISO in this type of situation:


ISO examples shooting starry landscapes
ISO 3200, f/2.8, 30 sec. (Left) ISO 6400, f/2.8, 25 sec. (Right)
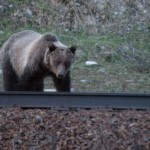
- To photograph wildlife in low-light conditions, you’ll have to raise your ISO to compensate for the lack of light and the use of a telephoto lens.


ISO examples of wildlife photography
ISO 4000, f/5.6, 1/40 sec. (Left) ISO 6400, f/5.6, 1/30 sec. (Right)
ISO F.A.Q.
Below you’ll find responses to some of the most common questions about understanding ISO in photography:
Conclusion
After all the theory and seeing some ISO photographic examples, the best way to really understand what is ISO in photography and how ISO works is to start practicing!
Shoot scenes with different light and different ISO levels, and zoom in on the images later to see how the exposure and digital noise change, the two main effects of ISO in photography.

To complete your understanding of ISO and understand how it affects exposure, I suggest checking out our beginner’s photography guide (or download it as a PDF guide here) and the articles about the other two basics in photography:
You also need to understand the following concepts:
I hope this guide to ISO in photography helps increase your knowledge about this important topic and helps you shoot stunning images!


Great article. Is the caption for the Northern Lights photograph correct? or should it be the other way around?
Thanks
We just fixed it, thanks Carla!
very informative
Thank you Aaron,
We tried to easily explain ISO so everyone starting can understand which is the best ISO to use for each case.
Dan