White balance in photography seems complex at first but can be understood very easily with a little time and plenty of examples! What is white balance and why is it important? How does it relate to color and available lighting? We’ll be getting into this topic in plenty of detail in this white balance guide.
An important key to understanding white balance in photography is knowing the difference between the various modes available, including automatic white balance vs. manual. We’ll cover that as well as how to set WB in camera, since different brands still tend to use the same icons and white balance presets.
Lastly, we’ll wrap things up with some white balance photography examples to further solidify your understanding. Many photographers spend years sticking to auto white balance. However, knowing how to make the right adjustments will increase your creative possibilities.
And it need not be difficult! Selecting which white balance to use for a scene will come naturally to you by the end of this white balance in photography tutorial!
- What is White Balance in photography?
- Setting White Balance in camera
- When to use Automatic WB vs. Manual WB
- White Balance in Post-processing
- White Balance in photography examples

GET OUR FREE EBOOK TO
MASTER THE PHOTOGRAPHY BASICS
20 LESSONS AND 80+ PAGES WITH EXAMPLES, INFOGRAPHICS, TIPS, AND MORE!
What is White Balance in Photography?
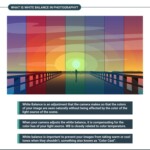
White balance in photography is defined as an adjustment that the camera makes so that the colors of your image are seen naturally without being affected by the color of the light source of the scene.
When your camera adjusts the white balance, it’s compensating for the color hue of your light source so the colors in your image stay true to reality. That is, the pure white parts of your image look white and don’t pick a warmer or colder tone due to the hue of the light source.
In photography, we often work with the noonday sun as an ideal light source. While perfectly balanced, not all lighting is as neutral as daylight. When working indoors or outdoors (in conditions other than pure daylight) and mixed lighting environments, the changes in hue will have a strong impact on the colors of your photo. White balance is important because, without it, colors in your images will take on warm or cool tones that you may not notice while photographing (something also known as “color cast”).

Our eyes and brains are very good at filtering out (white balancing) unnatural hues. However, a digital camera captures exactly what’s there, and the resulting image may look nothing like what you expect. In short, the white balance of an image can be affected by the color temperature of light in the environment.
In order to understand white balance in photography, we need to learn the basics of how white balance and color temperature work.
White Balance and Color Temperature
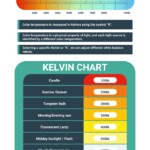
White balance and color temperature are very closely related. We describe color temperature in kelvins, a scale used to measure the color temperature of a specific light source. The nomenclature for describing kelvins in white balance is simply “K”.
Color temperature is a physical property of light, and each light source is identified by a different color temperature.
For example, candlelight and tungsten are extremely warm in color temperature, with values ranging from 1500-3000 K. Fluorescent light is related to the slightly warm cast of fluorescent lighting (typically around 4000-4500K). The color temperature of the Daylight white balance setting is relatively neutral at 5000-6500K, and will typically be the best choice for shooting outdoors. However, if the sky becomes overcast, you may need to choose the cloudy white balance setting, around 7500 K, to add warmth to the blue hues.

The color temperature and white balance settings in-camera can be a bit contradictory. When it’s set to auto, your camera automatically compensates for the color temperature. However, if you want your picture to look colder, you’ll have to select a warmer color temperature and vice versa so your camera can compensate with the opposite color temperature. We’ll see this in some white balance examples below.
Color temperature is only part of the puzzle but is fundamental for explaining white balance in photography.
Setting White Balance in Camera
Your white balance camera settings ensure you have the most accurate possible colors. While automatic white balance is the most common option, there are many choices to work with.
Manual white balance is sometimes needed for complex situations. Fortunately, most cameras include several different manual white balance modes to fine-tune your colors and save time on post-processing.
Automatic White Balance – AWB in Camera
The AWB in-camera setting is the one the vast majority of photographers stick to. We can define auto white balance as the adjustment that allows the camera to select the best white balance and color temperature settings for a given scene.
Digital cameras are best at finding the correct white balance from 3200-6500K. In other words, they’re very accurate at selecting the best color temperature between a warm indoor and daylight white balance, the light environments photographers usually work with.

The camera AWB rarely chooses an improper white balance, except for difficult lighting environments that we’ll discuss shortly.
White Balance Presets – Semi-Automatic WB
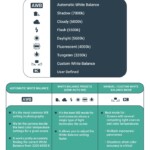
Semi-Automatic White Balance is perfect for environments where a single type of light dominates the scene. Each of the in-camera white balance presets has a symbol that will help you adjust the necessary setting faster and compensate for the best white balance in your image.
White balance symbols commonly used by most camera brands include a cloud for overcast skies or a bulb for indoor lighting (white balance tungsten). The sun is always white balance daylight, and fluorescent light white balance is usually a picture of a fluorescent fixture.

White Balance Manual Camera Settings – Custom White Balance Mode
Auto and Semi-Automatic white balance get the job done in the majority of situations. However, it’s important to know how to use manual white balance settings as well. These tools give you the best possible color accuracy, especially in challenging scenarios.
There are two types of custom white balance modes: using a neutral card or surface to calibrate white balance in camera, and manually selecting a Kelvin number.

Neutral white and mid-grey cards are used by studio photographers for setting white balance manually when extremely accurate color rendering is necessary, such as in product photography. All you need to do is select Custom White Balance and then take a photograph of a neutral white object.
The second white balance manual setting is directly adjusting the color temperature. As I mentioned earlier, this is a little counterintuitive. Remember that the higher up the color temperature goes, the cooler the light source in question is. By manually choosing your white balance and color temperature, the camera counters the dominant hue with its opposite color temperature.
For example, a manual setting of 8000K instructs the camera to add extra warm tones to generate a neutral daylight white balance. Conversely, if you want your image to look cooler, you have to select a lower white balance around 3200 K, something I usually do when shooting the Milky Way.
If you’re not sure which white balance to use, my recommendation is to preview the changes in hue on the LCD as you make manual adjustments to give you an idea of how the setting works.

As a photographer, you eventually need to use all of these settings, so it’s good to know and practice using all the WB settings. Now that you have a better understanding of how white balance in photography works, let’s discuss when to use each of these modes!
When to Use Automatic White Balance (AWB) vs. Manual White Balance
We use white balance in photography to ensure unnatural color casts are eliminated (or enhanced if we have a creative concept). But given the two tools we have, when should we use Automatic WB or Manual WB?
When to Use Automatic White Balance (AWB)
Auto White Balance is the tool you’ll use for most situations. Modern cameras are very good at selecting the correct white balance for each scene. However, when the color temperature is warmer than 3200K (tungsten) or colder than 6500K (daylight), auto white balance can struggle.
In these situations, selecting a Semi-Automatic white balance mode is best. But what about situations where there isn’t an obvious choice?

Automatic WB is the mode used in most situations
When to use Manual WB
When deciding on automatic white balance vs. manual, we need to pay special attention to the available light.
For example, it’s best to use manual white balance when your scene has several competing light sources with different color temperatures. An indoor environment lit by both warm incandescent lights and cool overcast daylight from a nearby window can confuse your auto white balance in camera. The same thing happens if you’re shooting at night with cool tones in the sky and warm tones coming from street lights.
One of the best examples to illustrate this happens when photographing Northern Lights, where the greenish/yellowish color of the Aurora against the cool sky drives the camera white balance nuts.

Manual WB mode is recommended when there are different lights and color temperatures in the scene
Photography involving multiple exposures or image stacking is a special case where you’re often better served by using manual WB. When photographing a landscape using exposure bracketing or a panoramic mode, your camera needs to take several shots of the scene. If you leave your setting on Auto White Balance, the camera may adjust the color temperature for each exposure or for different elements within the frame of your panorama. Since this can make post-processing more complicated than necessary, we’re better off manually adjusting the white balance a single time.

White Balance manual mode is also key for shooting Panoramas
Lastly, another reason to use manual white balance is when your scene doesn’t contain any neutral white or grey tones. That’s why most photographers prefer using manual white balance and WB cards when shooting studio work. Product shoots, studio portraiture, and fashion photography rely heavily on the perfect color accuracy that manual WB can capture.
How to Change White Balance In Camera
This is the perfect time to get your camera’s user manual out, since changing the White Balance depends on the manufacturer and camera model as we explained in our camera settings guide.
Adjusting white balance in entry-level cameras relies on finding the settings within the camera menu. Because Automatic White Balance works so well most of the time, beginners don’t need a dedicated WB button. That’s why there are fewer options for setting white balance in camera in entry-level models.
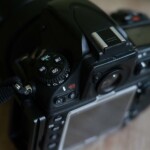
On the other hand, white balance in advanced cameras is easier to locate, since it’s a feature that professional photographers want instant access to. If you’re shooting with an advanced model, it’s likely there are white balance quick access buttons on your camera body. The WB button on most advanced models gives you instant access to both Automatic WB as well as the Semi-Automatic white balance presets (tungsten, daylight, cloudy, etc).

White Balance quick-access button (WB) in Nikon Full-Frame Camera
Another option is to select a custom Function (Fn) button to assign modes to, especially manual white balance settings like color temperature selection or white balance card calibration.
Regardless of the brand, model, or price, the white balance symbols are similar (incandescent bulb, sun, cloud, etc) and usually display the white balance kelvin color temperature (3200, 6500, 7500, etc).
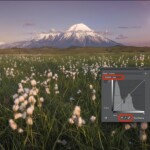
White balance in Post-Processing
Now that we’ve proven the importance of white balance, it’s time to talk about how to make white balance adjustments in post-processing. Sometimes, despite your best efforts, your color hues aren’t what you expected. Fortunately, changing the white balance in Lightroom and Photoshop (or any other editing software) can be accomplished using several quick and easy methods!
White Balance in RAW Files vs. JPEG
If you’re shooting RAW, the white balance is one of the few adjustments that you can completely change in post-processing without affecting the quality or sharpness of your image, something that’s not possible when we make other adjustments in post, like those related to exposure.
Following this, the white balance adjustments in RAW files are far more flexible than JPEG white balance. This is one of the reasons to shoot in RAW that we covered in our 25 best photography tips for beginners.
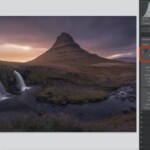
How to Change the White Balance in Lightroom
Changing the white balance in Lightroom is very straightforward. You can do it from the basic panel in the develop module, and there are three different ways to adjust the WB in Lightroom:
- Using the Lightroom White balance presets: Same as the Semi-auto WB modes in camera, Lightroom offers different presets to adjust your color temperature like tungsten wb, cloudy, daylight, etc.
- Manually with the tint/temp sliders: This is the easiest way to manually adjust your white balance in Lightroom. Simply move the tint and temperature sliders according to your goals.
- Using the eye-dropper: This is the most accurate way to change the WB in Lightroom. Once you select the eye-dropper tool on the left side of the temp/tint sliders, Lightroom will open a mosaic with different colors so you can pick a neutral grey. Once done, LR will automatically adjust your white balance, and later, you can fine-tune the final white balance if necessary.

Lightroom White Balance settings
How to Change the White Balance in Photoshop
Changing the white balance in Photoshop can be done in several different ways:
- Using Adobe Camera Raw: ACR uses the same software engine as Lightroom, so you can apply the same process as for changing the white balance in Lightroom. Simply bear in mind that some adjustments like the eye-dropper are located in different places.
- Using a color balance adjustment layer: This is an easy way to change the WB in Photoshop. Using this adjustment, you can tweak your WB by compensating for the main RGB channels with the opposite colors.
- Using Curves or levels:This method is a bit more complex than the previous one. Going to image → adjustments → curves or levels, you have different eye-droppers to set the white, grey, and black point of your image. Photoshop will automatically adjust the white balance, and you can fine-tune your WB using either the curves or levels adjustment.

White Balance adjustment in Photoshop using Curves
Which White Balance to Use: Creative Use of White Balance in Photography
Deciding which white balance to use is an essential tool, not just for accuracy but also for creating the artistic concept we have in mind.
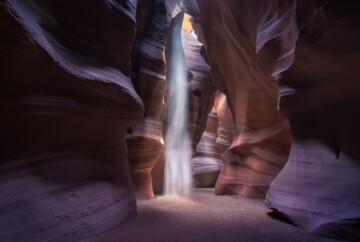
The importance of white balance goes beyond a simple color correction. There’s no such thing as an artistically improper white balance because photography is not always about color accuracy. For example, instead of choosing to correct the white balance, a landscape photographer may decide a sunset sky needs more warmth or a cloudy day needs cooler tones to create a moodier image.

Cooler White Balance to create a sense of cold, mystery, and mood
A travel or documentary photographer may want to showcase the unique lighting environment of a shady location in a way that wouldn’t work with daylight white balance. The best white balance in photography is always the one that helps viewers understand your intent as an artist.
Deciding what white balance you should use depends on your style. Many photographers are far more interested in their artistic vision than 100% realism. Unless your vision or photography subject depends on accuracy, of course. If fashion or product images are what you shoot, then correct white balance is extremely important.
White Balance in photography Examples
If color temperature and white balance are still a little unclear, here are some examples of white balance in photography to examine!
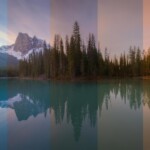
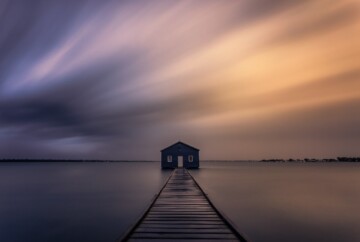
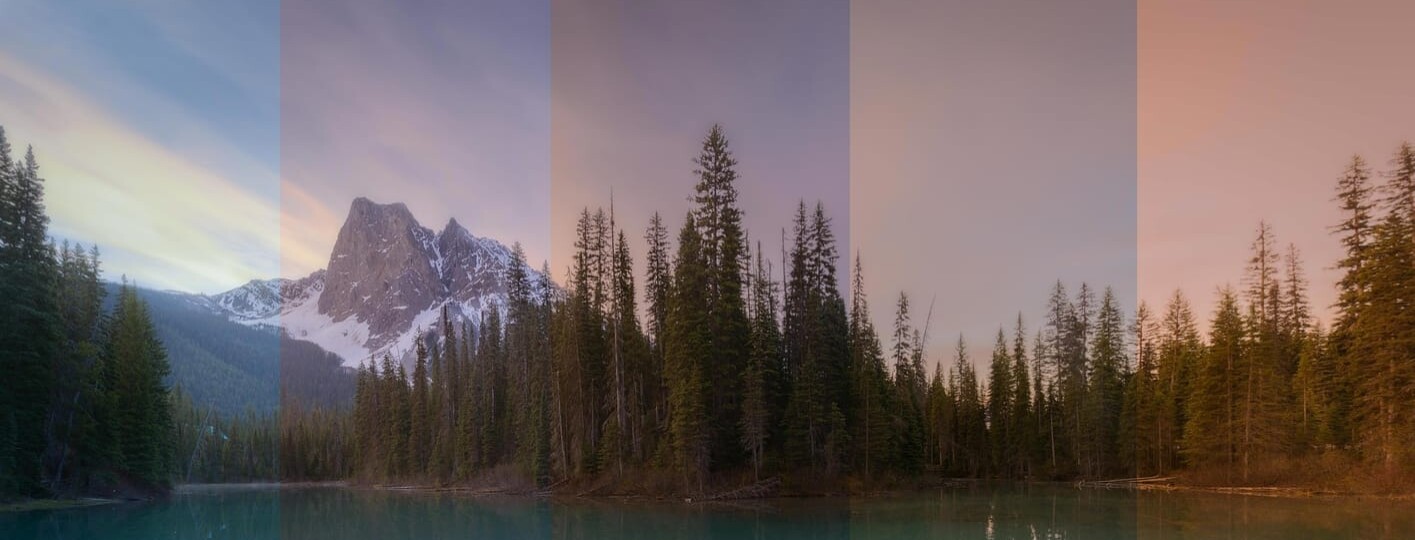
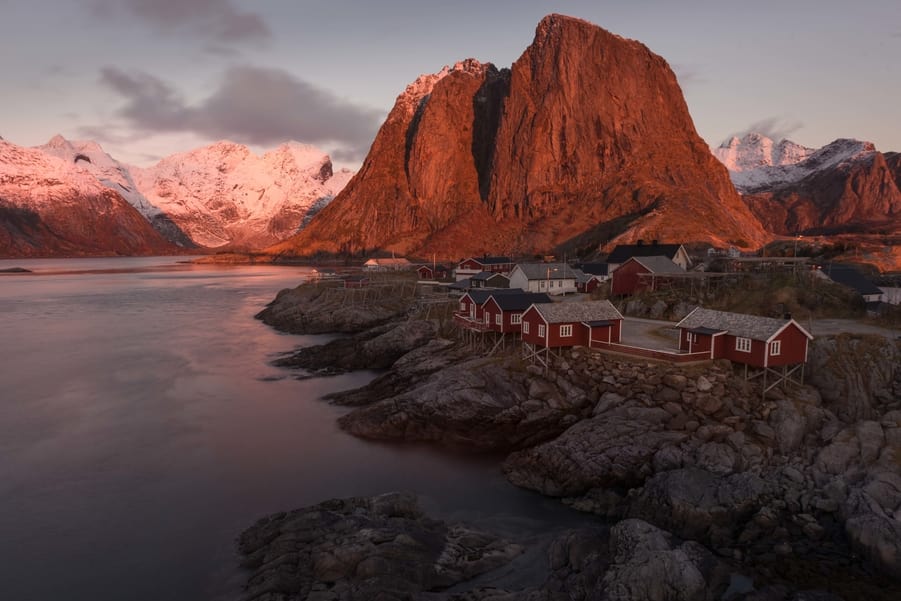
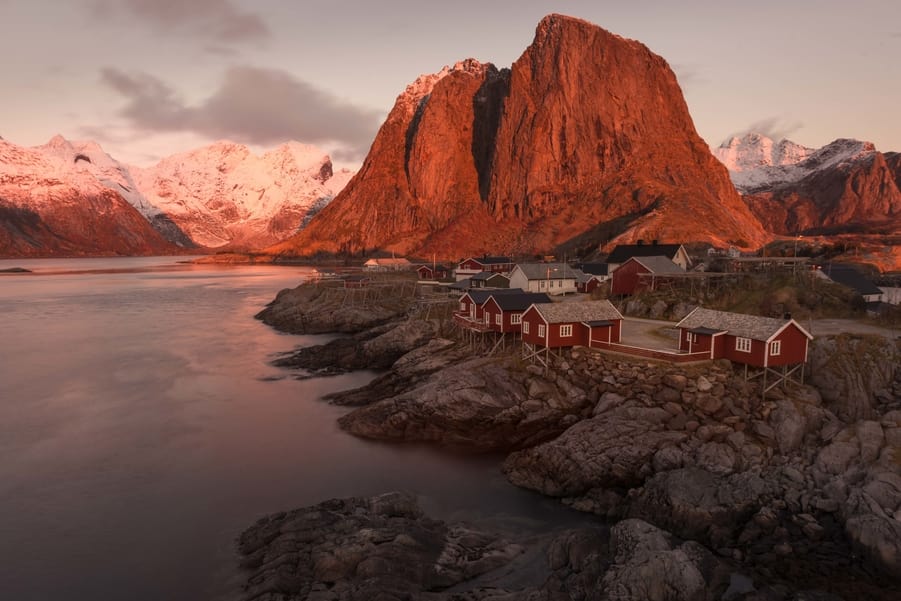
White balance example – Landscape photography
When shooting landscape photography or any other genre during the day, the Auto WB works fine most of the time. In the WB example below, the Automatic White Balance captured the scene with accurate warm and cool tones.
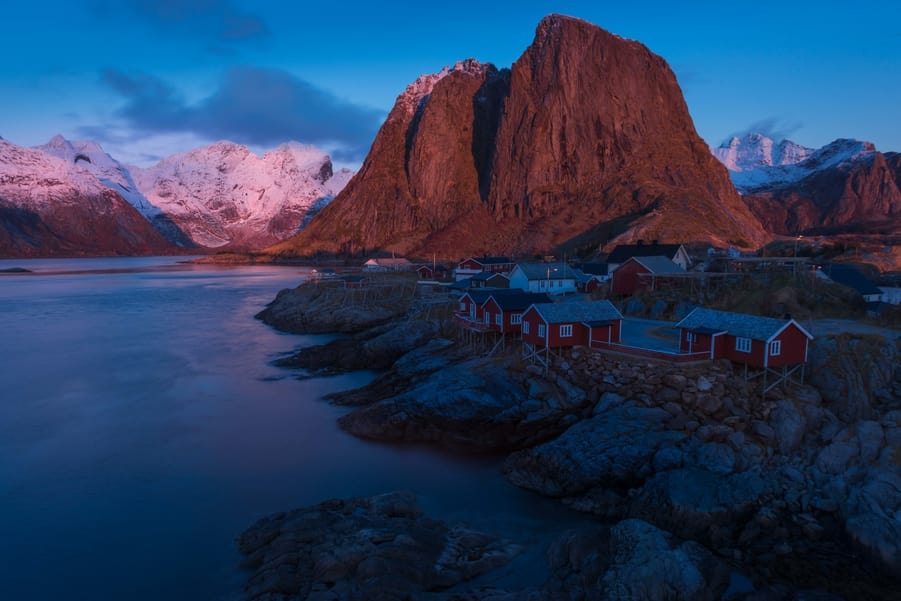
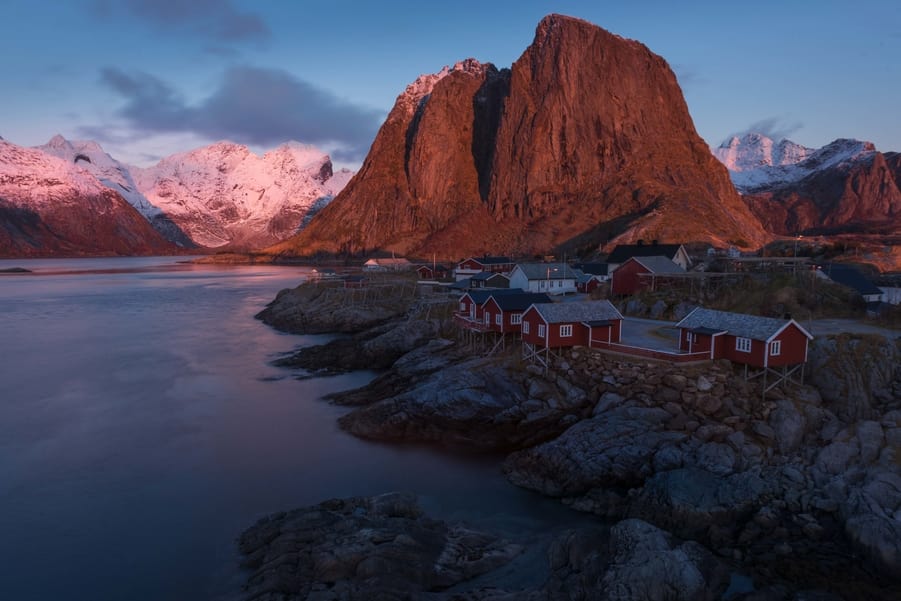
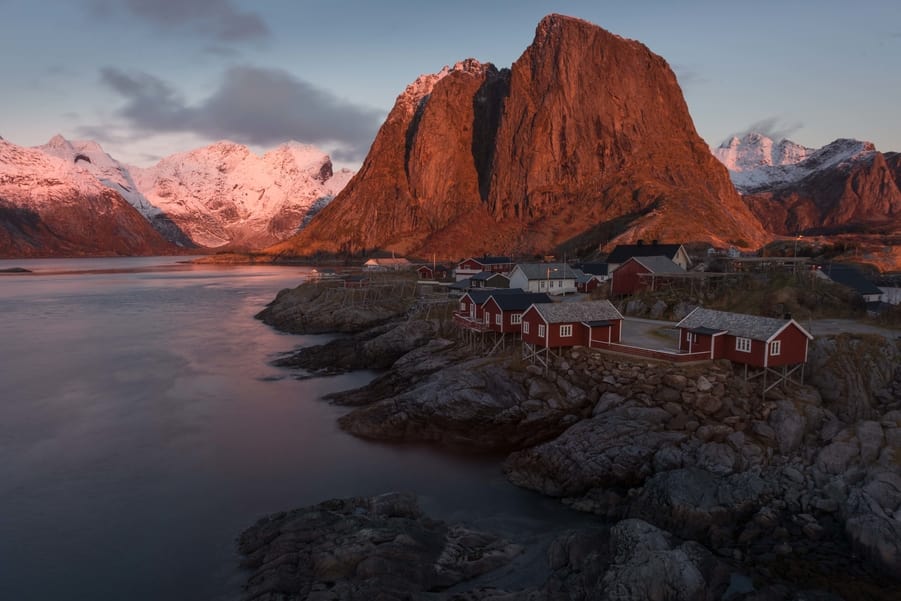
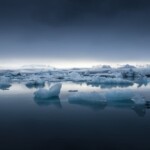
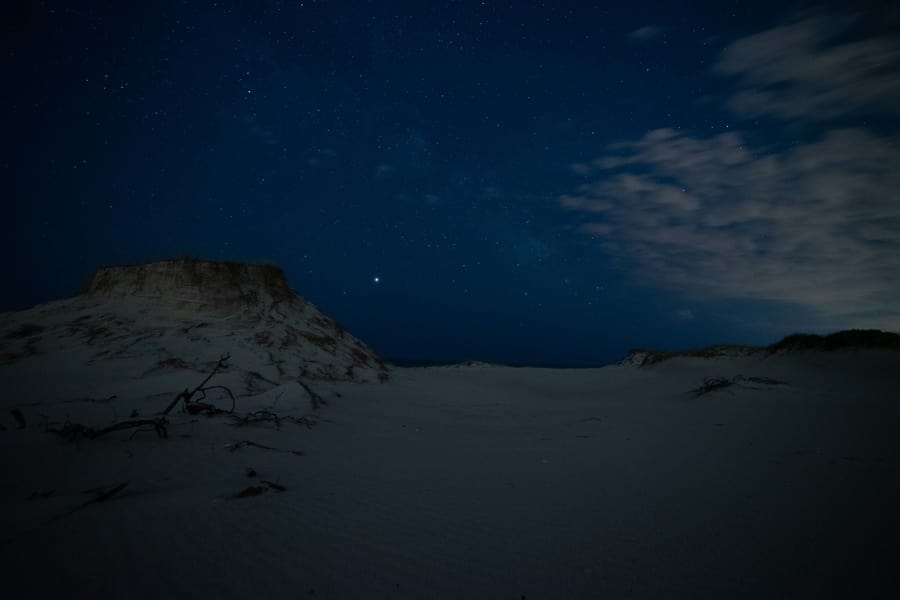
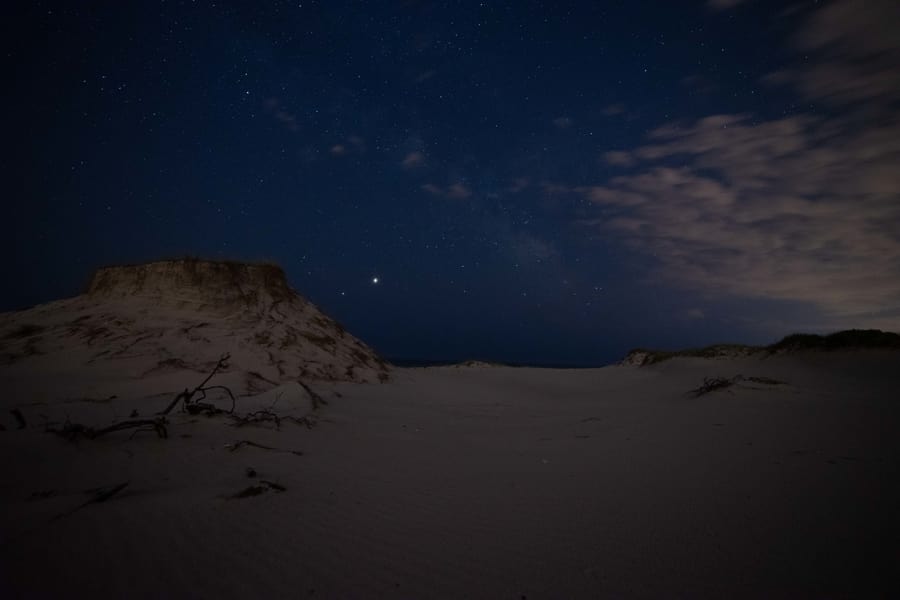
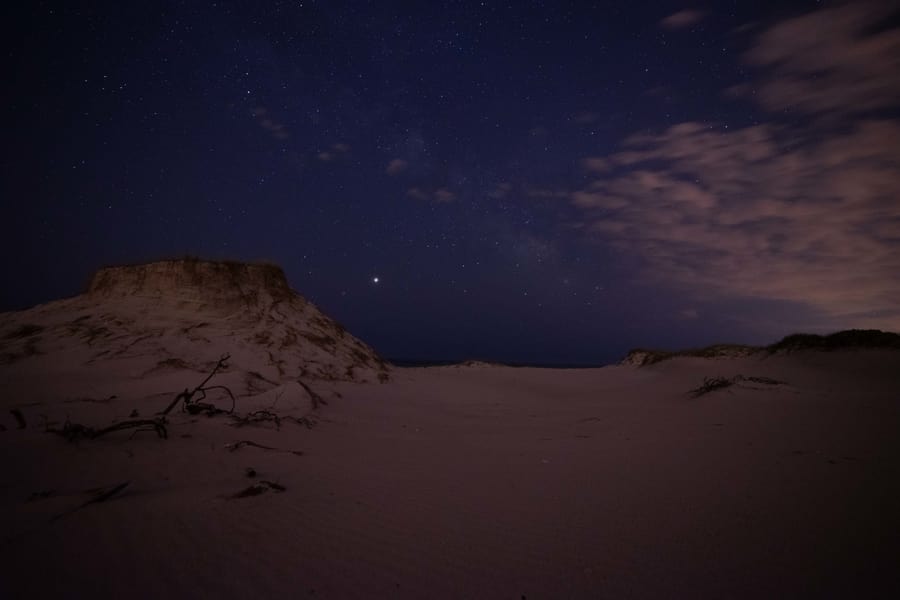
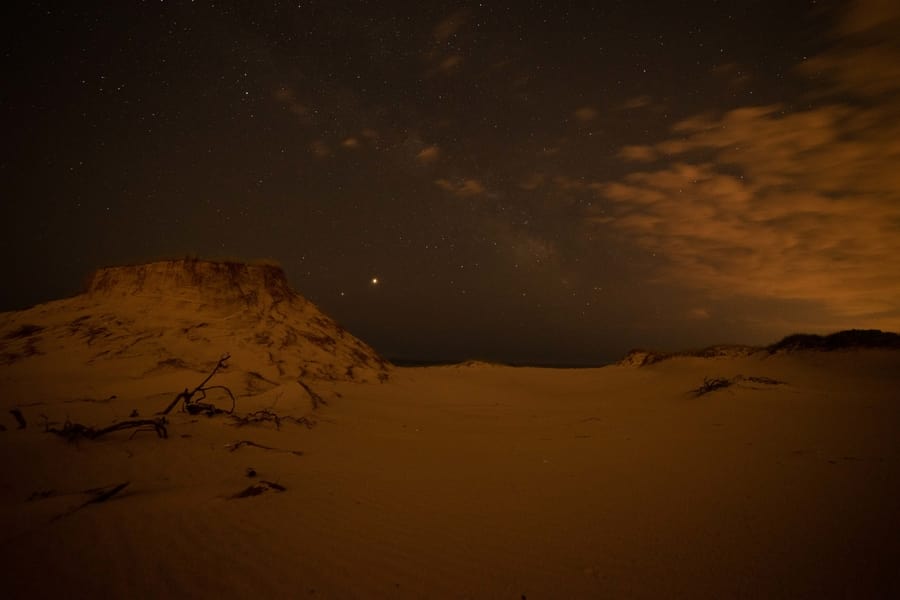
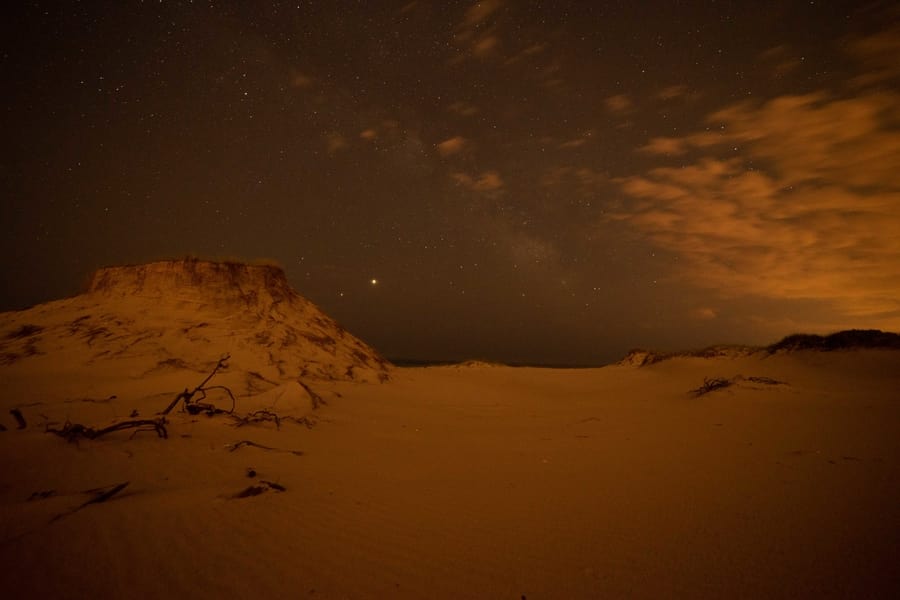
White balance example – Night photography
When you photograph at night, you can’t trust the automatic WB, especially if there are external lights, such as streetlights, light pollution, or strong moonlight. In the White balance example below, the AWB shows a strong warm color cast (Cloudy) since the passing clouds were picking the warm color from the light pollution. To fix this, I set manual white balance to 3400 K.
You can find more settings for shooting at night in our Milky Way photography guide.
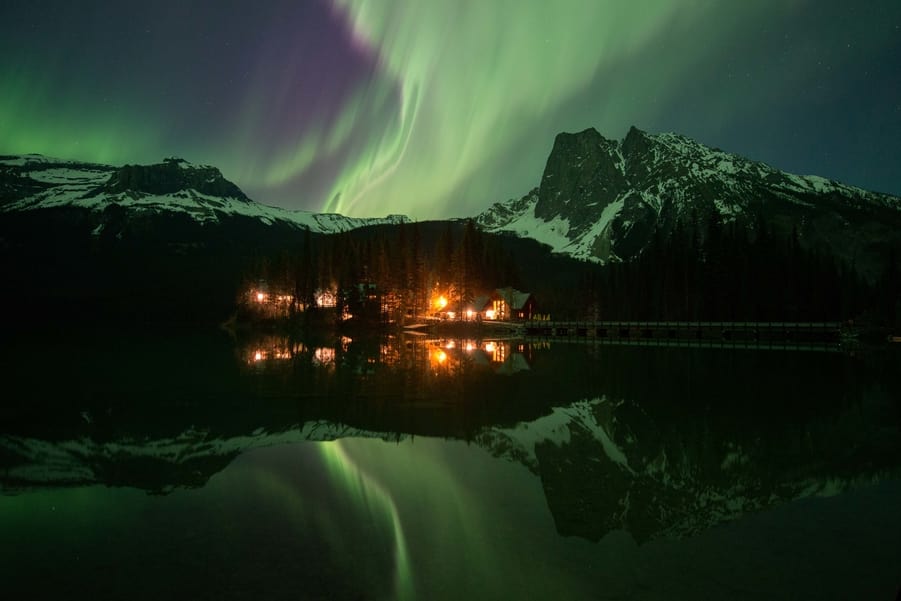
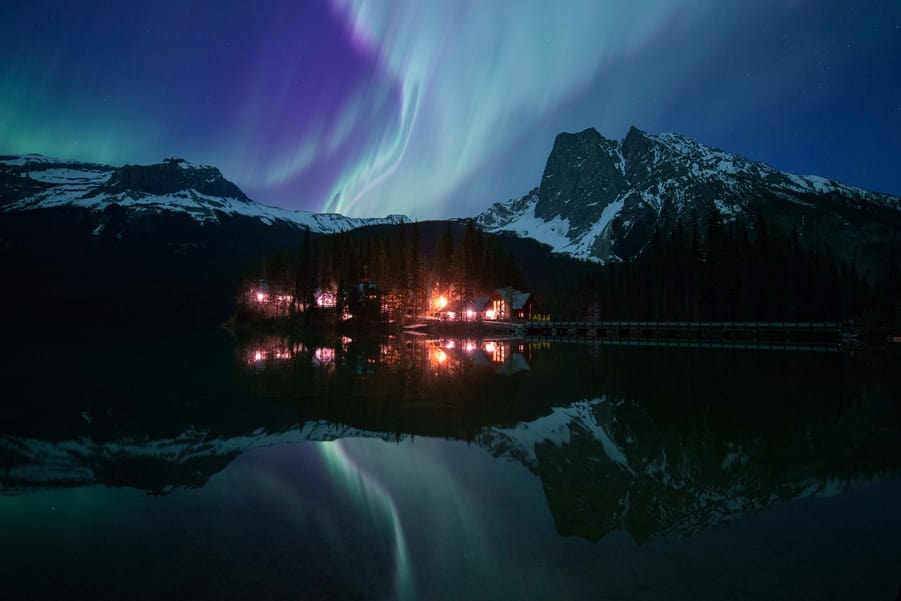
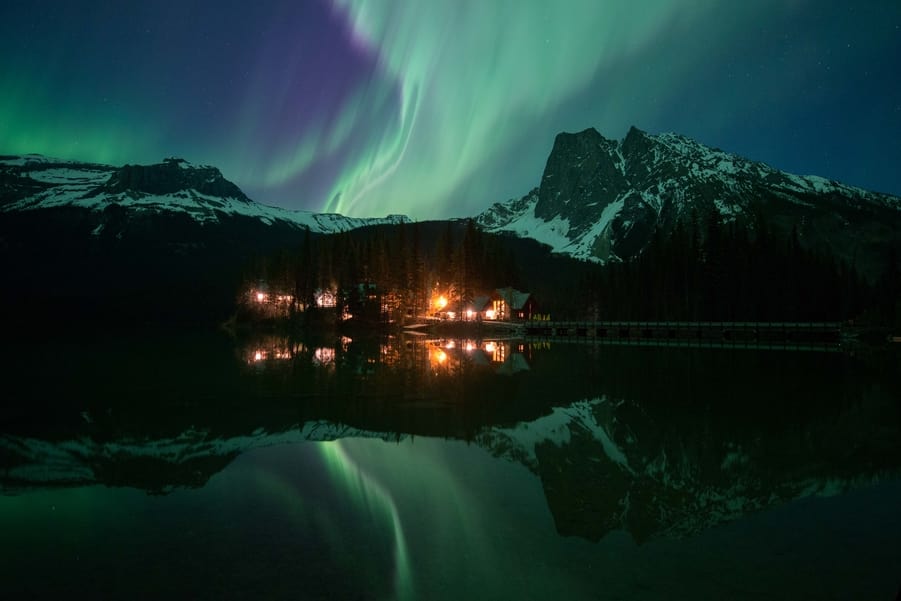
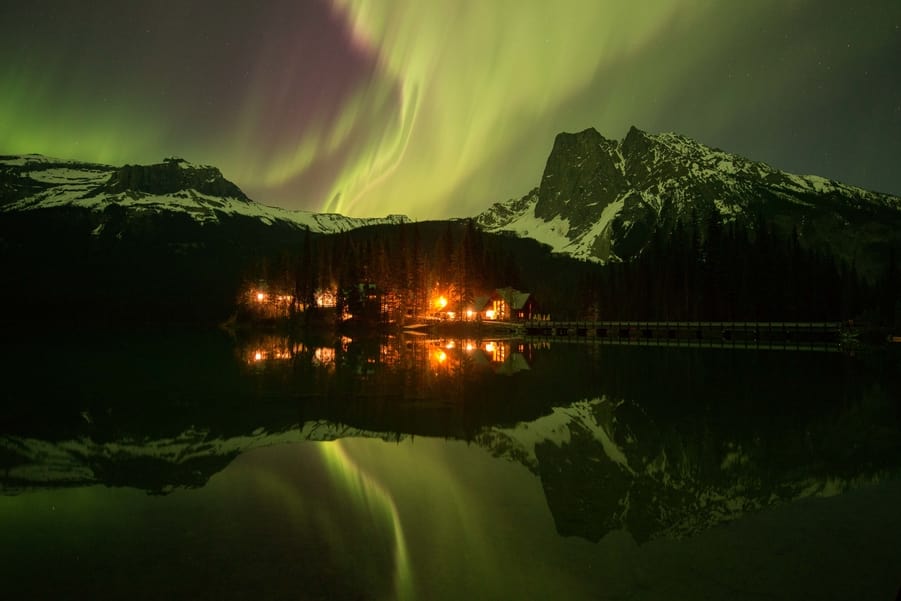
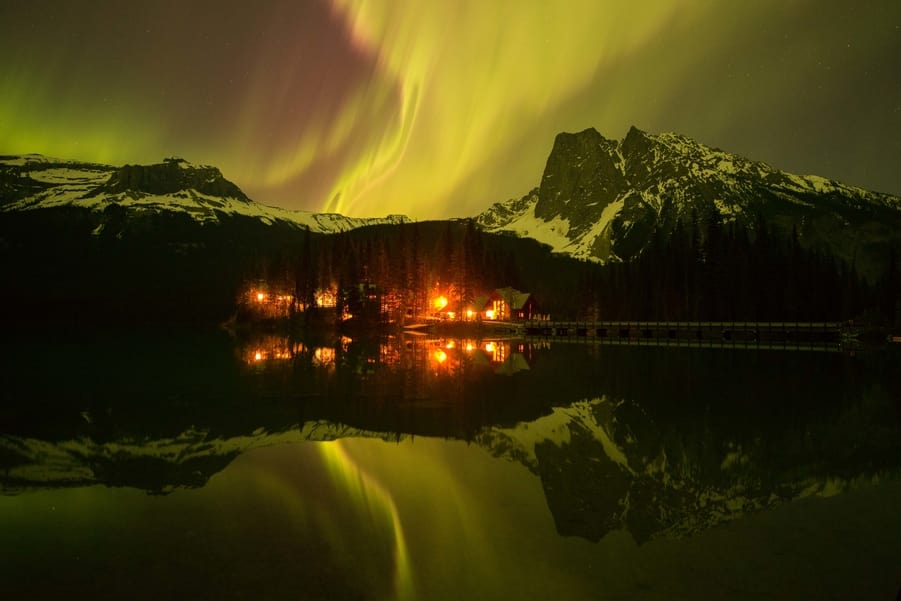
White balance example – Photographing with External lights
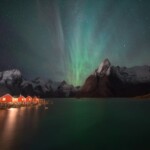
For this white balance example with external lights, I used this Northern Lights scenario, since it’s one of the easiest ways to understand white balance in photography.
As you can see, I wasn’t just shooting with different light sources and different color temperatures. The color temperature of the Northern Lights also kept changing. This light situation can be very challenging for the AWB, changing from Tungsten to cloudy and other color temperatures in a second. To sort this out, I just set the Manual WB to 3500K, since it was the color temperature that best represented the real Aurora color.
If you’re interested in learning more about how to shoot the Aurora, you can check our Northern Lights photography guide.
White Balance in Photography F.A.Q.
Below, you can find some of the most common questions related to white balance in photography:
Conclusion
I hope that this guide to white balance in photography has helped you understand not only the definition of white balance but also the specifics of color temperature and when to use auto white balance vs. manual.
While AWB is perfect for a wide range of subjects and environments, practicing with Semi-Automatic and Manual white balance modes will help you get the most from them when required. Knowing where these settings are on your camera body or in the menus is essential for getting the best white balance on camera.
Remember that deciding how to use white balance depends not only on the subject but also on what sort of artistic vision you have in mind. Some subjects, like landscape photography, are more flexible in how we can use white balance. Others, like product photography, usually need true-to-life White balance settings for realistic colors.
Lastly, make sure you check and understand the white balance examples to get the best colors for your vision or subject! Practice makes perfect, so my final white balance tip is to go out and shoot in as many different light environments as you can to see how your image color temperature changes depending on your white balance settings.
If there are still aspects to white balance in photography that are at all unclear, feel free to shoot me a comment and I’ll be glad to clarify! Also, don’t forget that you can learn more photography in our PDF photography course.
Happy capturing!