Long exposure night photography is the best way to capture the magic that happens every day when the sun goes down. Landscape photography is my favorite genre, and night photography is undoubtedly one of the most exciting things to shoot.
Taking photos at nighttime might seem daunting. Shooting in the dark might even be scary for a lot of people, but trust me: once you try long exposure photography at nighttime, you’ll discover a whole new world!
With this long exposure night photography guide, you’ll lose any fear of stepping over to the “dark side”. You’ll find inspiration from some night photography ideas, as well as all the answers that you are looking for: How can I take long exposure night shots? What is long exposure night photography?
Just keep reading below and you’ll find a breakdown of the whole process so you can start taking the long exposure night photos you have always dreamt of!
What is long exposure night photography?
The definition of long exposure night photography is the process of taking photos at nighttime using a slow shutter speed. As we explained in our guide to long exposure photography, the shutter speed is the cornerstone of long exposure photography. When you’re shooting at nighttime, long exposure photography helps you compensate for the lack of light by opening the camera shutter for a determined length of time and capturing scenes that your eyes can’t see.

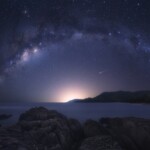
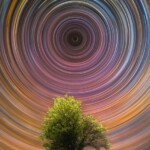
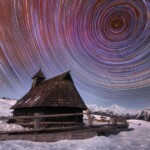
Star trail captured using the long exposure technique at night. Image by Uros Fink
Taking long exposure photographs at night, you’ll be able to capture starry skies, fireworks, car trails, or mesmerizing landscapes lit by the moonlight. Regardless of your goal, the basic principle is taking a long exposure in low-light conditions. I highly recommend reading our guide to take photos of the milky way and our Northern Lights photography guide if you want to dive deeper into those specific photography genres.
How to do long exposure night photography
Long exposure photography at night is not as simple as it seems. Shooting in the middle of the night, surrounded by nothing but darkness, is not a conducive environment for taking easy pictures. On top of that, dealing with your camera and settings is always challenging when you can’t see.
But don’t worry; having an idea of how to do long exposure night photography in advance makes everything easier. Below, I’m breaking down the 10 basic steps to do long exposure night photography:
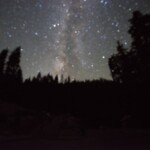
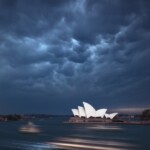
1. Plan your long exposure photography at night in advance
Walking around in the dark without knowing where to go is not the best scenario, so scout and plan your location and the images that you want to take.
The absolute key to long exposure photography at nighttime is planning, and in most situations, great planning pays off. Pack your bag carefully, and don’t forget extra batteries, memory cards, warm clothes, and a headlamp!

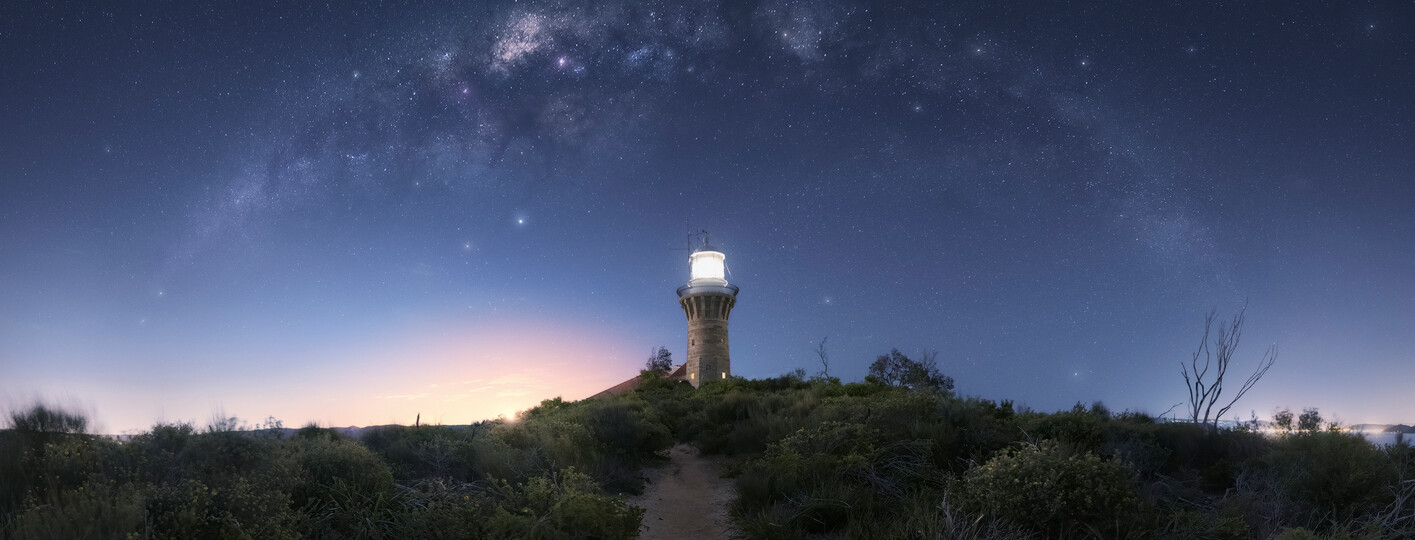
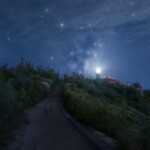
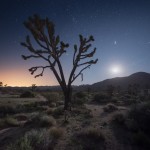
1. Plan your nighttime long exposure. Sydney, Australia – 20 sec. f/2.8, ISO 2500
When it comes to planning events such as moon or Milky Way shots, I recommend using any type of Astro calendar. A good example is our Milky Way Calendar, which is also perfect for planning night long exposure photographs.

I created Calendars for 20 different regions on earth. They are very easy to use and you can download the Milky Way calendars for this year here:
GET THE CALENDAR WITH THE BEST DATES TO PHOTOGRAPH THE MILKY WAY IN 2026
You'll also receive our PDF guide to photographing the Milky Way!

2. Choose your long exposure night sky composition
Use your headlamp or a flashlight to find the elements you want in your composition. If you want to take a long exposure of the stars, using an app like Photopills will help you find and predict the movement of the Milky Way.

2. Choose your composition. Mojave Desert – 10 sec. f/2.8, ISO 1250
Check our guide on photography composition here.
3. Set your camera on a tripod to take long exposures at night
Set up your tripod by making sure that it’s stable in a safe place and mount your camera onto your tripod. This is essential for avoiding any side effects, such as vibrations, if you want to take sharper images.

3. Set your camera on a tripod. Iceland – 1.6 sec, f/2.8, ISO 2000
4. Adjust the basic long exposure night photography settings
Turn down the brightness of your LCD screen to avoid underexposing your images, make sure you are shooting in Raw and Manual mode, turn off the image stabilization of your lens, and attach the shutter release or turn on the delay mode in your camera.

4. Adjust the long exposure night photography settings. Iceland – 4 sec. f/2.8, ISO 3200
5. Set your ISO and Aperture
As we explain in-depth below, these settings will vary according to the conditions. They play a key role in long exposure night photography.

5. Set your ISO and Aperture. California, USA – 25 sec. f/2.8, ISO 3200
6. Focus on your long expo night shot
This is possibly the most challenging step while doing long exposure photography at nighttime. Even though the technique will vary depending on your subject (focusing to photograph car trails is not the same as focusing on the milky way), nailing your focus is particularly important. Don’t forget to turn off the Auto Focus after focusing.

6. Set the focus or you’ll get a blurry image. Yosemite, USA – 30 sec. f/2.8, ISO 5000
7. Calculate the shutter speed
The shutter speed is the most important setting in long exposure photography at night, and it’ll depend on the subject, light conditions, and your goals. Below we’ll dive into the best shutter speed for nighttime long exposure photography according to the scene.

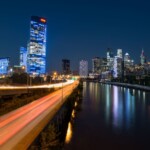
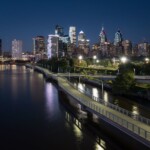
7. Calculate the Shutter Speed. Philadelphia, USA – 15 sec. f/11, ISO 100
8. Take a test shot of your night sky image
Use a shutter release or your camera’s built-in delay mode to avoid any shaking. Also, if you’re shooting with a DSLR, I recommend turning on the mirror lockup to minimize the vibrations.

8. Take a test shot. Australia – 15 sec. f/2.8, ISO 10000
9. Check the test shot to make sure that the settings are correct
Don’t forget to check the focus, histogram, and composition once you have taken your first photo. If you’re shooting the stars, zoom in to verify that they’re sharp, especially in the corners.

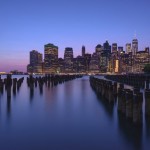
9. Check the test shot. NYC, USA – 20 sec, f/13, ISO 100
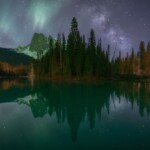
10. Take your final long exposure night photo
Readjust your settings if necessary, shoot, and enjoy the magic of taking long exposures at night!

10. Take your final photo. Two Jack Lake, Canada – 30 sec. f/2.8, ISO 2500
These are the basic steps to do long exposure at nighttime, but depending on your circumstances, gear, and conditions, you might need to change or skip some steps. The best way to find your workflow is through practice and patience.
Keep in mind that there are huge differences between doing long exposure night street photography, like taking photos of light trails at nighttime, and taking photos of the stars in a completely dark environment. Therefore, the basic settings (ISO, Aperture, and Shutter Speed) will change depending on the long exposure night photography that you’re doing.
Long exposure night sky photography settings
The best camera settings for long exposure photography depend on the light conditions and the subject that you’re shooting; the key is to have the right exposure and to capture the subject according to your desired image.
In order to succeed, you’ll need to adjust the three photography basics related to the exposure triangle: ISO, aperture, and shutter speed.
ISO for long exposure night photography
ISO is a crucial setting when doing long exposure night photography. Most of the time, shooting at nighttime means generating digital noise in your photos due to high ISO’s. To set the right ISO, you should consider some factors:
- Your camera: It is essential to know the limits of your camera to avoid digital noise in your photos. As a general recommendation, if you are shooting with an entry-level camera, don’t raise your ISO above 3200. If, on the other hand, you’re using a high-end camera, you can handle the noise up to ISO 6400 or even higher in the latest professional models.
- Ambient light: If you’re in a city or a place with external lights, the light pollution will be strong, so you can use a mid-range ISO like 400-800 to avoid blowing out the highlights. If you are shooting the stars, you can set higher ISOs like 3200-6400. Keep the moonlight in mind too and adjust your ISO accordingly.

Set the ISO according to the light conditions and your gear. Photo by Uros Fink
Don’t hesitate to use high ISOs within your camera limits, and don’t forget to check our guide to avoiding digital noise in your photos and the best noise reduction software in case you need to get rid of noise. I currently use Topaz DeNoise AI.


Aperture in long exposure photography at nighttime
Unlike daytime long exposure photography, a large aperture is required while shooting long exposure night photography in most situations. Night photography requires using a faster aperture to capture more light with your camera sensor.
Choose the widest aperture of your lens if you’re doing astrophotography, like f1.8 or f2.8. If you’re shooting long exposures at night in cities, you can close your aperture to f5.6, f8 or even f11 when the external lights are strong.

Use a wide aperture in most situations. Philadelphia, USA. 20 sec. f/11, ISO 100
Shutter speed for long exposure night photography
As we mentioned before, shutter speed is the key to long exposure photography at nighttime. Depending on your subject, you should set your shutter speed accordingly:
- Light Trails: Use an exposure longer than 30 seconds to get more trails in your photo, but be careful not to blow out the highlights.
- Star Trails: You have two options: taking an ultra-long exposure of several hours to capture the star’s movement in one photo or stacking multiple exposures of 20-30 seconds of the stars. You can find more information in our Star trails photography tutorial.
- Fireworks: Use a shutter speed between 2-10 seconds to capture the beauty of long light trails. You can stack several images in Photoshop to show different fireworks in the same image.
- Milky Way: Use the NPF rule explained in our Milky Way photography guide to know the maximum shutter speed you should set according to the focal length and camera you are using. It’ll be somewhere between 12-30 seconds if you’re using a wide lens. This is very important for capturing sharp stars instead of trails.
- Northern Lights: With faint Northern Lights, you can use a shutter speed between 8-15 seconds. If the Northern Lights are more active, you can use a faster shutter speed to capture the movement of the Aurora, between 1-5 seconds. You can check our guide to find the best shutter speed for Northern Lights photography.

Set your shutter speed according to your subject. Lofoten Islands, Norway – 4 sec, f/2.8, ISO 6400
If you are familiar with the basics of long exposure night photography, I recommend trying some tracked astrophotography using one of the best star trackers on the market. The difference in quality that you’ll see in your images will be huge!
Long exposure night photography tips
We’ve covered all the basics for doing night sky long exposure photography, but in order to help you take your night images to the next level, I’d like to add a few more tips for long exposure photography at nighttime:
-
- Invest in a good tripod: It sounds obvious, but it’s very likely that you’ll get back home with blurry photos if you don’t use a sturdy tripod. You can check the best tripod for long exposure photography at nighttime here.
- Use a good camera: Having a better camera doesn’t make you a better photographer, but if there is a type of photography where gear makes a difference, it’s nighttime photography, especially when photographing the Milky Way. I covered the best models in this guide to the best cameras and lenses for night photography.
- Add still elements to your composition: If you are taking long exposure night photographs to capture light movements, add static elements to the composition, like buildings, rocks, or mountains, to make your compositions more interesting.

Add interesting elements to your composition. Yoho, Canada – 4 sec. f/2.8, ISO 5000
- Shoot in Raw: To capture files with the best quality and enough data to play with in post-production.
- Set a custom White Balance: While taking long exposure night photographs, set the white balance manually to see consistency in all your photos, especially if you are photographing Milky Way panoramas. Something between 2850-3900K is a good starting point.
- Use a long exposure calculator: You can find lots of helpful apps to calculate the shutter speed for long exposure photography at nighttime. You can check how to use them with a couple of examples in our long exposure photography guide.
- Use the moonlight in your favor: When you’re shooting the Milky Way or doing long exposure night photography for the stars, you need to avoid shooting when the moon is too bright, but the moon can sometimes illuminate your long exposure landscapes and create a nicer atmosphere.
- Reduce the noise in post-processing: Don’t delete your images if they are noisy. Instead, you can use any of the best noise reduction software to reduce the noise while editing your long exposure night photos.
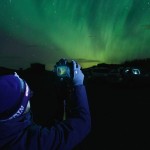
- Don’t forget to take warm clothes and a headlamp: Even the hottest days can be pretty cold at night, and there is nothing worse than feeling constantly cold while taking photos at nighttime. A headlamp is key, not only for safety, but also to help you focus and highlight elements in the scene if necessary.
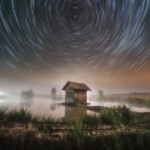
- Use an intervalometer: An intervalometer is a handy accessory while doing long exposure night photography, especially if you’re planning to shoot time-lapses or star trails. It is like a shutter release with more extras and allows you to adjust settings and to program shootings. You can find many cheap models online.

Follow the best tips to do long exposure night photography. Sydney, Australia – 3.2 sec. f/11, ISO 250
Long exposure night photography ideas
Inspiration is essential when you’re getting into long exposure night photography. Sometimes, it’s difficult to know the results that you can achieve, so, in the meantime, all you need are some ideas of long exposure pictures at night to imagine all the different images that you can create.
Nevertheless, I encourage you to make an effort and try to do something different. Even though copying is fine when you’re starting out in long-exposure photography, taking an original and personal photo is much more rewarding.
Below, you can check our selection of long exposure night sky photography ideas:
STAR TRAILS PHOTOGRAPHY
This is one of the most spectacular long exposure techniques at night. To learn how to capture them, I highly recommend checking our star trails photography guide.

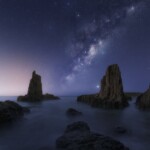
Night long exposure to capture Star Trails. Image by Uros Fink.
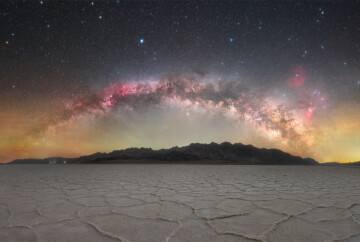
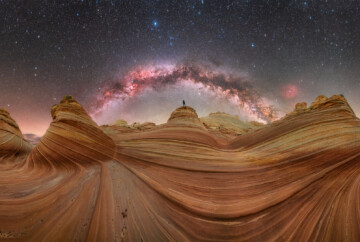
Long exposure night SKy photography examples – Milky Way

Milky Way over Cathedral Rocks, Australia – 20 sec. f/2.8, ISO 8000
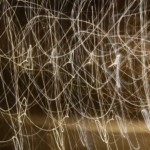
Long exposure night photography ideas – Car Trails

Long exposure and car trails. Madrid, Spain – 55 sec. f/8 ISO 100
Long exposure night SKy photography examples – Fireworks

Long exposure at night and fireworks. Niagara Falls, Canada – 1.6 sec, f/2.8, ISO 100
Long exposure photography at night ideas – light painting

Light painting example shooting long exposures at night. Florence, Italy. – 15 sec. f/5.6, ISO 800
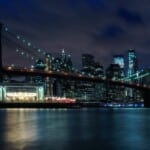
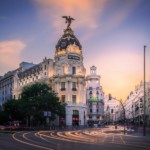
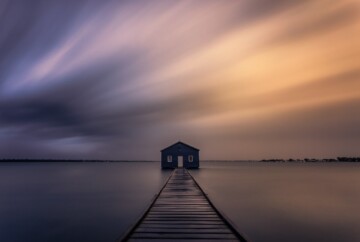
Long exposure night Sky photography ideas – City Lights

Long exposure at night with city lights. NYC, USA – 30 sec, f/9, ISO 1250
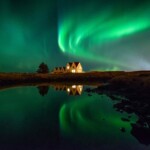
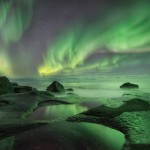
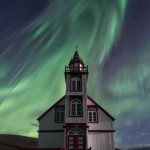
Long exposure night SKy photography examples – Northern Lights

Long exposure night sky ideas. Northern Lights in Iceland – 2.5 sec, f/2.8, ISO 4000
Long exposure photography at night ideas – Meteors

Long exposure night meteor. Thala Beach, Australia – 20 sec. f/4, ISO 3200
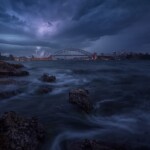
Long exposure night photography ideas – Lightning

Storm and Lightning over Sydney, Australia. 1sec. f/11, ISO 320
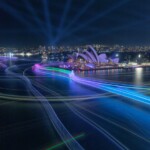
Long exposure night SKy photography examples – Light Shows

Long exposure and city light show in Sydney, Australia – 540 sec. f/8, ISO 400
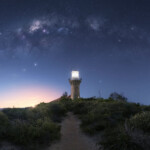
Long exposure night photography ideas – fireflies

Logn exposure at night to capture Fireflies. Pennsylvania, USA – 5 sec. f/5.2, ISO 150-60 x 40 photos. Shot by Joseph James
Conclusion
Shooting long exposure night photographs is not an easy task. There are lots of variables that might seem overwhelming, but following the simple steps and tips for long exposure night photography mentioned in this guide, you’ll have a paved way to dip your toes into this wonderful photography genre.
I hope this guide helped you understand the process of how to do long exposure night photography and that you succeed in taking all the long expo images at night that you want.
I also recommend checking our other long exposure photography guides:
- Ultimate Guide to Long exposure photography
- Daytime long exposure photography
- Landscape long exposure photography
If you have any questions related to long exposure at night, don’t hesitate to leave a comment below!


Finding the right fix for your personal machine problems when you require them lets you target your business’s important
projects, office production and daily tasks.
2nd factor to success: Install the CPU heatsink – If you like to venture
to a cool place to enjoy some aircon when you are hot, a similar
can probably be said with the CPU that you’ve just installed.
Did you know that empty printer inkjet cartridges out of
your printer were fully-capable of polluting the environment beyond levels unimaginable.
Look into my blog; http://Umbrellapayments.Com/__Media__/Js/Netsoltrademark.Php?D=Nachhaltigeentwicklung.Net%2F__Media__%2Fjs%2Fnetsoltrademark.Php%3Fd%3Dka.T.H.L.E.E.Nb.L.E.V.In.S.0.0.527