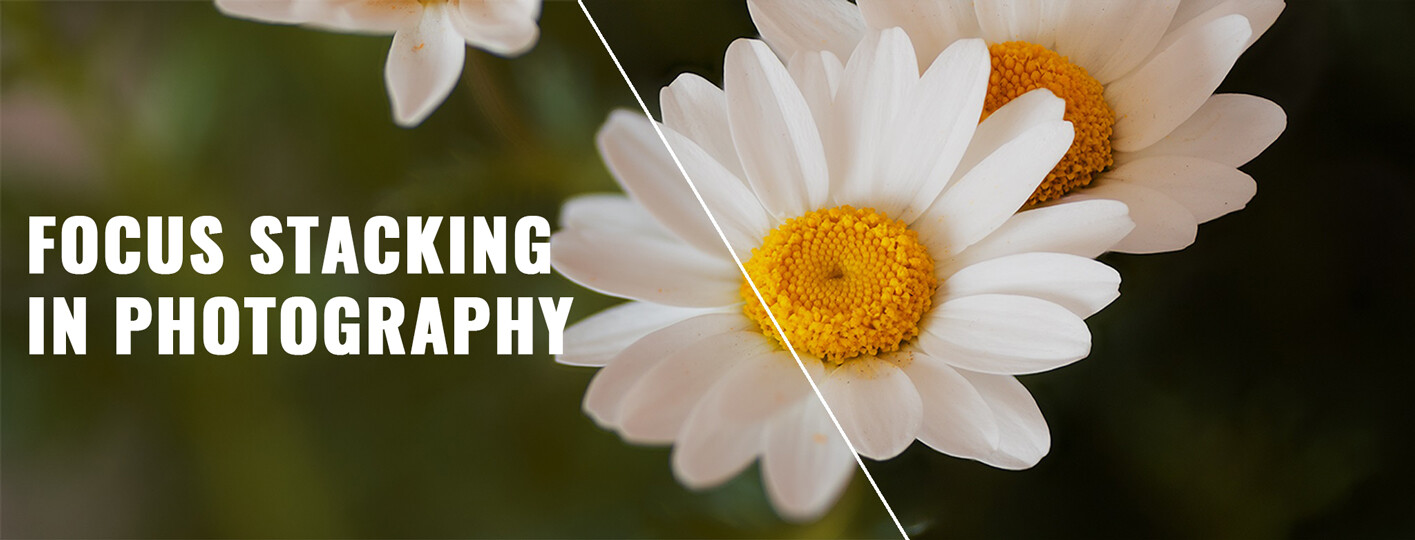
Focus stacking is a technique that opens up a whole new world of possibilities for your photography.
For many photographers, learning how to focus stack images may seem intimidating and, like something only pro photographers can do. I felt the same way too, but once I learned how to focus stack my images, I was able to add more depth and increase the sharpness in my photographs.
In this step-by-step focus stacking guide, you’ll learn what focus stacking is, how to apply this technique on location, and how to use the best focus stacking software.
I’ve divided the information into easy-to-understand sections, so you can easily follow along:
What is focus stacking?
Focus stacking (also known as focus blending) is a technique that allows you to create images that are sharp from front to back. In certain situations, your aperture, focal length, or distance from the subject can limit the areas in focus in your image. In those cases you can rely on focus stacking your images to effectively increase your depth of field, maximizing the focus in your image with no limitations.
Focus stacking works best when the subject you are photographing isn’t moving, which makes it very useful for a variety of photography genres such as landscape, macro, and product photography.


Comparing a focus-stacked photograph
If you want to better understand the different factors that can affect the focus of your image (aperture, focal length, distance from the subject), I recommend checking our depth of field in photography guide.
Something that is worth mentioning is the difference between focus stacking and focus bracketing. Focus bracketing consists of taking multiple photos at different focal planes (focus points), while focus stacking is the act of blending those photographs to create a single image that’s sharp throughout.
Although the two are technically different techniques, both terms are generally used to refer to the whole process of focus stacking. For the sake of simplicity and clarity, in this article, we will use these terms interchangeably.
NOTE: Don’t mistake focus stacking for focal stacking. When you focus stack, you blend images taken at different focus points, whereas focal stacking means blending images taken at different focal lengths.
Why is focus stacking useful?
As I mentioned before, certain situations can present a larger depth of field than your aperture, focal length, or distance to your subject can handle.
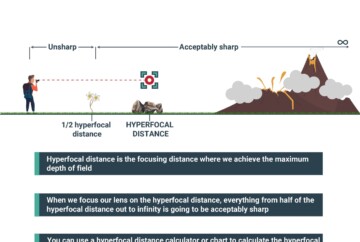
Focusing on the hyperfocal distance can help to maximize your depth of field, but this trick is ineffective when there is a subject just a few inches away from your camera.

Focus stacking is useful in landscape photography
Another option is closing your aperture, which will increase your depth of field; however, diffraction might become an issue. Exposure would also be affected, and you’d have to readjust most of your settings.
Focus stacking is the best solution for all these scenarios. It allows you to keep your aperture at lower values, around the sweet spot of your lens, and still get tack-sharp images all the way through. The only drawback is that you will need to spend a few more minutes in post-processing to focus blend the images, but as you’ll see later in the article, the actual process is very easy.
When to use focus stacking
Focus stacking in photography is a very useful technique. Still, you don’t need to use it every time you capture images. As with any powerful tool, it’s important to know when to use it and when not to.
A good rule of thumb for figuring out if you should focus blend your images is to choose your composition, take a test shot with your final settings, and review the image. If you find any blurry elements, you want to be in focus, then you should focus stack.

Focus stack your images if you need everything to be tack sharp
These are the main scenarios where focus blending your images (remember, it’s the same thing as focus stacking) is useful:
-
- With an ultra-wide-angle lens (17mm or wider) where you have elements in the foreground that are very close to your lens, like rocks or flowers, and elements in the midground and background such as waterfalls or mountains.
-
- With a telephoto lens when you are trying to frame a distant subject in a scene where there are elements at different distances and you want to get everything in focus.
-
- In macro photography when you want your images in focus all the way through.
On the other hand, these are the situations where you don’t need to focus stack:
-
- When you are looking for a shallow depth of field because you want to isolate the subject in your photograph, as in portrait photography.
-
- If your subject is moving fast, for example, in sports or wildlife photography.
How to focus stack – Step by Step guide
The focus stacking process can look daunting at first, but it’s easier than it seems.

Focus stacking is also useful when using a telephoto lens
This is, in a nutshell, the best way to do focus stacking:
1. Choose your composition
The first step when you want to focus stack is to compose your image. Sometimes, the type of composition you choose will determine if you need to focus stack or not, so always start by making sure that you get the best possible composition.
One of the most common situations to focus stack is when you have a foreground element that is very close to your camera.
You can find some inspiration and examples in our photography composition article.
2. set up your tripod
Make sure your tripod is steady – if it moves during the process, it’ll be harder to blend your images later in post-processing.
You can also do a focus stacking handheld, but, as commented, the editing process will be more complex.

Focus stack your photos when you have a strong foreground
3. Close your aperture for focus stacking
As I mentioned earlier, your aperture directly impacts your depth of field. Closing your aperture will guarantee a greater depth of field, meaning you won’t need to take as many images.

Close your aperture to focus stack; that way you can shoot fewer photos
Bear in mind that, the more you close your aperture, the more optical diffraction there will be in your image which will result in losing image quality.
4. Dial in your shutter speed
Select your shutter speed depending on how fast your subject is moving. I recommend using fast shutter speeds, about ½ second or faster. That way, the time gap between the first image and the last one will be short.

Use a fast shutter speed to freeze your focus stacking subject
If you are shooting fast-moving subjects, like flowers being blown by the wind, you’ll have to use a fast shutter speed, like 1/500 or faster depending on the movement.
5. Set your ISO
Ideally, you want to use the lowest ISO possible; however, if your scene requires increasing the exposure after you’ve dialed in your aperture and shutter speed settings, you can compensate by increasing your ISO.
A good example is, again, moving subjects where you’ll have to use a fast shutter speed. In these cases, raising the ISO will be the only option to compensate the exposure triangle for a narrow aperture.
6. Focus and shoot in different areas
In this step, you can use the autofocus or manual focus. I recommend starting at the front and working your way to the back. Start by focusing on the elements you have in your foreground, then move to your midground, and finally shoot your background.
The number of images that you need will depend on your aperture, focal length, and distance from the closest element. Sometimes, two images will be enough while other times, you’ll have to capture several more to get all the different areas in focus.

Take more photos than you think you’ll need for your focus stacking
NOTE: Some camera models have a built-in focus bracketing and stacking mode that will automate this process. You’ll find a complete list of models in the F.A.Q section at the bottom of this article.
7. Check the focus in all your photos
Make sure you’ve covered the entire focal plane of your image. If you encounter an element that is out of focus, repeat that single shot or go back to step 4 and re-do it all. Similarly, if the brightness of the scene has shifted, you should start again from step 4.

After shooting, carefully check your image for out of focus parts
8. Focus stack your images in Photoshop or any other focus stacking software
Once you have focus bracketed your images, it’s fundamental to use software to blend all the images and get a final image with the maximum focus.
In the next section, I’ll show you how to focus stack in Photoshop, Lightroom, and Helicon Focus.
Focus stacking in Photoshop
Focus stacking in Photoshop can be done by following just a few simple steps.
Before learning how to focus stack in Photoshop, make sure you have focus bracketed your shots on location, as that will be the basis for this process.
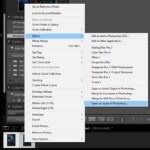
1. Open your images in Photoshop
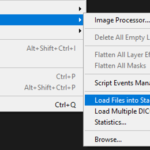
Click on the File menu, then go all the way down to Scripts and select Load Files into Stack.

1. Load your focus stacking images into Photoshop
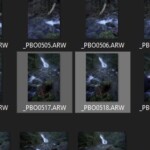
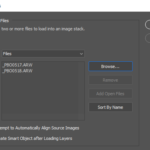
2. Find your images
In the new window, click Browse, then find and select your images. Finally, click OK.

2. Click Browse and find your images
NOTE: You could check the first box (Attempt to Automatically Align Source Images) to have Photoshop auto-align the layers when you click OK; however, I recommend aligning your images after you’ve imported them.
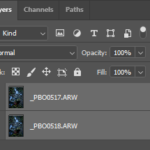
3. Select all your layers
Click on the first layer, then hold down the Shift key and click on the last layer.

3. Select all your layers
4. Auto-Align the layers
Open the Edit menu, then click on Auto-Align Layers.

4. Auto-Align your layers
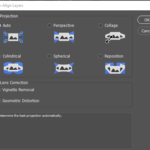
5. Chose Auto projection
Under Projection, leave it as Auto and then click OK. This step might take anywhere from a few seconds to a few minutes depending on your computer and the number of images you have imported.

5. Auto projection will do the job most of the time
NOTE: Don’t skip this step even if you used a tripod. Any minor vibrations between the shots, or even focus breathing could cause your images to not be aligned properly by default.
6. Auto-Blend Layers
Keep all your layers selected, then open the Edit menu again, and click this time on Auto-Blend Layers:

6. Click on Auto-Blend Layers
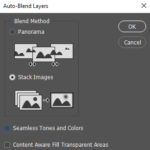
7. Select Stack Images
Under Blend Method select Stack Images. Leave both checkboxes at the bottom unchecked, then click OK.

7. Use the Stack Images option
NOTE: I don’t recommend using Seamless Tones and Colors because it’ll make slight exposure and color adjustments in some areas of your image, which can result in unwanted artifacts that will require masking and other corrections.
This step may take anywhere from a few seconds to a few minutes depending on your computer and the number of images you have imported.
8. Check the resulting focus-stacked image
At this point, the focus stacking process is complete. Zoom in on your image and make sure everything looks good.
Photoshop isn’t perfect, and sometimes the focus stacking result might not be a hundred percent accurate. In the next section, I’ll show you how to fix any errors.


8. Check the resulting focus-stacked image
fixing focus stacking imperfections in photoshop
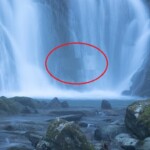
Photoshop doesn’t always do a great job at focus stacking, and you might find some mistakes here and there. After focus stacking your image in Photoshop, zoom in and make sure everything looks good. If you find any visual glitches, follow the instructions below to fix them.
Fix focus stacking errors in photoshop
I’ve personally noticed this tends to happen more often with elements like water, as you can see in this image.
Always take a close look at your final focus-stacked image and locate any unwanted artifacts.

Locate the imperfection
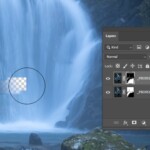
Go over to your layers panel, then start hiding layer after layer until the artifact disappears, and you see the checkered pattern.

Find the layer with the glitch
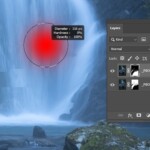
Make the layer visible again, then select the layer mask. After that, select the Brush tool. Use a normal soft brush, with 100% opacity and with the foreground color set to black.

Remove the imperfection using the Brush tool
Paint over the artifact and it’ll disappear, making the checkered pattern visible. Remove the whole glitch.

Don’t worry if you see the checkered pattern; that’s how it should be for now
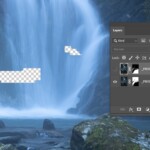
Move over to the layer mask right underneath the layer with the glitch. Use the soft brush with 100% opacity, but this time, select white as your foreground color. Paint over the area with the checkered pattern. This will fill in the area correctly.

Paint over the layer mask right beneath and fix the imperfection
Repeat this process for every defect you find in your image that needs to be corrected.
Focus stacking in Lightroom
Starting your focus stacking process in Lightroom comes with a few benefits. If you need to make any adjustments to your photos, you can easily apply them to this software. What’s great about Lightroom, is that you can easily batch process your photographs, which speeds up the editing process.
To focus stack in Lightroom follow these simple steps:
1. Import your images into Lightroom
In the Library tab, click on Import, then locate the images you want to import for focus stacking.
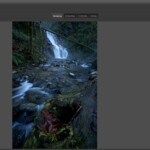
2. Open the Develop module
Click on Develop at the top right corner.

Open the Develop module
3. Edit your image
Apply any adjustments you need to your image. You might want to adjust your exposure so that it matches in all the photographs or use lens corrections if you used an ultra wide-angle lens, which may cause distortion.
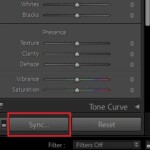
4. Synchronize the settings
Once you are happy with your image, select all the images you imported by clicking on the first one, then hold Shift and click on the last image. Now click on Sync.

Sync the changes
In the new window, click Check All, then click on Synchronize.
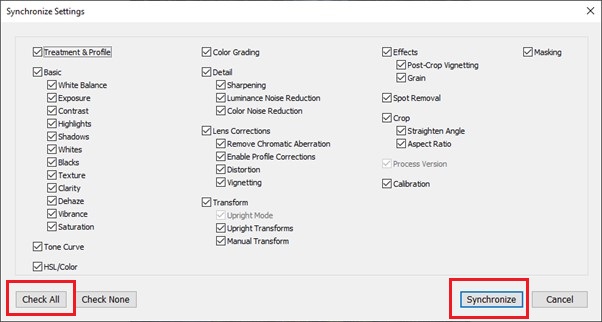
Check all and click Synchronize
5. Open as Layers in Photoshop
Keep all your images selected, then right-click on any of the images and go to Edit in – Open as Layers in Photoshop.

Open as layers in Photoshop
6. Focus stack your images
Once you open your images in Photoshop, follow steps 3 to 8 from the previous section.
When using Lightroom, you still need Photoshop to do the actual focus stacking process. As of today, Lightroom doesn’t have a built-in focus stacking tool. You can get Lightroom and Photoshop as a bundle for $9.99/month.
Other focus stacking software – Helicon Focus Stacking
Helicon Focus is the best and most advanced focus stacker you can find. Although it’s not perfect, it’s faster and more accurate at focus stacking than Photoshop.
I didn’t want to forget Helicon Focus in this focus stacking tutorial, so here is how to use Helicon Focus:
1. Locate your images
Open a new Windows Explorer window or a new Finder window and find the images you want to import for focus stacking.

1. Open Helicon Focus
2. Select the images
Click on the first image you want to use. As you hold down the Shift key, click on the last image you want to import.

2. Locate your focus stacking images then drag and drop them in Helicon Focus
3. Drag and drop the images
Drag all the selected photos and drop them in Helicon Focus.

3. Make sure all your images are loaded into Helicon Focus
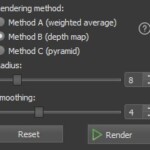
4. Render your image
Click on the Render. Use the default, which will get the job done.

4. Default settings will get the job done
NOTE: Rendering time will depend on the number of pictures you’ve imported, as well as your computer’s processing capacity.
5. Save your image
Once the rendering is done, click on the Saving tab, then select the saving or publishing option of your choice.

5. Choose how you want to save your final image
I’ve been using Helicon Focus for years and, as I mentioned, it’s much faster and more accurate than Photoshop when you want to focus stack your images. The only downside of this software is when there are moving elements (like flowers blowing in the wind), but in most scenarios, you’ll be able to focus stack your photos in seconds.
You can get Helicon Focus here for $30 a year or $115 for a lifetime license. They also offer a free trial version.
Focus Stacking Examples
Learning how focus stacking works and how you can apply it to your photography will put you on the right path to becoming a better photographer.
However, the best way to understand a new concept such as focus stacking is through visual examples.
I’ve selected some images that I took using the focus stacking technique. I hope these will get you inspired for your next focus stacking session.
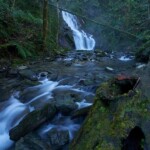
Focus stacking in landscape photography
As I’ve covered throughout this article, focus stacking in landscape photography is extremely useful.
One of the most common landscape composition techniques is to have a strong foreground, with leading lines, flowers, rocks, etc. This creates a very powerful image, but it’s usually almost impossible to get everything sharp in one photo, so you need to focus stack.

Focus stacking in landscape photography will add depth to your compositions
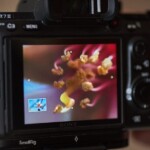
Focus stacking in macro photography
Macro photography is the genre that benefits the most from focus stacking. Macro lenses are known for having a very shallow depth of field and the subject is usually very close to the lens, making it almost impossible to get your whole image in focus in one shot. If you are into macro photography, focus stacking is a technique you must learn.


Comparing depth of field in a macro photo
Macro photographers often use specialized tools, such as focus stacking rails, for more precision.
Focus stacking in astrophotography
In astrophotography, we use very wide apertures, generally f/2.8 or wider, to capture more light. This reduces our depth of field, which will, in turn, force us to focus stack if we have elements in the foreground. A very good example of this is Milky Way photography, where we generally have a subject in the foreground.

Focus stacking can also be done in astrophotography
Check out our Milky Way photography guide to learn more about this fascinating genre.
You can also apply focus stacking rules when shooting at night.
Best tips for focus stacking
Over the years, I’ve become more efficient at how I focus stack my images. I’ve put together this list of focus blending tips to help you avoid some of the mistakes I made in the beginning.
- Close the aperture in your lens
Most of my focus stacked photos are taken between f/11 and f/16. This reduces the number of images needed to cover the whole focal plane of the image.
When closing the aperture for focus stacking, always consider optical diffraction. If your goal is to capture the sharpest images, I don’t recommend going over f/16 on most lenses.
- Take more images than you think you need
Being efficient doesn’t mean you have to rush through the process. It’s better to have shots you won’t need than the other way around. Take your time and make sure you’ve covered all the focus points in your composition.

Don’t skimp on pictures; take as many as you need
- Use manual mode
In scenes where the light doesn’t change much, manual mode will provide better results at ensuring consistent exposure across all photos. Manual mode also gives you better control over the settings, allowing you to make sure everything looks optimal.
- Shoot a bookmark photo
Take a photograph of your hand before shooting your first image and after you shoot the last one. During the editing process, this will help you know where your focus bracketed images begin and where they end, which will make things easier during post-processing.
- Always zoom in
Always zoom in on and review the individual images, and make sure the entire focal plane of the image is covered.
Focus stacking F.A.Q
These are the most common questions that arise when it comes to understanding focus stacking:
Conclusion
Hopefully, after reading this focus stacking guide, you’ll decide to try and put this powerful technique into practice. For me, it was a game-changer in my photography.
Additionally, understanding when and how to use focus stacking will become second nature the more you practice. I encourage you to grab your camera and play around with this technique. The next time you see a scene where using the hyperfocal distance isn’t enough to get maximum focus, you’ll know the best way to capture a sharp image from front to back.

Focus stacking in landscape photography
When it comes to focus stacking software, remember that this step is key for merging all the images. Focus stacking in Photoshop is possible, but if you find yourself focus stacking a lot, I recommend using Helicon Focus since it makes the process faster and easier.
If you have any questions related to focus stacking, feel free to post them in the comments below!


Awesome article! I really needed to know this, I will save it for later in case I forget how it’s done. Thanks for sharing! <3
Thanks so much, Alex. This is a very helpful technique in landscape photography 🙂
Great read! Any recommendations in regards to White Balance setting?
I recommend using a manual white balance setting and adapting to the scene. If you are shooting RAW it is easy to correct your white balance in postprocessing anyway, but when you set it to manual or any of the predefined presets (cloudy, sunny, tungsten, etc.) it is one less thing you have to worry about in the editing process.
Thank you, thank you and thank you again. I am thanking you for two things. 1. As a hobbyist, I naturally will center my main object. However, as I started reading to improve my photography, most articles were against centering the main object but rather placing it either on your right or left of the scene. I copied these but never was pleased with my images. Gradually, I lost interest in photography. Looking at your images, there is a happiness I feel in appreciating the pictures you took. I soon realized that you placed the object of main interest in the middle in direct view of the readers eyes, not to the right or left. I will go back to how I have previously been shooting. Again, than you I believe again.
2. I did buy Helicon focus in 2016 but have not used it for awhile as I got away from focus stacking and into multiexposure landscape photography using layers in photoshop and lightroom. Your article have aroused my interest again into focus stacking. Thanks.
You have found a new student.
I appreciate your comment Ernest and I’m glad to know your are going back to photography. Composition varies a lot depending on the subject you want to capture and the conditions. I suggest you take a look at our article on composition if you want to learn more: https://capturetheatlas.com/photography-composition/
On the other hand, as for Helicon Focus, it’s a great piece of software, and if you are going to be doing focus stacking, I strongly recommend it.
Thank you so much for this comprehensive analysis. I believe the Canon R5 and R6 also have a function for focus bracketing.
You are correct, the R5 and R6 have a focus bracketing function, however, I’m not sure if it stacks the images directly in camera.
Thanks for your comment!
Thank you so much for this comprehensive analysis. I believe the Canon R5 and R6 have a function for focus bracketing.
Thank you! Most advanced cameras include this function now, which makes everything easier 😉