When traveling abroad, get a policy from one of the best travel insurance companies. Get a 5% discount on Heymondo, the only insurance that pays all medical bills upfront for you, HERE!
Whether you’re researching how to get your Havasu Falls permit or you’re just about to set off, I know how overwhelming it can be to plan a trip to this incredible place. It’s not just any hike—it’s truly a once-in-a-lifetime adventure. And honestly, there’s a reason it’s considered one of the must-see spots in the Grand Canyon.
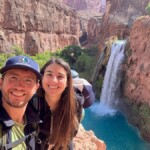
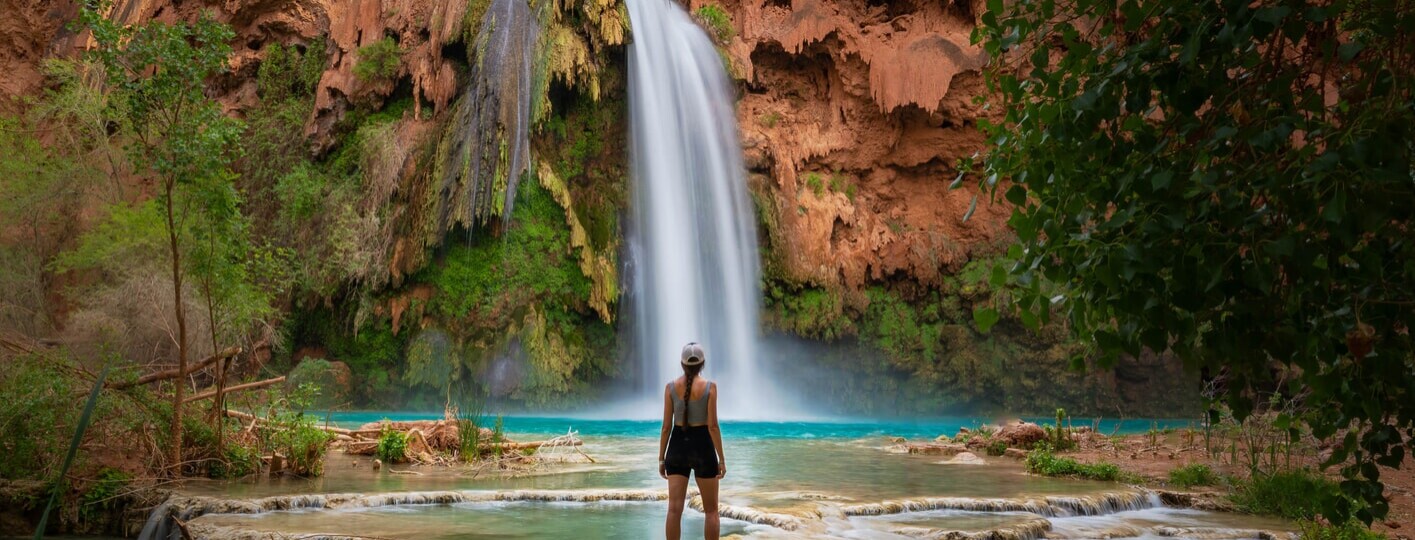
I’ll admit, ever since I moved to the U.S., visiting Havasu Falls had been in the back of my mind. I’d seen those unreal photos of electric blue water crashing down red rock walls—but that was about it. One day, I finally looked into it. And before I knew it, I was deep into planning, obsessing over permits, and prepping for one of the most epic hikes of my life.

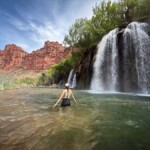
Hiking and camping at Havasu Falls, Arizona
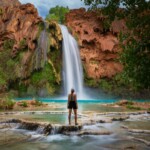
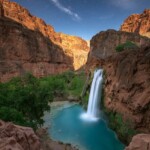
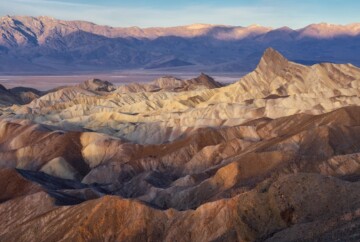
If you’ve ever dreamed of finding a remote heavenly spot in the middle of the desert, this is it. Havasu Falls is straight out of a postcard, located near the Grand Canyon West Rim on Havasupai land. But getting there isn’t as simple as just showing up—you need to plan ahead. It’s a long hike, permits are tricky, and there’s a lot to know before you go. But trust me, every single step is worth it.
In this guide, I’ll walk you through everything you need to know about hiking to Havasu Falls. Remember, I’ve been in your shoes before. So, listen to my tips and I promise you won’t regret it! Here is a summary of what I’ll cover here:
- Things to know before visiting Havasu Falls
- How to get to Havasupai Falls
- Havasupai Falls hiking details
- Reservations & permits
- Camping or Lodge – Where to stay when visiting Havasu Falls
- Havasu Falls hiking itinerary
- Havasu Falls hiking map
- Havasu Falls packing list
Things to know before visiting Havasu Falls
Before you lace up your hiking boots and hit the Havasu Falls trail, allow me to share some history about the homeland of the Havasupai people, who have lived in this canyon for centuries. Their name means “People of the Blue-Green Waters,” and once you see the falls, you’ll understand why.
Traditionally, they were nomadic farmers and hunters, moving between the canyon floor in the summer and the plateau in the winter. However, in the late 1800s, settlers and miners arrived, claiming their land. By 1882, their territory was reduced to just 500 acres. After a long legal battle, they regained 185,000 acres in the 1970s, preserving their culture and sacred lands.

Things to know before visiting Havasu Falls
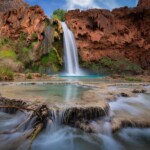
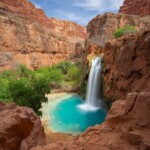
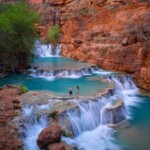
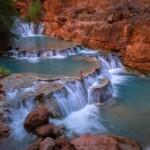
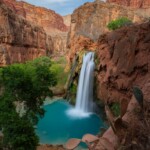
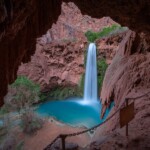
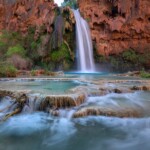
The location of Havasu Falls is a bit remote, situated about 1.5 miles from Supai Village. These falls are famous for their vibrant blue-green water, created by the high calcium carbonate content. Over time, flash floods have reshaped the waterfall’s appearance, changing it from a wide curtain of water (once called Bridal Veil Falls) to its current single, powerful stream.
Today, the Havasupai Falls Reservation is among the most beautiful attractions near the Grand Canyon and remains a sacred and protected site, so you have to follow the rules to help preserve this incredible place.
How to get to Havasupai Falls
There are four main ways to reach Havasupai Falls in the Grand Canyon, but I think hiking is the best option for most people. Here’s a breakdown of each method:
1. Helicopter (Not Recommended)
You can take a helicopter from Hualapai Hilltop to Supai Village, which is about 1.5 miles from the falls. The flight costs $100 per person (each way), and luggage typically costs an extra $50. Helicopters usually operate Sundays, Mondays, Thursdays, and Fridays, starting at 10:00 a.m., though sometimes they begin earlier.
There’s no way to reserve a spot in advance; you have to sign up on the day of your flight at either Hualapai Hilltop or Supai Village. Plus, locals and tribal contractors always get priority, so tourists often wait hours or even get bumped, so it’s not the most reliable option.
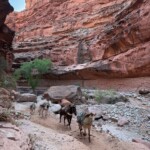
2. Mules (Not Recommended)
Yes, you can use mules to carry your gear in and out of Havasupai, but you’ll need to book in advance—at least 48 to 72 hours in advance. Each pack mule can carry up to four bags, with a maximum weight of 32 pounds per bag and a size limit of 36” long, 19” wide, and 19” tall. Only soft-sided bags are allowed, and they must be free of anything hanging off the outside.
The cost is $400 round-trip between Hilltop Trailhead and either the Campground Entrance or the Lodge. If you miss the scheduled drop-off time and need a late run, that’s an extra $300. Bags must be dropped off by 10:00 a.m. at Hilltop on your way in, and by 6:00 a.m. at the Campground Ranger Station on your way out. Just know that if you drop your bags off in the morning, they likely won’t reach Supai until later in the afternoon, since mule trains start their day heading out from the village.

2. Mules (Not Recommended)
But beyond the logistics, I can’t personally recommend it. The mules here aren’t treated well—they looked underfed and overworked, and it just didn’t sit right with me to make an animal carry my stuff while I hiked for fun. If you can, pack light and carry your own gear. It’s tough, but totally doable and so much more rewarding.
3. Hiking (The option we chose!)
The best way to get to Havasupai is by car and then by foot. From Peach Springs, Arizona, we took Highway 66 east for 6 miles, then turned onto Indian Route 18. This 64-mile road led us directly to Hualapai Hilltop, where the hike began. You can easily find directions to Havasu Falls on the map I provided at the end.

3. Hiking (The option we chose!)
From the Hualapai Hilltop parking lot, it was an 8-mile hike to Supai Village, followed by another 2 miles to the campground and falls. The hike was pretty long but beautiful. I will give you all the details in this guide.
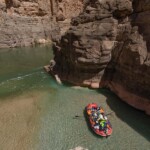
4. Rafting + hiking (An original way to do it)
For hardcore adventurers, there’s a fourth option: rafting down the Colorado River through the Grand Canyon and then hiking up Havasupai Creek. Some rafting trips stop near the confluence of the Colorado River and Havasu Creek, where you can begin a tough hike upstream to Beaver Falls, Mooney Falls, and finally Havasu Falls.

4. Rafting + hiking (An original way to do it)
But here’s the thing—this is not the usual way to visit Havasu Falls, and it requires careful planning. First, you’ll need a rafting outfitter with the proper river permits and one that can help coordinate your Havasu Falls reservation as well. Since check-in for Havasupai permits must happen in person at the Grand Canyon Caverns Inn in Peach Springs the day before your trip starts—and there they will provide you with a wristband that you need to wear at all times during your visit—this route gets logistically tricky. On top of that, the hike from the river is extremely challenging. You’ll face steep climbs, river crossings, and rope-assisted ascents, especially near Mooney Falls.
Havasupai Falls hiking details
The Havasupai Falls hike length is no joke—it’s a tough trek through rugged desert terrain, but the reward is absolutely worth it. I’ll share my personal experience and a full breakdown of the hike later, but for now, here’s a quick overview of what to expect:
- Elevation at trailhead: 5,174 ft
- Trail Type: Out-and-Back
- Distance: Approximately 8 miles one-way to Supai or 10 miles to the campground
- Elevation loss: About 2,300 ft
- Duration: 4-6 hours going down and 5-7 hours going up
- Difficulty: Challenging
- Obstacles: Steep switchbacks, loose and rocky terrain, limited water sources
Havasupai reservations & permits
Now, let’s talk about the Havasupai Falls permit. Unlike some other popular hiking spots, day hiking is NOT allowed anywhere in the Havasupai Indian Reservation. That means every visitor needs to book either a camping reservation at Havasu Campground or a lodge stay at Havasupai Lodge.
All reservations are booked under one name only, and this person will be designated as the Trip Leader. Their presence is mandatory at check-in. If the Trip Leader isn’t there, the reservation will not be honored, and the group will be turned away. So, make sure whoever books the trip is actually going!

Havasupai reservations & permits
A campground reservation can include up to 12 people max. However, keep in mind that larger groups are harder to book, especially for specific weekends. If possible, keep your group size between 4 to 8 people for better chances of getting a permit. And the minimum stay at Havasu Falls is 3 nights and 4 days for both the campground and the lodge.
Before heading out, double-check that you have these essentials for check-in:
- A printed copy of your reservation confirmation email (or a screenshot on your phone)
- Your vehicle’s license plate number (write it down or take a photo)
- Your Trip Leader
- Proof of account for all hikers (a printout of their account information page), confirming that everyone has accepted the Havasupai reservation terms & conditions
Here are important reservation dates for 2025-2026 you need to keep in mind:
RESERVATION TYPE | DATES |
|---|---|
Presale reservations | December 16, 2025 - January 3, 2026 |
General public reservations | February 1, 2026 |
Permit cancellations/transfers | Updated daily at 8:00 a.m. Arizona Time |
HAVASUPAI RESERVATIONS |
|
Remember that check-in for ALL permit reservations (campground and lodge) take place at Grand Canyon Caverns Inn, located at Mile Marker 115, Route 66 near Seligman, Arizona 86434.
How to get a permit to hike to Havasu Falls
I’ll be honest, I had no clue it was so difficult to get permits for Havasu Falls! It’s super competitive, so you’ll need a little bit of luck! But don’t worry, I have done this recently, so I pretty much know all the ins and outs. Here’s how you do it:
Step 1: Create your Havasupai Reservation account
Before you can book anything, you must create an account on the official Havasupai Reservation System. There are actually two separate websites: one for the Havasu Falls Campground and one for the Havasupai Lodge. Even though they’re linked in the top menu, they’re completely different systems—so choose where you want to stay, or make accounts on both if you’re still undecided. The process is the same, but I recommend doing this well in advance of permit day. Here’s how to sign up:
- Head to the official reservation site and click “No account? Sign up here >>.”
- Enter your email and create a secure password.
- Check your inbox and confirm your email address.
- Fill out your profile details (name, phone number, address, etc.).
I decided to add a payment method to speed up my checkout process later and it worked wonders, so I recommend doing the same.
| Pro tip: Set multiple reminders (a week before, a day before, and an hour before) to make sure you don’t miss Permit Release Day. Being ready on time gives you the best chance. |
Step 2: Log in early on Permit Release Day
Havasupai permits for 2025 went live on February 1st at 8 a.m. Arizona Time. If you’re planning for next year, make sure to be logged in 10-15 minutes early because when the clock hits 8:00 a.m., it’s a mad dash.
- When the system opens, click “Make A Campground Reservation” or “Make A Lodge Reservation”
- Select the number of people in your group (max 12 per reservation) or the number of rooms (max 3 with up to 4 people each).
- Pick your desired start dates. The more flexible you are, the better your odds.
Once the system opens, move fast. There’s a time limit, and if you wait too long, your spot might disappear. Try to complete your reservation ASAP. We tried with 2 different computers to increase our chances of getting the permit and by 8:03 I already had my booking confirmation. Just 30 minutes later, all spots were sold out for the two weeks that were available.
Step 3: Consider the presale reservation system
If you want to improve your odds, consider entering the presale lottery, which runs from December 16, 2025 – January 3, 2026. This allows you to submit up to three preferred travel dates, and if you’re lucky, you’ll get assigned one of them before general reservations even open.
Keep in mind that presale does not guarantee you a permit. You might win, you might not. But it’s 100% worth a shot! We were pretty flexible with our days, so we just tried with the Early on Permit, and it worked for us, but if your schedule is limited, the presale lottery is a great option.
Step 4: Check the permit cancellations/transfers list
If you couldn’t get the permit during the initial release, don’t lose hope! Many people cancel their trips, and those permits get put back into the system. Here’s what you can do:
- Go to the Permit Cancellations/Transfers section on the reservation site.
- Check the list daily at 8 a.m. Arizona Time when it updates. If a spot opens up that works for you, grab it immediately!
Step 5: Celebrate – You’re going to Havasu Falls!
Once you’ve successfully booked your permit, you’ll get a confirmation email from the Supai Office of Tourism. DON’T DELETE this email because you’ll need it for check-in. Before your trip, they’ll send important instructions and expectations, so stay on top of your inbox.

Step 5: Celebrate – You’re going to Havasu Falls!
| Important: Keep in mind that all payments are non-refundable and due upfront. While you can’t change or cancel your reservation, you can transfer it to someone else through the official Transfer System. Also, when booking, only one credit card is allowed per group. |
How much does it cost to hike Havasu Falls?
Let’s talk money—because a Havasu Falls tour isn’t exactly a budget trip. For 2025, here’s what you’ll need to pay for your stay:
- Campground Reservation – $455 per person for a mandatory 3-night stay.
- Lodge Reservation – $2,277 per room for 3 nights (for up to 4 people).
- Helicopter Ride (Optional) – $100–$150 per person, one way, from Hualapai Hilltop to Supai Village.
- Pack Mule Service (Optional) – $400 round-trip per mule (carries up to 4 bags, 32 lbs. each).
- Parking at Hualapai Hilltop – Free. Make sure you leave the parking permit on the dashboard of your vehicle.
Where to stay when visiting Havasupai Falls
When visiting Havasu Falls, you’ve got two options: camping at Havasupai Campground along Havasu Creek or staying at the Havasupai Lodge in the village of Supai. Here’s what you need to know about each:
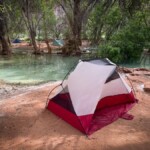
Havasu Campground
The Havasupai Campground stretches about a mile between Havasu Falls and Mooney Falls. There are no assigned campsites—you choose your spot when you arrive. Just make sure to use an existing site, and don’t create a new one.

Havasu Campground
We chose to camp because it was cheaper for two people and felt like the best way to experience Havasu Falls. There are many spots to set up your tent, but we chose one site by the river with incredible views, between the second and third composting toilets. The amenities were super basic, but we got a site with a picnic table. Anyway, when you’re surrounded by towering canyon walls and stunning waterfalls, you won’t care! Waking up to the sound of rushing turquoise water is not something you get to experience every day.
Havasupai Lodge
If you prefer a bed and a roof over your head, the Havasupai Lodge in Supai Village is your option. It’s about 2 miles before Havasu Falls, in Supai, and offers 24 basic but comfortable rooms, each with two queen beds (sleeps up to 4 adults) and a private bathroom. You won’t find TVs or phones here, but you will get clean bedding, towels, and soap—just the essentials.

Havasupai Lodge
Guests can use a shared microwave and charcoal grills, and there’s a small general store nearby for snacks and supplies. The lodge doesn’t have its own restaurant, but the Supai Café is just a short walk away.
Which is best: Havasu Campground or Havasupai Lodge?
| HAVASU CAMPGROUND | HAVASUPAI LODGE |
|
|
|
|
Havasu Falls hike itinerary
Here’s how we split up our 4-day adventure in Havasupai! I’ll walk you through exactly what we did, where we went, how long it took, and all the details. Of course, feel free to adjust based on your own pace. I love hiking, so you’ll see plenty of long treks in here. But if you want a more relaxed experience, you can totally take it slower!
Day 0: Preparing for the big hike
All Havasupai permit check-ins (for both the campground and the lodge) happen at Grand Canyon Caverns Inn on Route 66, just past Seligman, AZ. You can check in the day before or the morning of your reservation between 6 a.m. and 5 p.m. We wanted to hit the trail early, so we checked in the day before and stayed at the Caverns Inn. It’s the closest spot, even though it’s still over an hour from the Hilltop trailhead. Some travelers stay at Hualapai Lodge, just 12 minutes from the check-in point, but several mentioned they barely slept due to frequent trains passing by during the night.
Camping at Hilltop is not allowed—no tents, no sleeping in your car or RV—otherwise, we would’ve just stayed there in our campervan.
We arrived around 4 p.m. after a 3-hour drive from Vegas. Dan was our Trip Leader, so he was the only one allowed into the check-in office. They gave him our parking permit (to leave in the car), wristbands (you must wear them the whole time you’re on the reservation), a label for our tent, and a paper copy of our permit (keep that on you, too).

Day 0: Preparing for the big hike
Then, we checked in at the Inn next door. We had a king suite booked for $142—not fancy by any means, but it did the job. Plus, they have a small restaurant and a 24-hour store where you can grab some supplies that you might have forgotten for your hike.

Hotel room at Grand Canyon Caverns Inn
The night before the hike, we set alarms for 4:00 a.m. to hit the trail pretty early and beat the heat. Since we knew we’d be off-grid for the next four days, we also made sure to let our families know our plans before going radio silent.
Day 1: Hike to Havasu Falls Campground
- Distance: 10 miles
- Time: ~4.5 hours of hiking (plus breaks)
- Elevation Loss: 2,400 feet (all downhill to the wash, then mostly flat)
- Trail Conditions: Dry, sandy, and rocky in some sections
- Minimum Water to Bring: They recommend 3 liters per person, but we only packed 2 liters each since we were hiking downhill in the cool morning and knew our typical water needs. That worked fine for us.
- Water Availability: No water sources until Supai Village (mile 8)
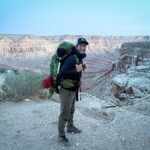
We kicked off our Havasu Falls adventure bright and early. We woke up at 4:00 a.m., grabbed a quick breakfast (we prepped sandwiches the night before), and drove to the Hilltop trailhead. We parked the campervan at 5:45 a.m. and hit the trail around 6:00 a.m.

Day 1: Hike to Havasu Falls Campground
The first mile is a steep descent into the canyon, with switchbacks carving down the rock walls. It was early April, so the air was crisp, but we warmed up fast— so much so that we stopped within the first miles to shed our jackets. One thing I don’t regret was bringing my trekking poles, especially with our heavy backpacks.
After about 2 miles, we hit the wash, and the trail mellowed out into a gentle, steady downhill all the way to Supai. We kept a moderate but steady pace, and by 9:00 a.m., we made it to Supai Village (mile 8.2).
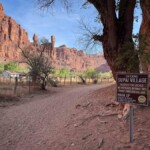
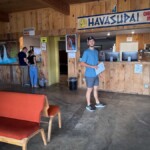
Supai is the most remote village in the lower 48 states, and it felt like stepping into a whole different world. Fun fact—it’s the last place in the U.S. that still receives mail by mule! We checked in at the tourism office and grabbed some cold drinks at the Havasupai Tribal Café before continuing on.
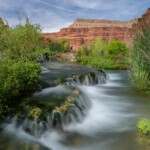
From Supai, it’s another 2 miles to the campground, but this part of the hike gets exciting. Along the way, we passed 50 Foot Falls, Navajo Falls, and finally, Havasu Falls. We didn’t linger too long since we just wanted to get to the campground ASAP.

Havasu Falls
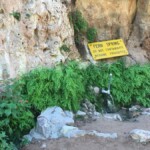
By 10:15 a.m., we reached the Havasu Campground and immediately looked for a good campsite. I recommend heading halfway in, as the best spots are located between the second and third composting toilets. However, some people prefer to camp near Fern Spring at the beginning of the campground, as it’s the only drinkable water source. If you choose this, avoid camping near the wall—there have been horror stories of rocks falling into the area.
The Havasu Campground runs for about a mile along both sides of Havasu Creek, and since there are no assigned spots, it’s first-come, first-served. We lucked out and found a shady spot near the creek with a picnic table, easy water access and beautiful views.

Havasu Campground
Once camp was set up, we spent the afternoon back at Havasu Falls, swimming and enjoying the view. By 3:00 p.m., the sun dipped behind the canyon walls, and it got noticeably cooler, so we headed back to camp. Dinner was freeze-dried meals, and after a long day, we crashed by 8 p.m.
Day 2: Hike to downstream waterfalls
Our first full day in Havasupai was all about adventure. I always wake up full of energy on the first morning of any trip, so I figured this was the best day to tackle the downstream waterfalls and the Colorado River confluence. This hike includes technical descents, river crossings, and some of the most stunning scenery you’ll ever see, but I don’t recommend hiking to the confluence unless you’re an avid hiker and pretty fit.
- Our Starting Time: 6:00 a.m.
- Total Distance:5 miles (round-trip)
- Total Hiking Time: 10 hours
- Total Elevation Gain/Loss: ~1,200 feet
- Trail Conditions: Steep descents with chains and ladders, rocky paths, river crossings, sections of scrambling, and unmarked sections beyond Beaver Falls
- Water Availability: There’s no treated water along the trail, but there are several spots where you can collect water to filter or purify.
- Minimum Water to Bring: We each brought 2 liters for the hike in and refilled after Beaver Falls. You’ll definitely need a water filter and purification tablets (expect to drink 4+ liters on a hot day.)
- Difficulty: Strenuous (but you don’t need to hike all the way to the confluence if you don’t want to)
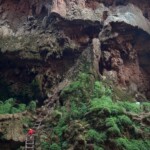
Mooney Falls
♦ 6:30 a.m. | 1 mile (one-way) | 20-30 mins | ~200 ft (steep descent)
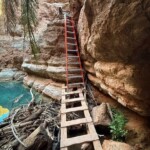
We set out early to reach Mooney Falls before the crowds, and I’m glad we did. You can see the waterfall from the top, but getting down to the base of the falls is an adventure on its own—you have to squeeze through rocky tunnels, descend slick wooden ladders, and grip onto chains bolted into the rock. The final stretch is so steep that you have to climb down backward like a ladder while mist from the falls makes everything extra slippery.
It’s also a bit tricky because the same path is used for both going up and down, meaning you sometimes have to wait for others to pass. Luckily, since we started early, we had the route to ourselves.

Mooney Falls
Dan led the way, and I followed, battling my fear of heights and doing my best not to look down. Once we made it to the bottom, we stood in awe of the thundering 200-foot Mooney Falls. The morning light hitting the mist was absolutely magical. Knowing we had a long day ahead, we couldn’t linger for too long. The trail followed the base of the rock wall we had just descended, so there was no need to cross the river yet—just look for the pink markers and follow the path.
| Pro Tip: Don’t bother bringing gloves! The chains are tough on your hands, and gripping them with wet fingers can be tricky. However, we found at least 30 pairs of gloves near the chain section, so you don’t need to worry about packing your own. The descent looks scarier than it actually is, and it’s totally doable without gloves too. |
Beaver Falls
♦ 8:30 a.m. | ~3 mile (one-way) | 1.5 hrs | ~300 ft
The next stop was Beaver Falls, Grand Canyon. The trail wound through lush greenery, crossed the creek at least three times, and included a few short ladders. Pink markers and stacked rock cairns marked the way—especially helpful when deciding where to cross the river.
We walked through dense fields of wild grapevines, their vibrant green leaves glowing against the turquoise water and the deep red canyon walls. The colors were so vivid, it felt like we were walking through a painting. Along the way, we passed unnamed waterfalls that could easily be the highlight of any national park—each one more beautiful than the last.

Grapevines along the Havasu Falls Trail
Parts of the trail ran right along the river, with countless inviting swimming holes, while other sections climbed higher up the canyon walls, offering breathtaking views from above. Most river crossings were knee-deep, though a few reached up to the hips, adding a fun and adventurous twist to the hike.
Eventually, we spotted the lone palm tree, the telltale sign that Beaver Falls was near. Just after passing beneath it, we reached a small wooden bridge and a vertical metal ladder.

Metal ladder along the trail
From there, we followed the pink trail markers to a sign confirming we had arrived. Just before heading down the final ladder to the main viewpoint, we took mental note of the trail junction that continues toward the confluence—we’d be returning there later.
We had originally agreed not to spend more than five minutes at Beaver Falls on the way out, hoping to reach the confluence with plenty of time for a swim at the falls in the afternoon. But the moment we laid eyes on it, we couldn’t help ourselves. The falls were absolutely stunning—and we had them completely to ourselves. We arrived around 8:35 a.m., and for our full thirty-minute break, we were the only ones there.

Beaver Falls
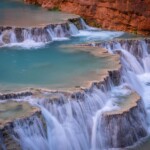
Dan didn’t even stop to grab a snack—he was too eager to photograph the stunning travertine formations that define this waterfall, with their intricate layers and terraces carved by mineral-rich water. While he explored the area with his camera, I took a quick break at the only picnic table to refuel with an energy bar before climbing down the waterfall to pose for a few shots.
We had seen Beaver Falls in both full sun and complete shade, and for photography, the best light is definitely when the waterfall is fully in shade. The softer light helps preserve the deep turquoise hues of the pools and enhances the rich, earthy reds of the canyon walls—colors that often get washed out under harsh sunlight. After capturing a few final images, we packed up our gear and continued the hike toward the confluence, still in awe of the magical scene we’d just experienced.

Photographing Beaver Falls
Confluence with the Colorado River
♦ 11:00 a.m. | ~4 mile (one-way) | ~2.5-3 hrs | ~700 ft
After leaving Beaver Falls behind, the trail to the confluence becomes noticeably wilder and less defined. It first climbs above the canyon floor, offering a brief elevation gain and sweeping views. Shortly after the falls, you’ll spot a small sign marking the boundary between the Havasupai Reservation and Grand Canyon National Park. From this point on, you’re officially hiking within the Park.
Next comes a bit of rock scrambling to descend back to the river and continue along the creek. This stretch is incredibly scenic—you’ll pass a striking cathedral-like formation before the landscape opens up again.

Confluence with the Colorado River
From here, there are no ladders or clear trail markers—just a faint footpath weaving through thick vegetation, sandy patches, and rocky terrain. The trail flattens out but often vanishes into the riverbed, forcing you to walk directly through the water. Pink ribbons tied to branches occasionally help guide the way, but route-finding becomes part of the adventure. When in doubt, follow the stacked cairns—especially at river crossings—they’ll be your best friend.
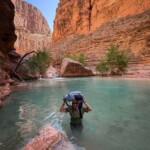
As you head deeper into the canyon, the terrain feels more remote and untouched. The walls narrow and tower overhead, while the turquoise flow of Havasu Creek runs steadily beside you. Multiple river crossings await—some are knee-deep and easy, others waist-deep with slippery rocks and stronger currents. Water shoes with good grip are essential, and trekking poles help with balance in deeper sections.

Crossing the confluence
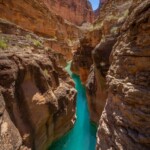
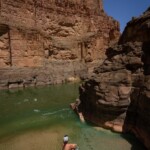
The final crossing before the confluence is the deepest—chest-high for most. Just when you start to wonder if you’ve gone too far, the canyon narrows into a stunning slot where the creek flows between vertical rock walls. You’ve made it!
For the best view of the confluence, cross Havasu Creek one last time and climb a short distance up the opposite canyon wall. From there, you’ll see the exact point where the vibrant turquoise of Havasu Creek merges into the muddy, fast-moving Colorado River—a view that’ll leave you speechless.

Confluence at Havasu Creek & Colorado River
Swimming at the confluence isn’t safe—the currents are extremely strong and can pull you toward the Colorado’s rapids. However, if you’re a strong swimmer, you can safely explore the first section of the slot canyon up to its narrowest point. Here, you may spot the endangered humpback chub, a large native fish that spawns in these waters.

Slot canyon at the confluence
Standing at the confluence truly feels like reaching the edge of the world. The vastness of the Colorado dwarfs the gentle flow of Havasu, and witnessing the collision of these two iconic rivers is both awe-inspiring and humbling.
Return to camp & wind-down
♦ 7:00 p.m. | ~8 miles (one-way) | ~4-5 hrs | ~1,200 ft
We spent over an hour between the overlook and the slot canyon at the confluence, soaking in the beauty and silence. Just as we were about to leave around noon—after a full morning of solitude—two rafts suddenly appeared at the junction, followed by a kayak and another raft. Within 15 minutes, the once-quiet confluence became crowded, especially as hikers started arriving soon after.
We chatted briefly with one of the raft groups, who were on day 15 of a 21-day expedition down the Colorado River—an incredible journey we hope to do ourselves someday. They planned to rest at the confluence before hiking up to Beaver Falls, so we decided to head out quickly and stay ahead of the crowd.
The return hike was much hotter, with little shade compared to the cool morning. We took a few breaks along the way to cool off in the river and have lunch. We finally reached Beaver Falls around 3:00 p.m., and to our surprise, the light was even better than earlier—perfect for photos and a well-deserved swim. Just downstream, we found a deep-blue swimming hole that felt like a hidden gem. We also explored the upper falls a bit before continuing on.

Afternoon at Beaver Falls
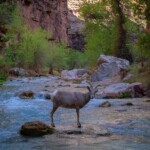
We left Beaver Falls around 4:30 p.m., with our legs already feeling the strain. Somewhere along the trail, near the wild grape fields, we spotted a group of bighorn sheep grazing—an unforgettable sight that added even more magic to the day. We reached Mooney Falls around 6:00 p.m. and spent some time photographing this stunning waterfall. Most hikers had already returned from the confluence, and I believe we were the last ones to get to the campground—but we wanted to make the most of the light for photos.

Bighorn sheep in the river
We climbed up the chains again, mist-soaked and tired, and finally made it back to camp around 7:00 p.m. By then, our legs were completely done. I had a few minor scrapes and blisters—not serious, but enough to remind me of the adventure we’d just had. We devoured our dinner, barely managed to change into dry clothes, and collapsed into our sleeping bags—falling asleep to the calming sound of rushing water. What a day.
Day 3: Hike to upstream waterfalls
After two days of adventure and some intense hiking, today was all about taking it easy, soaking in the scenery, and enjoying the beauty of the lesser-visited Havasu waterfalls. A quick breakdown of the day’s adventure before you hit the trail:
- Our Starting Time: 5:30 a.m.
- Total Distance: ~5 miles round-trip
- Total Hiking Time: ~2 hours (without including stops)
- Total Elevation Gain/Loss: ~200 feet
- Trail Conditions: Mostly flat and well-worn, with minor scrambling near Fifty Foot Falls
- Water Availability: Accessible at all waterfalls, but treat before drinking
- Minimum Water to Bring: We each brought 1 liter and it was enough for us
- Difficulty: Moderate
Havasu Falls
♦ 5:40 a.m. | ~800 ft | ~10 minute-walk
We started the morning early, catching the very first rays of sunlight hitting Havasu Falls. The golden glow illuminated the turquoise water, casting a magical light over the entire scene—one of those moments you wish you could freeze in time. While Dan took full advantage of the soft light, photographing the waterfall from every possible angle, I found a nearby bench and dozed off for a bit, lulled by the soothing sound of cascading water.

Havasu Falls
He captured everything—the shifting colors in the travertine terraces, the swirling patterns in the pool below, and even a couple of curious squirrels climbing along the canyon walls behind the falls. Eventually, we regrouped at one of the nearby picnic tables to enjoy a slow breakfast with one of the best views you could imagine.
After lingering a bit longer than planned, we packed up around 8:00 a.m. and began our hike upstream toward Supai, following the same familiar trail that had led us to the campsite on our first day.
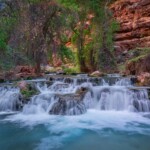
Navajo Falls
♦ 8:15 a.m. | ~0.5 miles | ~20-minute walk
Our first stop was Navajo Falls, a hidden gem compared to the more famous falls. The trail here was relatively easy, and within minutes, we found ourselves gazing at cascading turquoise water. Lower Navajo Falls (Rock Falls) was just off the main trail, offering a wide, open canyon perfect for sunbathing and wading in the pools.

Navajo Falls
We took some time to explore both Upper and Lower Navajo Falls. No crowds, just the sound of the water and the canyon around us. We loved every second of it.
Fifty Foot Falls
♦ 9:00 a.m. | ~0.3 miles | ~10-minute walk
Just a little farther upstream, we reached Fifty Foot Falls—one of the most underrated gems in Havasupai. With no official trail leading to it, it’s easy to miss, but absolutely worth the detour.
We got turned around a couple of times, but I’m so glad we eventually found our way. This spot is something you definitely don’t want to miss.

Fifty Foot Falls
Surrounded by lush greenery and the vibrant red canyon walls, we found the perfect place to relax. We spent a full hour here, soaking in the warm morning sun and swimming in the crystal-clear pools. Thousands of waterfalls cascaded down the rocks, creating a surreal, almost jungle-like oasis in the middle of the desert.
Supai Village
♦ 10:30 a.m. | ~1.2 miles | ~30-minute walk
By 10:30 a.m., we arrived at Supai Village, the heart of the Havasupai community. We took our time strolling through the quiet dirt paths, soaking in the calm and remote feel of the place. I had read that the Havasupai people are known for being reserved, but I was pleasantly surprised—many greeted us with a smile or a friendly wave as we passed by. It’s their home, after all, and with hikers coming through regularly, it’s understandable that they keep to themselves.

Supai Village
From what I could observe, life here is simple—very basic living, with small homes scattered beneath towering cottonwood trees that offer much-needed shade. Out of respect for the community, photography is strictly prohibited within the village, and it’s important to know that masks must still be worn at all times—a rule that remains in place since the COVID-19 pandemic.
Before continuing the hike, we stopped at the local café for lunch. We ended up staying for about an hour and a half, enjoying a slow meal, resting our legs, and chatting with a few fellow travelers. If you stop here, don’t skip the frybread tacos—they were just what we needed before facing the final stretch of the trail.

Cafe at Supai Village
The menu is simple but satisfying: burgers, fries, and several frybread-based dishes. Some of their signature items include the Indian Taco with beef, the Supai Burger served on fried bread, and the Supai Combo. They also stock basic essentials like soda, Gatorade, ice cream, fruit, canned goods, and small toiletries. Since everything has to be flown or carried in by mule, prices are understandably higher than usual—but having a warm meal in a place this remote feels like a real treat.
| Tip: If you’re craving frybread tacos but don’t want to hike all the way up to Supai Village, keep an eye out for a small stand just above Havasu Falls. It doesn’t have set hours and isn’t always open, but if you’re lucky, you might catch it serving up fresh tacos in the afternoon. |
Return to camp & wind-down
♦ 1:00 p.m. | ~2 miles | ~1-hour walk
After lunch, we started the walk back to camp, retracing our steps past Fifty Foot Falls, Navajo Falls, and Havasu Falls one last time. We made it back around 1:00 p.m., with plenty of time to rest, cool off with a swim in the river, and start getting everything ready for the long hike out the next morning.
We headed to bed around 6:00 p.m.—not exactly exhausted, but well aware that our alarm was set for 3:00 a.m.
Day 4: Hike out of Havasupai Indian Reservation
- Total Distance: 10 miles
- Total Time Hiking: 5.5 hours
- Elevation Gain: ~2,400 feet (all uphill)
- Trail Conditions: Rocky, exposed, and sandy in sections; last 1.5 miles are steep switchbacks
- Minimum Water to Bring: They recommend 3 liters per person, but we only packed 2 liters each since we were hiking very early in the cool morning and knew our typical water needs. That worked fine for us.
- Water Availability: No water sources after Supai Village
Waking up on our last morning in Havasupai was bittersweet. On one hand, we didn’t want to leave this paradise. On the other, we knew we had a 10-mile uphill trek ahead of us—and we were determined to make it out before the sun caught up with us.
We woke up at 3:00 a.m., packed up our camping gear, grabbed a quick breakfast, and started our hike out at 4:00 a.m., setting off in the darkness with only our headlamps guiding the way. The first light had yet to kiss the canyon walls, and the air was cool and crisp, making it the perfect time to tackle the 10-mile climb back to the hilltop. Dan wanted to capture some night shots of Havasu Falls, so we made a 30-minute stop at the overlook before continuing.

Nighttime at Havasu Falls
The first two miles through Supai Village felt easy, and we made good progress, stopping briefly to refill our water before venturing deeper into the canyon.
Next came a steady uphill climb through the red rock corridors. Thankfully, the temperatures stayed cool, and we had shade all of the way. We kept a steady pace, taking short breaks every few miles to sip water. The last 1.5 miles—the dreaded switchbacks—were as tough as expected, but the thought of the end being in sight kept us moving forward.
I realized we were moving pretty quickly, as we reached Hualapai Hilltop by around 8:30 a.m. Most hikers heading down were surprised to see us already at the trailhead. Sure, you can start the hike out later, but I don’t regret waking up early—it felt great to avoid the heat and be back home in Las Vegas for lunch.

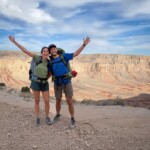
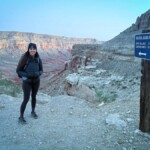
Hualapai Hilltop
Seeing the parking lot after days of hiking felt surreal. We dropped our packs, stretched out, and just sat for a while, taking in the view of the canyon one last time. Havasupai had been everything we hoped for and more—the waterfalls, the blue water, the adventure. Every sore muscle was worth it.
Havasu Falls hiking map
Having an offline map of Havasu Falls was a lifesaver for us, and I highly recommend it, especially if you’re planning to hike to the confluence or visit lesser-known spots like Fifty Foot Falls. I suggest using an app like Maps.me and downloading this detailed map of Havasu Falls, which includes hiking trails, key attractions, and lodging options.
Keep in mind that there’s no cell service during the hike, at the campground, or even in Supai—except for very limited access in the village. So be sure to open the map before you lose signal and zoom in on all the areas you plan to explore. That way, the map will be fully cached and ready to use offline when you need it most.
The best time to visit Havasu Falls
The best time to visit Havasu Falls in Arizona is spring and fall. March to May and September to November offer the perfect balance of warm (but not scorching) temperatures, manageable crowds, and beautiful conditions for hiking and swimming. I definitely don’t recommend a summer trip; hiking in 100+ degree heat is brutal, and monsoon season (July–August) can turn those stunning blue waterfalls into raging brown rapids.
Winter (December–February) is super quiet, but nights can be freezing, and shorter daylight hours make hiking much more challenging.

The best time to visit Havasu Falls
We went in mid-April, and it was pretty much perfect—warm enough for a refreshing short swim, and the waterfalls kept that unreal turquoise color. I might have preferred going a little later, to be able to spend more time in the water, but, well… permits are tough to get, so you take what you can get!
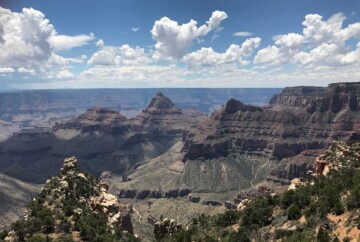
Oh, and if you’re planning a bigger Arizona adventure, check out our guide on the best time to visit the Grand Canyon for more insights!
What to bring – Havasu Falls packing list
If this is your first long-distance hike, check out my Grand Canyon packing list for a full breakdown of what you’ll need in this kind of environment. But for now, you can use this checklist to make sure you’ve got everything for backpacking to Havasu Falls.
- Water bladder
- Water filter and water tabs
- Hiking backpack
- Waterproof hiking boots
- Water hiking shoes (highly recommended to hiking to Beaver Falls or the confluence)
- First aid kit with hydrocolloid blister plaster (I love the Compeed ones)
- Ultralight backpacking tent
- Sleeping bags
- Ultralight sleeping pad
- Ultralight camping pillow
- Hammock (optional, but nice to have)
- Jetboil
- Camping silverware and knife
- Headlamp
- Backpacker poncho (if the forecast isn’t great)
- Garmin InReach (optional)
- Trekking poles (optional)
- Freeze-dried backpacking meals (I like Wild Zora)
- Snacks like nuts, nut butter, or dried fruit to keep your energy up
- Garbage bags (you’ll need to pack up all your trash)
- Rope (to hang your food and trash)
- Hat
- Sunglasses
- Sunscreen
- Hiking clothes
- Swimsuits
- Quick-dry camping towel
- Toilet paper (usually available at the toilets, but bring one roll just in case)
- Hygiene products (even biodegradable soaps are not allowed in the river, but you can bring wet body wipes – I love the Goodwipes)
Things you can leave at home:
- Fuel canister – There are usually hundreds left behind; you can likely grab one when you arrive at camp.
- Gloves – You’ll find plenty in all sizes before the chain section at Mooney Falls.
Remember that the conditions for camping at Havasu Falls are as simple as it gets—there are no shops or supplies waiting for you at the campground. Don’t count on finding anything there! Make sure you bring everything you’ll need for the trip.
Safety considerations for visiting Havasu Falls
Havasu Falls is pure magic, but it’s also deep in the backcountry, so a little preparation goes a long way. I’ve done this adventure, along with multiple camping trips in the Grand Canyon, so here are a few key things to keep in mind before you go.
1. Manage your water wisely
Staying hydrated is absolutely essential on the Havasu Falls trail—especially if you’re hiking during the warmer months.
- For the hike to the campground, bring at least 3 liters (100 oz) per person. The trail is long, dry, and exposed, and you won’t find any water sources along the way. If temperatures are high, consider bringing more.
- If you’re hiking to the confluence, plan for a full-day trek and carry at least 2 liters per person to start with. You can refill along the way by filtering and purifying water from the creek, so make sure to pack a water filter and purification tablets—you’ll definitely need more than what you start with.
- For the hike out, keep in mind that it’s steep and demanding. I recommend starting as early as possible to avoid the heat. Most experts recommend having 3–4 liters (100–140 oz) I personally used less since I hiked mostly in the dark, but it’s always better to carry more than you think you’ll need.
2. Treat your water
The water here may look crystal clear, but don’t let that fool you. You have to treat it before drinking. Whether you’re filling up at Fern Spring or pulling from the creek, bring a water filter, purification tablets, or a UV sterilizer to avoid any nasty surprises (giardia is not the kind of souvenir you want).

Fern Spring
3. Avoid hiking in the heat
If you’re visiting during the warmer months, start your hikes early. That means waking up before the sun. The desert heat is no joke, and those canyon walls trap it in, turning the trail into an oven by midday. Plan your treks in the early morning or late afternoon to stay cool.
4. Be prepared for flash floods
Havasu Canyon is prone to flash floods, especially during the monsoon season (July–September). Check the weather at Havasu Falls before heading out, and if rain is in the forecast, rethink your plans. If you hear a sudden rush of water or notice the creek rising quickly, get to higher ground immediately.
5. Watch your step on slippery trails
The trails near the waterfalls can be wet and slick from mist. Those wooden ladders and chains at Mooney Falls? They get slippery. Take your time, wear good grippy shoes, and don’t hesitate to use gloves for the chain section; your hands will thank you!

Stairs at Mooney Falls
Additional tips for exploring the Havasupai Falls area
I’ve already covered all the major details, but there are still a few important things to keep in mind:
- All campground reservations must be for 3 nights/4 days.
- No COVID vaccination or test required, but masks are mandatory in Supai Village and public areas. Bring your own mask—failure to comply may result in removal. COVID policies may change.
- No tents, sleeping bags, heaters, or camping gear for sale. The store has limited food, so you have to bring your own supplies.
- Only one name is on the reservation, and that person must be present during check-in. A photo ID must be brought on the hike to confirm the reservation.
- Pack up all your trash—littering is not tolerated and can result in fines of up to $1,000.
- A wristband is required past Supai Village—your reservation gets you access, so keep it on at all times.
- No campfires allowed. Only gas stoves are permitted for cooking.
- Be aware of wildlife, including mountain lions, bighorn sheep, snakes, and scorpions.
- Fresh spring water is available about a third of the way into the campground, at Fern Spring, but it must be filtered or purified before drinking.
- No shampoo or soap is allowed in the creek or campground to help protect the water sources.
- No drones, loud music, or rock climbing—keep the experience peaceful for everyone.
- No diving, cliff jumping, or nudity—stay safe and respectful.
- Water toys, inner tubes, and pool floats are not allowed—let’s keep the natural beauty undisturbed.
- No pets—please leave your furry friends at home.
- No drugs or alcohol—this is a sacred place, and all visitors are expected to honor that.
- Photography rules: No photos of Havasupai Village, pack mules, or Tribe members—respect their privacy and culture.
Our experience visiting Havasu Falls – Is it worth the hike?
Let’s be real—no place is perfect, and Havasu Falls has its downsides. The first is the cost. I understand it’s a sacred and remote area, and that tourism is the main source of income for the Havasupai people, but the price still feels steep—over $100 per night just to camp.
Beyond that, there was quite a bit of trash around. I wish visitors were more respectful, but the reality is that Havasu draws a lot of people who aren’t seasoned hikers and may not understand how to behave responsibly in nature. For what we pay, there should at least be some kind of maintenance crew to help manage the impact of tourism—or more staff ensuring that campers follow the rules.
Another thing that really bothered me was the condition of the pack mules. I saw some that looked overworked and underfed, and I’ve heard similar stories from others. It’s heartbreaking and something that absolutely needs to change. In my opinion, if you can’t hike in with your own gear, maybe Havasu isn’t the right trip for you—or at the very least, consider staying at the lodge instead of camping. I saw people hauling in heavy lights, chairs, and all kinds of unnecessary stuff. If they had to carry it themselves, I doubt they’d bring half of it.
The infrastructure could also use some improvements—cleaner and safer water sources and better upkeep of the compost toilets would make a big difference.
That said, Havasu Falls is still one of those places you have to experience at least once in your life. The moment I saw that unreal turquoise water against the red canyon walls, all the exhaustion from the hike vanished. The waterfalls, the peaceful pools, the sound of rushing water…it felt like stepping into a scene from Planet Earth.

Our experience visiting Havasu Falls – Is it worth the hike?
The hike itself was incredibly unique. The steep descents, ancient riverbeds, and towering canyon walls made it unlike any trail I’ve ever done. I also loved the cultural aspect of visiting Supai Village and getting a small glimpse into indigenous life.
So, is Havasu Falls worth it? Absolutely. Just go in with realistic expectations, respect the land and the people, and soak up every second of this incredible place. I’m already dreaming of going back—so if you happen to have two extra spots, hit me up!
FAQs – Havasu Falls, Arizona
By now, we’ve covered pretty much everything about hiking and camping at Havasu Reservation. To wrap things up, I’ve answered a few common questions below to help with any last-minute planning.
And that’s everything you need to know about hiking to Havasu Falls! I hope this guide helps you plan your adventure. If you have any questions or want to share your own experiences, drop a comment below—I’d love to hear from you.
Safe travels!