Are you thinking about crossing the Bright Angel Trail off your bucket list? That’s awesome! Deciding to take on this hike is exciting, and it’s also a bold move! The trail offers one of the best hikes in the Grand Canyon, and it’s easy to see why.
The first time I hiked the Bright Angel Trail, I wasn’t expecting much. I figured it would be a tough desert hike with lots of sweating, panting, and wishing for shade. But wow, was I wrong! The jaw-dropping views, the well-marked trail, and those rest stops with water stations and shady spots—it was a hiker’s dream come true!
But don’t let the beauty fool you—it’s not a walk in the park. While hiking the Bright Angel Trail is one of the best things to do in the Grand Canyon, it takes some serious planning, preparation, and good physical fitness. But don’t worry; I’m here to share my experience and guide you through the ins and outs, so you’re ready to take on this trail like a pro!
Guide to the Bright Angel hike in the Grand Canyon
The Bright Angel Trail is probably the most famous hike on the South Rim of the Grand Canyon. Besides its incredible scenery, this trail has a rich history. For centuries, people have used it to reach the natural water source at Havasupai Garden.
The trail got its name from the Bright Angel Fault, which created a natural path down to the water. Long before it became a hotspot for hikers, Native Americans used this route to get to the canyon springs. We even spotted some ancient pictographs along the trail dating back to probably more than 4,000 years ago —I’ll tell you later where to look for them!

Guide to the Bright Angel hike in the Grand Canyon
Today, the trail is a favorite for both hikers and visitors, and it’s considered one of the must-do activities on the South Rim. Whether you’re planning an all-day trek or a shorter journey, I’ve got you covered with all the details. Here’s a quick breakdown of what we’ll discuss:
- Bright Angel Trail length and elevation gain
- Bright Angel Trail average hiking times
- Most popular itinerary ideas
- Where to stay when doing a multi-day hike
- Bright Angel Trail permits & fees
- Best time to hike the Bright Angel Trail
- Safety considerations
- Packing list
- Map of the Bright Angel Trail
Bright Angel Trail length and elevation gain
There are two main destinations starting from the Bright Angel trailhead: one that takes you all the way to the Colorado River and another that ends at Plateau Point. Both are amazing but come with their own challenges. Here’s what you need to know about each trail:
Bright Angel Trail to the Colorado River
This is the classic Bright Angel Trail that takes you right down to the Colorado River. It’s my personal favorite because the trail is well-maintained, and when you reach the bottom of the canyon, it feels like you’ve landed in a whole new world—a perfect spot for camping or resting up before the hike back.
One of the best parts of this trail was the solitude. We hardly saw anyone else after the first 3 miles, so it felt like we had the whole Grand Canyon to ourselves— such a magical experience!
- Bright Angel Trail length: 8 miles (one-way)
- Bright Angel Trail elevation gain: 4,380 feet
- Bright Angel Trail average time: 4-5 hours going down and 6-8 hours going up
Bright Angel Trail to Plateau Point
Taking the Bright Angel Trail to Plateau Point is a popular choice for one-day hikers. You’ll follow the same trail to the Colorado River until you reach Havasupai Gardens, then branch off towards Plateau Point.

Bright Angel Trail to Plateau Point
The hike to Havasupai Gardens is about 4.5 miles, and then it’s another 1.5 miles to Plateau Point. There’s a water station at the Gardens where you can top up your bottles before heading to the viewpoint. The trail winds down toward the Tonto Platform, where you get breathtaking views of the inner canyon and the Colorado River below.
- Distance: 6.2 miles (one-way)
- Elevation gain: 3,244 feet
- Duration: 3-4 hours going down and 5-7 hours going up
Bright Angel Trail average hiking times
Here’s a handy breakdown of distances, elevation changes, and estimated times for both the ascent and descent on the Bright Angel Trail:
Mileage | Elevation (ft) | Duration (descending) | Duration (ascending) |
|
|---|---|---|---|---|
Bright Angel Trailhead | 0 | 6,844 | Starting Point | Ending Point |
1.5 Mile Resthouse | 1.5 | 5,730 | 45 min | 1h 30 min |
3 Mile Resthouse | 3 | 4,750 | 1h 40 min | 3h 15 min |
Havasupai Garden | 4.5 | 3,800 | 2h 30 min | 5h |
Plateau Point (alternative) | 6.2 | 3,600 | 3h 30 min | 6h |
Colorado River | 8 | 2,450 | 4h | 7h |
Phantom Ranch | 8.8 | 2,480 | 4h 30 min | 7h 30 min |
BRIGHT ANGEL TRAIL AVERAGE HIKING TIMES |
||||
Keep in mind that these times are just averages. You might go faster or take it slow to enjoy the viewpoints, recharge at the rest houses, or explore detours along the way.
Bright Angel Trail to 1.5 Mile Resthouse
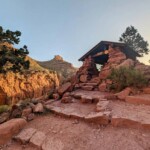
We kicked off our hike around 6 am, with that early morning energy and excitement. Once you pass the bathroom and plaza area, you’ll see a big sign that says “Bright Angel Trail Trailhead.” We couldn’t resist snapping the first photos of our journey here!
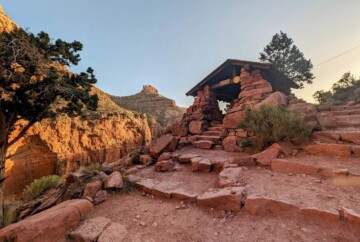
The first 1.5 miles are relatively easy, with a nice downhill slope that winds down the cliffside. About half a mile in, you’ll reach the first tunnel. Look up to your left, and you’ll see ancient red pictographs of deer under an overhang. This spot, called Mallery’s Grotto, is estimated to be around 4,000 years old!
At about one mile, you’ll come to the second tunnel, where you can admire the stunning layers of rock. Another 15 minutes of walking, and you’ll arrive at the 1.5 Mile Resthouse, which has water, toilets, and an emergency phone.
Bright Angel Trail to 3 Mile Resthouse
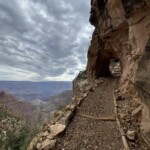
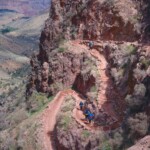
By 6:40 am, we were on our way to the next stop. After the 1.5 Mile Resthouse, the trail to the 3 Mile Resthouse gets a bit narrower in places, but it’s still wide enough, never dropping below four feet. Around 7:30 am, we reached the 3 Mile Resthouse and refilled our water bottles.

Bright Angel Trail to 3 Mile Resthouse
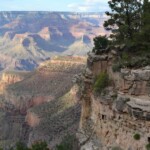
This resthouse is similar to the 1.5 Mile Resthouse—small but good enough to provide shelter if the weather takes a turn. There’s also a viewpoint here, where I managed to get some of my favorite shots of the Grand Canyon’s walls!
Bright Angel Trail to Havasupai Gardens (Havasupai Gardens Campground)
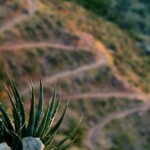
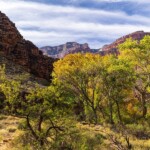
After a quick break, we continued on the trail to tackle the next section of switchbacks, known as Jacob’s Ladder, which takes you down through the Redwall Limestone. As you get closer to Havasupai Gardens, the path flattens out, which makes it a much easier walk across the slopes of Bright Angel Shale.
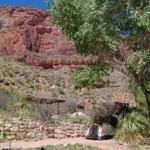
We reached Havasupai Gardens (formerly Indian Gardens) around 8:30 am, about 4.5 miles down the trail. This spot is popular for hikers and campers who choose to stop here rather than continue all the way to the Colorado River. It’s a fantastic place for camping in the Grand Canyon (with a permit, of course) and has pit toilets and a water station.
Bright Angel Trail to Plateau Point (alternative detour)
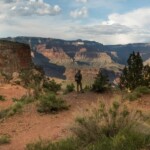
The Plateau Point Trail is a bit of a detour off the Bright Angel Trail, but trust me, it’s worth every step if you have the time. Even though it doesn’t lead all the way down to the Colorado River, the views are absolutely stunning! If you’re camping at Havasupai Gardens Campground, this delightful 3-mile round-trip hike is the perfect evening adventure—it’ll take you at most an hour from the campground.
To get there, hike first to Havasupai Gardens, but instead of continuing along the Bright Angel Trail, turn left toward the Plateau Point Trail and continue for 1.5 miles to the viewpoint. Some spots in this section can be a bit overgrown, so just watch your step.

Bright Angel Trail to Plateau Point
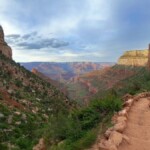
The trail begins to descend toward the Tonto Platform—the plateau that separates the inner gorge and river from the upper canyon. As you move away from the creek, the landscape shifts back to desert. Keep right at the junction with the Tonto Trail, pass by a water tank, and continue onward. Shortly after, you’ll arrive at the Plateau Point Viewpoint.
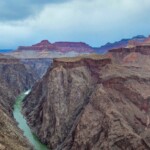
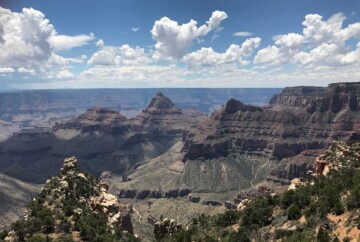
The trail dips down to a rock platform secured with safety rails. From here, you’ll get a breathtaking view of the Colorado River roaring a thousand feet below. To the north, you can spot Cheops Pyramid, Bright Angel Canyon, and the striking Zoroaster and Brahma Temples.
The first time we hiked the Bright Angel Trail, we skipped this viewpoint in our rush to reach the river. But on our second trip, while hiking the rim-to-rim trail, we took things slow, spent a night at Havasupai Gardens, and made sure not to miss Plateau Point—and wow, it was totally worth it! It’s truly one of the best viewpoints on the South Rim.
Bright Angel Trail to the Colorado River (Pipe Creek River Resthouse)
If you’re skipping Plateau Point, that’s totally fine! After a quick rest at Havasupai Gardens, head straight toward the Colorado River. Just past the Gardens, you’ll hit some trail junctions with Tonto West and Tonto East. Keep south, following Garden Creek as it carves through the Tapeats Sandstone.

Bright Angel Trail to the Colorado River (Pipe Creek River Resthouse)
Next up is the Devil’s Corkscrew—a series of steep, zigzagging switchbacks that slice through the dark cliffs of the ancient Vishnu Schist. It’s a tough section, so try to avoid it during the heat of the day since those black rock walls soak up the sun. Once you conquer the Corkscrew, the trail smooths out as you follow Pipe Creek.
Around the 7-mile mark, you’ll find plunge pools and small waterfalls where Garden Creek merges into the Pipe Creek drainage. The trail gently leads you down to the River House rest area. Look out for a side trail to Pipe Creek Beach—it’s a short walk, and you’ll get to dip your feet in the cool waters of the Colorado River!
Bright Angel Trail to the Bright Angel Trail Bridge
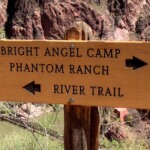
By 10:15 am, we finally had our feet in the Colorado River—what a thrill! The sun was heating up fast, so we decided to head to our cabin as soon as possible. We retraced our steps back to the junction, and from there, we transitioned onto the River Trail, which means the Bright Angel Trail technically ends here.

Bright Angel Trail to the Bright Angel Trail Bridge
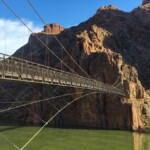
As you head east, the trail contours above the river, leading you through sandy dunes for the next 1.5 miles. Soon enough, you’ll reach the Bright Angel Bridge, also known as the “Silver Bridge.” This cool suspension bridge doesn’t just help hikers cross the fast-flowing Colorado River; it also supports a Trans-Canyon waterline that carries fresh water from the north side of the canyon to Havasupai Gardens.
Bright Angel Trail to Bright Angel Campground
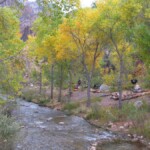
Once you cross the river, follow the trail as it meanders past park buildings and private residences. Just keep an eye out for the signs leading to Bright Angel Campground. This spot is absolutely beautiful, with benches shaded by trees and a creek running through it—perfect for a well-deserved break!
Bright Angel Trail to Phantom Ranch
About half a mile past the campground, we finally reached our cabin at Phantom Ranch around 11:30 am. Tired but excited, we grabbed our keys from the Canteen. The staff was super friendly, and just from the look of it, you can tell they run the ranch like a well-oiled machine. Plus, there’s a creek just 300 feet from the cabins—what more could we possibly ask for?

Bright Angel Trail to Bright Angel Campground
The only minor downside is that they don’t serve lunch, except for the $25 sack lunches. Luckily, we packed sandwiches and didn’t mind the wait until the early dinner that we had booked in advance.
Most popular itinerary ideas
You’ve got two main options for tackling the Bright Angel Trail: a day hike or a multi-day hike. Let’s dive into both:
Hiking the Bright Angel Trail in one day
While it’s possible to hike the entire Bright Angel Trail in one day, I’ve got to say—I wouldn’t recommend it unless you’re in top-notch shape and have some serious hiking experience.
For super-fit hikers, it can take around 10 hours. But for the average adventurer, you’re looking at 12-15 hours roundtrip. Of course, you can just hike part of the trail and turn around when you feel like it. However, if you’re up for the challenge, here’s how you can pace yourself:
- 5:00 AM: Kick off your hike from the Bright Angel Trailhead.
- 5:45 AM: Reach the 1.5 Mile Resthouse—take a break if you need to.
- 6:30 AM: Arrive at the 3 Mile Resthouse and grab a quick water refill.
- 7:30 AM: Reach Havasupai Gardens. This is a perfect spot for a snack and a short rest—don’t forget to top up your water bottles.
- 9:30 AM: Make it to the Colorado River! Dip your feet in, have a snack, and recharge your batteries.
- 10:00 AM: Start your journey back, aiming to reach Havasupai Gardens by 11:45 AM. If it’s scorching hot, hang out here until the heat dies down.
- 2:00 PM: Get to the 3 Mile Resthouse—more snacks and water breaks are a must!
- 4:00 PM: Arrive at the 1.5 Mile Resthouse. Almost there! Rest up before tackling the final stretch.
- 6:00 PM: Wrap up your hike back at Grand Canyon Village.
Honestly, while a day hike on the Bright Angel Trail is doable with enough preparation, it’s a pretty grueling trek. The terrain is challenging, and temperatures can skyrocket as you get closer to the canyon floor. If you’re determined, just make sure to bring a headlamp—you might find yourself hiking those last few miles after sunset.
If the full hike feels like a bit much, you can always aim for one of these turnaround spots instead:
- 5 Mile Resthouse
- 3 Mile Resthouse
- Havasupai Gardens (4.5 miles one-way)
Of course, exploring the Grand Canyon in one day can be exciting and packed with adventure, but I’m a big fan of taking my time. There’s just so much to see, and the more time you have, the more you can soak in the sheer beauty and vastness of this incredible place!
Hiking the Bright Angel Trail in two days (or more)
If you can take two days for the Bright Angel Trail, you’re in for an unforgettable experience! With an overnight stay at either Bright Angel Campground or Phantom Ranch, you can enjoy a good rest before the climb back. A great option is to take the South Kaibab Trail down and hike back up via Bright Angel Trail, giving you a bit of variety and some of the best canyon scenery.

Hiking the Bright Angel Trail in two days (or more)
Just bear in mind that the South Kaibab Trail is tougher, with no shade, resthouses, or water stations to refill your bottles. If you still want to explore it, I recommend going down to the Colorado River via this trail and then hiking up to the rim via the Bright Angel Trail.
Here’s how you do it:
Day 1: Getting down to the river (South Kaibab Trail)
- 6:00 am – Shuttle bus to South Kaibab Trailhead: Start your day by hopping on the Kaibab Rim (Orange) Route shuttle bus from Grand Canyon Village to the South Kaibab trailhead near Yaki Point. The first bus leaves at 6 am, so you’ll be on the trail by about 6:30 am.
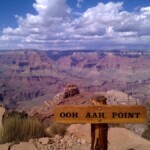
- 7:00 am – Ooh Aah Point (1 mile): By 7 am, you’ll reach Ooh Aah Point, one of the most stunning viewpoints in the Grand Canyon.
- 7:30 am – Cedar Ridge (1.5 miles): Around 7:30 am, you’ll arrive at Cedar Ridge, a popular stop with restrooms and a bit of shade.
- 8:00 am – Skeleton Point (3 miles): By 8 am, you’ll reach Skeleton Point, the first spot where you can see the Colorado River glinting below. A perfect place to rest up!
- 9:00 am – The Tipoff (4.5 miles): By 9 am, you’ll find yourself at The Tipoff, where the East Tonto Trail connects with South Kaibab. There are also restrooms just a short walk away.
- 12:00 pm – Kaibab Suspension Bridge (6 miles): By noon, you’re crossing the iconic bridge over the Colorado River, leading you to Boat Beach and, shortly beyond, to Bright Angel Campground. You’re almost there!
- 12:30 pm – Bright Angel Campground/Phantom Ranch (6.5 miles): Head up the final half-mile to Phantom Ranch or set up camp at Bright Angel —with permits of course!
Day 2: Bright Angel Trail return
- 6:00 am – Start from Bright Angel Campground or Phantom Ranch: Hit the trail early to enjoy cooler temperatures for the climb.
- 6:30 am – Cross the Bright Angel Bridge and follow the trail along Pipe Creek.
- 9:00 am – Reach Havasupai Gardens (Indian Garden) (4.5 miles): A perfect stop to recharge and refill your water bottles.
- 10:30 am – Arrive at 3 Mile Resthouse. Take some time to catch your breath.
- 12:00 pm – Arrive at 1.5 Mile Resthouse. With restrooms, water, and shaded spots, it’s a great place to hydrate, have some snacks, and stretch your legs.
- 12:30 pm – Final push to the South Rim: This last section is steep, so take your time and enjoy the evolving views as you ascend.
- 2:00 pm – Arrive at Bright Angel Trailhead: Congratulations, you made it!
If you’re looking for a more adventurous journey, I definitely recommend doing the entire Rim-to-Rim hike. You can hike the North Kaibab Trail (from the North Rim) and return to the South Rim via the Bright Angel Trail. In our guide to the Rim to Rim hike, we explain everything about the logistics to plan this multi-day adventure.
How to get to the Bright Angel Trailhead
The Bright Angel Trailhead is very easy to find, located on the northwest side of the Village. If you’re visiting the Grand Canyon by car, you’ll find several parking lots near the trailhead. If those fill up, don’t worry—there are four other lots in the Village, or you can park pretty much anywhere that doesn’t have a “No Parking” or “Staff Parking” sign.
Address: 15 Bright Angel Trail, Grand Canyon Village, AZ 86023, United States. Pop this into Google Maps, and you’re good to go!
If you’re staying nearby without a car, you can easily walk to the trailhead. Grand Canyon Village is really small, and everything’s close by. For example, we stayed at Bright Angel Lodge, one of the best hotels in the South Rim, and it was just a six-minute walk from our doorstep to the trailhead!

How to get to the Bright Angel Trailhead
If you’re a bit farther away, another option is to hop on the Village (Blue) Shuttle Bus, which stops near the Bright Angel Trailhead. If you’re staying in one of the hotels in Tusayan, you can take the Tusayan (Purple) Shuttle to the Visitor Center and then transfer. Just keep in mind that the Purple Route only runs during the summer.
If you’re planning to hike down the South Kaibab Trail and come up via Bright Angel Trail, park at Bright Angel Trailhead and then take the Kaibab Rim (Orange) Shuttle to South Kaibab Trailhead, just before Yaki Point. Remember, no private vehicles are allowed at Yaki Point Road, so the shuttle is the only way to go!
Where to stay while hiking the Bright Angel Trail
Alright, let’s talk about accommodations! Since the Bright Angel Trail starts at the South Rim, you’ll need to head there first. If you’re short on time, you could plan to arrive early in the morning, tackle the trail, hike back, and move on to your next destination the same day.

Where to stay while hiking the Bright Angel Trail
But if you want my advice, definitely consider spending at least a night—either before or after your hike—at one of the best hotels in the Grand Canyon. It’s absolutely worth taking the extra time to explore the South Rim and its incredible viewpoints and attractions.
One fantastic option is the Bright Angel Lodge that I mentioned earlier. It’s located right near the trailhead and has that cozy, historic charm. It’s perfect if you want to wake up right at the start of your adventure! And don’t worry; there are plenty of other choices nearby if you’re looking for something with a different vibe.
Now let me tell you about the accommodation options you have if you’re doing the hike over several days — that is, if you want to sleep at the bottom of the Grand Canyon.
Phantom Ranch
Phantom Ranch is the only lodging option along the Bright Angel Trail in the Grand Canyon—except for the campgrounds, of course! The ranch is a bit remote; there’s no road access, so your only ways to get there are by mule, on foot, or via rafting.
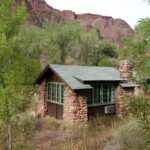
These cabins in the Grand Canyon can accommodate 2 to 4 guests and come with basic amenities, including bunk beds or king beds, cold-water sinks, and private bathrooms. There’s also a Shower House nearby that really feels like a luxury after that trek!
Now, here’s the deal: these cabins are limited and super popular. So, the National Park Service has set up a reservation system to manage demand, and you’ll need to enter the lottery system 15 months in advance!

Phantom Ranch
If you win the lottery, you’ll get an email and have 10 days to confirm your stay. Any unclaimed spots are released for general reservations in the 13-month window, but those go fast, so don’t count on last-minute luck!
We managed to snag a cabin for two, which cost $222 a night. Dorms and group cabins are a bit more budget-friendly, especially if you’re traveling with a group.
There’s also the Phantom Ranch Canteen, a cozy little restaurant exclusively for guests. It’s open daily from 8 am to 8 pm, serving breakfast and dinner. Meals range from $25 to $65, and you need to reserve a spot in advance. We tried both the steak and veggie options, and they were absolutely delicious! Plus, we grabbed two sack lunches for our hike back, which were about $50 total—$25 each.
Bright Angel Campground
When we first decided to hike the Bright Angel Trail, we were too late to secure a spot at Phantom Ranch, but we managed to enter the Bright Angel Campground lottery and score a spot there instead. As someone who loves camping, I was excited to stay at one of the most iconic campgrounds in the USA.
The campground was beautiful, right in the heart of nature, with Bright Angel Creek running through it. The restrooms were clean, with running water and flush toilets, and there was drinkable water available. Each campsite had plenty of space for a tent, plus a picnic table, a footlocker for storing food, and even a pole to hang your backpacks on.

Bright Angel Campground
Sure, there’s no shower, but trust me, that creek is a lifesaver. Most campers cooled off by sitting in Bright Angel Creek, and it was hilarious watching the little fish nibble away at our tired feet like a mini spa treatment!
Just a heads-up: to obtain the backcountry permit required to camp here, you will need to plan at least 4 months in advance. We were lucky to start planning this adventure at just the right moment by chance, but if you already know when you plan to go, and the lottery isn’t available for your dates yet, make a note in your calendar and familiarize yourself with the lottery website so you can be prepared. No last-minute space is held for this campground!
Havasupai Gardens Campground (formerly known as Indian Garden Campground)
If you’re not planning to hike all the way down to the Colorado River, Havasupai Gardens Campground is a solid option. It’s located on the Bright Angel Trail, about halfway between the South Rim and the Colorado River. It’s also a perfect spot if you’re aiming to explore Plateau Point and want a comfortable night’s rest before continuing your hike.

Havasupai Gardens Campground
This campground is smaller than Bright Angel Campground, with just 15 sites. There are 14 small group sites that fit 1 to 6 people, plus one large group site that can accommodate 7 to 11 people. You’ll find potable water, restrooms, and even emergency phone service here. Each campsite has a table, two ammo boxes for safe food storage, a pack pole, and a shade structure.
Similar to Bright Angel Campground, camping at Havasupai Gardens is limited to two nights, so plan accordingly! And if you’re looking for a last-minute spot, a few permits are sometimes available in person for visitors at the Backcountry Information Center but don’t count on them. Make sure to book your spot here well in advance.
Bright Angel Trail permits & fees
You don’t need a permit for hiking the Bright Angel Trail in one day. However, unless you have a reservation for the Phantom Ranch, you will need a backcountry permit to stay below the rim during your multi-day hike on the Bright Angel Trail. To secure a backcountry permit online, you need to apply for a specific use area, date, and group size. Popular spots like Bright Angel Campground (CBG use area code) tend to fill up fast, so getting a permit can be a bit of a challenge. Permits for Havasupai Gardens (CIG use area code) are slightly easier to obtain, but I wouldn’t rely on them either.

Bright Angel Trail permits & fees
Your best bet is to enter the early access lottery four months before your planned hike. For example, if you’re hoping to start your hike in November, make sure to apply during the two-week window that ends on July 1st. Winners are notified the next day and can lock in their dates and pay for their reservation.
The permit fees are $10 per application plus a nightly fee of $15 per person for below-rim areas (or $4 per person for above-rim backcountry areas). And don’t forget, these fees are on top of the standard Grand Canyon entrance fees.
Best time to hike the Bright Angel Trail in the Grand Canyon South Rim
The best time to hike the Bright Angel Trail is during the cooler months—late autumn, winter, or early spring. Temperatures are much more manageable during these seasons, making your hike a lot more enjoyable (and safer)! Personally, I love hiking in June or October, when the mornings are crisp, and the afternoons are just perfect for soaking in the views.
Pro tip: Start your hike early in the morning when it’s cooler—midday heat can be brutal. Always check the weather before you head out. Finding the best time to visit the Grand Canyon can make all the difference between having a great adventure or a heatwave struggle.

Best time to hike the Bright Angel Trail
If you’re considering a summer hike, be prepared for some serious heat! Temperatures at the bottom of the canyon can easily skyrocket past 100°F (38°C), and the Inner Gorge often feels like a blazing 110°F (43°C) or more. Just to give you an idea, when we visited in early October, it was a cool 50°F on the rim in the morning but spiked to a scorching 95°F at Phantom Ranch.
If you’re visiting the Grand Canyon in winter and you want to hit this trail, keep a few things in mind. While the trail and campgrounds are open, water pumps might be shut off, and the first 1.5 miles can be icy and muddy. So, you have to bring traction devices and prepare for the challenging terrain ahead! This hike is recommended only for more experienced hikers. Additionally, the North Rim closes after the first snowfall, making it an unsuitable time for a Rim-to-Rim hike.
Grand Canyon Bright Angel hike safety considerations
First off, let me put your mind at ease—hiking the Bright Angel Trail is totally safe, as long as you take some basic precautions. Here are some tips to help you stay safe while enjoying one of the Grand Canyon’s most beautiful trails.
Bright Angel heat precautions
The biggest thing to watch out for is the heat—it’s no joke! In the summer, temperatures can get intense, especially in the Inner Canyon. Try to avoid hiking during the hottest hours of the day, generally between 10 am and 4 pm. Instead, start your hike early in the morning or later in the afternoon when it’s cooler.
Keep an eye on these hot spots along the trail:
- Between Phantom Ranch and Havasupai Gardens
- The Box, a narrow passage that can feel like an oven in the summer
- The notorious “Devil’s Corkscrew“—those switchbacks near the Colorado River can be brutal!

Bright Angel hike safety considerations
We reached the Devil’s Corkscrew around noon, and it was HOT! We were so relieved to find those cool creeks nearby to splash our faces—just be careful, those creeks are for cooling off, not swimming.
Remember to pack sunblock, a hat, and lightweight clothing. And if you ever feel dizzy, faint, or have a headache, find some shade and rest for at least 30 minutes. There are shaded spots at the 1.5-mile and 3-mile rest houses, as well as at Havasupai Gardens. Taking it slow and listening to your body can make a lot of difference in how tough it is on your body!
Bright Angel water sources and water management
If you’ve ever tackled a long desert hike, you know just how important hydration is! Luckily, the Bright Angel Trail has several rest houses along the way, complete with water stations to keep you refreshed:
- At the trailhead
- At the 5 Mile Resthouse
- At the Three Mile Resthouse
- At Havasupai Gardens (about 4.2 miles in)
Most of the year, natural springs are available, but it’s important to note that some of them are seasonal. To avoid surprises, always double-check that these water sources are flowing. You can easily get the latest updates on their website or give the Backcountry Information Center a call at (928) 638-7875.
One important thing to remember is that you must treat any water you collect from natural sources in the Grand Canyon. The easiest way to do this is by using a portable water filter or purification system, which does a great job of removing contaminants. For an extra layer of safety, you can also use water purification tablets or boil the water for at least one minute to ensure it’s safe to drink.
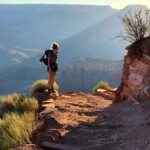
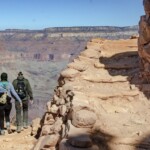
Staying safe near cliffs and edges
If you’ve got a fear of heights, let me be real with you: the Bright Angel Trail might not be your best bet. This hike has some narrow edges and drop-offs that’ll have you trekking alongside sheer cliffs for hours!
If you’re not sure how you’ll handle it, I recommend testing the waters by starting the trail and going about a quarter mile past the tunnel. See how you feel—if the heights make you nervous, no worries! Just head back and enjoy a stroll along the Rim Trail instead. There’s no shame in choosing a safer hike!

Staying safe near cliffs and edges
Now, for everyone hitting the trail:
- Remember to stay aware at all times. I know the views are absolutely breathtaking, and it’s easy to get lost in the scenery. But don’t let those jaw-dropping vistas distract you from watching your step!
- The sun can be pretty intense, too, sometimes even blinding, so bring polarized sunglasses to cut through the glare and keep your focus sharp.
- If you’re stopping to snap some photos, double-check your footing and make sure you’re not too close to the edge—safety always comes first!
The trail is well-maintained, but it has plenty of switchbacks, steep sections, and spots that don’t have barriers or railings. Some sections can feel pretty exposed, especially as you descend deeper into the canyon, and even give you that vertigo vibe if you’re sensitive to heights. So, take your time, stay mindful, and enjoy the adventure without taking unnecessary risks!
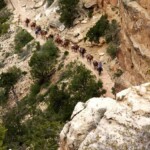
Sharing the Bright Angel trail with mule trains
The Grand Canyon’s rugged terrain is no joke, and before the trails were improved, mules were the lifeline for getting gear, supplies, and even people from the South Rim down to the Colorado River.
They were, and still are, the only way to reach the bottom of the canyon except for walking. So, if you’re hiking the Bright Angel Trail, be ready to share the path with these hardworking animals.
- You might catch a whiff of the mules before you see them, especially on those hot days. A small dab of Vicks VapoRub under your nose can help if the smell gets too intense!
- The mules will be, well, doing their business on the trail, so watch your step!
- Early mornings are your best bet to avoid getting stuck behind a mule train. When you do come across a mule train on a narrow part of the trail, the handler will guide you on what to do. Usually, you’ll step to the side, hugging the wall, and let the mules pass by.

Sharing the Bright Angel trail with mule trains
Don’t worry, these mules are pros at navigating tight spaces and people, and they won’t kick. Just listen to the handler’s instructions, keep calm, and you’ll be just fine! And as tempting as it might be, resist the urge to pet or feed the mules—they’re not aggressive, but they can bite!
These mules also carry people down to Havasupai Garden or all the way to Phantom Ranch for overnight stays. I’m not a big fan of mule riding—it just doesn’t sit right with me, and I avoid it on my trips for ethical reasons. But if you’re comfortable with it, go for it! Just make sure to plan well in advance because mule rides on the Bright Angel Trail are super popular and tend to fill up quickly—you will need to book them 15 months ahead!
Grand Canyon wildlife awareness
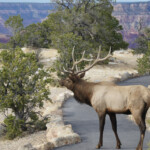
When you’re hiking or camping, you have to respect the Grand Canyon’s wildlife. You might come across all sorts of critters, from ravens and cheeky squirrels to deer, mule deer, elk, collared lizards, and even the rare sight of a pink rattlesnake!
And if you’re lucky (or unlucky, depending on how you feel about it), you might even spot coyotes, black bears, or the majestic condor soaring overhead.

Grand Canyon wildlife awareness
Now, don’t worry too much—most of these animals prefer to keep their distance. They won’t bother you unless they feel threatened. But here are a few tips to keep your encounters friendly:
- DON’T feed the wildlife! Feeding them does more harm than good and can cause them to lose their natural instincts.
- While encounters with rattlesnakes and scorpions are rare, it’s always a good idea to watch where you step, just in case.
- If you’re camping, give your shoes a shake before slipping them on in the morning.
- Keep your food and gear securely stored to avoid visits from curious raccoons and squirrels.
The best approach is to stay alert, respect their space, and just enjoy the magic of seeing these creatures in their natural habitat.
Bright Angel Trail packing list
Here’s a comprehensive Grand Canyon packing list to ensure you’re fully prepared for your adventure on the Bright Angel Trail. These essentials should have you covered, but feel free to change the list based on your personal preferences:
- A comfortable hiking backpack
- A collapsible water bottle or a hydration bladder
- Water filter to treat water from natural sources
- Snacks and food (pack lightweight yet filling options like nuts, nut butter, or dried fruit to keep your energy up)
- Sturdy hiking boots
- Appropriate clothing
- Sunscreen
- Trekking poles (absolutely necessary if you’re traveling when the trail is muddy, rainy, or icy)
- Personal hygiene items, including travel toiletry bottles
- A wide-brimmed hat
- First aid kit
- Backpacker poncho (summer thunderstorms come with the potential for torrential rains)
- Garbage bags
- Headlamps or flashlights
- Multi-tool or Swiss Army knife
- Grand Canyon Bright Angel Trail map (both an online and paper map)
- Garmin InReach
- Emergency whistle
- Insect repellent
- Hand sanitizer

Bright Angel Trail packing list
If you’re planning to camp at Havasupai Gardens or Bright Angel Campground, you’ll want to add these items to your list as well:
- Ultralight backpacking tent
- Sleeping bags
- Ultralight camping pillow
- Jetboil
- Camping silverware
- Firestarter or lighter
Additional tips for hiking the Bright Angel Trail
Here are some tips to help you get the most out of your journey!
- Pick the right time to hike: Spring or fall is ideal since the temperatures are milder.
- Start early in the morning: You’ll beat the heat and enjoy cooler temperatures as you hike.
- Plan ahead: Make sure to secure your permits, lodging, and meals well in advance.
- Dress for the weather: Most of the year, loose-fitting, light-colored clothing will help you stay cool and protect your skin.
- Ditch the headphones: Stay alert for mule crossings, rattlesnakes, and other trail sounds!
- Abide by trail etiquette: Always give mules the right of way and be respectful to fellow hikers. And remember, hikers coming up have the right of way over those going down.
- Wear sturdy footwear: Hiking boots or shoes are a must for handling the rugged terrain.

Additional tips for hiking the Bright Angel Trail
- Sun protection is key: Don’t forget your sunglasses, a wide-brimmed hat, and plenty of sunscreen.
- Stay fueled and hydrated: Carry plenty of water and high-energy snacks to keep your energy up.
- Navigation tools: Bring a GPS device and a downloaded map of the Bright Angel Trail on your phone.
- First aid essentials: Pack a basic kit with items like band-aids, antiseptic wipes, pain relievers, and any personal medications.
- Check the weather: Always look up the latest forecast and trail conditions before you head out.
- Dress in layers: The weather can change quickly, so bring layers that you can add or remove as needed.
- Winter gear: If you’re hiking in winter, bring traction devices for navigating icy sections.
- Let someone know your plans: Share your route and expected return time with a friend or family member in case of emergencies.
- Plan your itinerary: Take into account the Grand Canyon operating hours.
Follow these tips and check out our guide with tips for visiting the Grand Canyon, and you’ll be all set for an amazing hike on the Bright Angel Trail!
Map of the Bright Angel Trail in the South Rim
Below, I’ve included a map of the Bright Angel Trail in the Grand Canyon so you can easily find all the lodging options, campgrounds, trail routes, and rest houses:
For more help, check out our Grand Canyon maps.
FAQs – Bright Angel Trail
We’ve covered everything you need to know about hiking the Bright Angel Trail. Now, let’s wrap up with some of the most frequently asked questions that might be on your mind.
And that’s all you need to know about hiking the Bright Angel Trail! I hope you find this information useful. If you have any questions or want to share your own experiences, feel free to leave a comment below. I’d love to hear from you.
Safe travels!