
The rule of thirds is the most popular composition technique, and most photographers use it on a daily basis. But, have you ever wondered why?
In this article, you’ll see in-depth what the rule of thirds in photography is, how to apply the rule of thirds to your images, some rule of thirds photography examples, and more!
By the end of this article, you’ll not only be familiar with the rule of thirds, but you’ll also learn how to break the rule of thirds to create powerful compositions. Let’s dive right in!

GET OUR FREE EBOOK TO
MASTER THE PHOTOGRAPHY BASICS
20 LESSONS AND 80+ PAGES WITH EXAMPLES, INFOGRAPHICS, TIPS, AND MORE!
What is the Rule of Thirds in Photography?
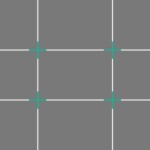
| Short answer: The rule of thirds in photography is a compositional guideline that evenly divides an image into thirds by using two horizontal and vertical dividing lines. Placing the subject or elements of interest where the lines intersect, creates a more powerful composition. It also helps framing the horizon line in an image. |

The rule of thirds is a powerful composition guideline in photography
The rule of thirds is used in photography to create visual balance and flow. It prevents the artist from placing the subject right in the center of an image or placing the horizon line where it could divide the image in two, just to mention a couple of examples.
Even though this is a basic concept in photography, it takes time to put it into practice. To make things easier, I’ve gathered all the information and examples that you need to apply the rule of thirds successfully. Keep reading to learn more!
How to Apply the Rules of Thirds for photography
The rule of thirds is widely used in photography and most people apply this composition guideline instinctively. However, if you want to create outstanding photographs, you need to master the rule of thirds composition. I’ll guide you through some simple tips to create breathtaking images using the rule of thirds. Are you ready?
Rule of Thirds Grid In-Camera
This is the first step to applying the rule of thirds. You need to be able to preview the rule of thirds grid. All camera models include this option to assist with composing the picture. It might not be activated by default, so you’ll need to activate it through the menu. Check your camera model user manual to find how to activate it.

Rule of thirds grid seen on the screen of a Sony camera
Place the subject in intersecting areas
To help with visual flow and storytelling, it’s important to place the key subject on the points where the lines intersect. Adding this simple tip to your creative process will instantly change your images for the best.

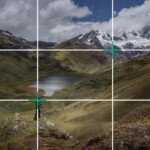
In this example, the landscape is the main area of interest, so I framed it in two-thirds of the image.
Give priority to the more important elements
The rule of thirds composition almost forces you to give priority to certain elements over others. For example, if you are photographing the horizon, you might find it useful not to place the horizon line right in the middle of the frame; this divides the image into two, which isn’t pleasing to the eye.
If you follow the rule of thirds, place your horizon either in the upper or lower third depending on what you want to emphasize; the foreground or the sky.

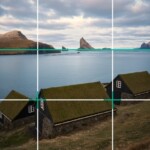
By placing the horizon line in the upper third I give room to the foreground and mid-ground.
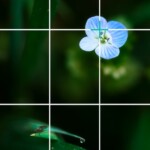
Complement the main subject
After placing the main subject in an intersecting area of the grid, fill the rest of the space with elements that add to the story. This is the most effective way to create an engaging photograph using the rule of thirds.

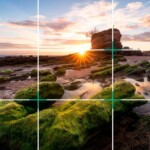
In this example, I’ve placed the sea stack (main element) and the complementing elements where two lines intersect.
Crop in postprocessing
As basic as it sounds, most photographers don’t crop their images. It took me some time to get used to cropping my images too. However, it’s such a powerful tool to refine your composition that you should at least give it a chance. Also, modern cameras have plenty of megapixels, enough to crop an image without any loss of sharpness.

I cropped this image by around 40% to adjust the rule of thirds composition
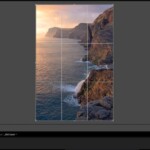
Rule of thirds grid in Lightroom
Most photo editing software allows you to visualize the rule of thirds so you can adjust the best photography composition. To visualize the rule of thirds grid in Lightroom do the following:
-
- Click on the crop tool or press R
- You’ll see an overlay of the rule of thirds grid on your image.
- If you want to see a different kind of grid, press O to cycle through the different overlays. You can press Shift + O to change the orientation of a particular grid.

Rule of thirds grid in Lightroom
Don’t get too obsessed
Sometimes you’ll notice that the rule of thirds composition doesn’t work in your scene. If that is the case, don’t force it. The rule of thirds is not a series of guidelines set in stone. It can be bent or even broken as I’ll explain later.
Best rule of thirds examples
To truly master your photography composition, the best you can do is to analyze great images and practice. Below, I’ve gathered several rule of thirds examples from different photography genres. In each image, you’ll see the rule of thirds grid to help you understand the composition better.
Rule of Thirds in Landscape Photography
The rule of thirds is one of the first composition guidelines that any landscape photographer learns. It’s versatile and easy to have a mental image of the grid. This is the technique I used for most of my early landscape photography and it helped me develop a better eye for composition.

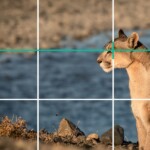
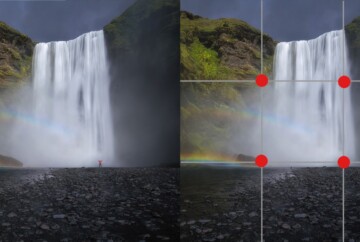
In landscape photography, the rule of thirds can help guide the eye to the most interesting areas.
Rule of Thirds in Portrait Photography
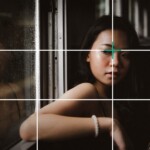
The rule of thirds in portrait photography helps create visual flow and storytelling. From now on, whenever you see a portrait, try to analyze it, you’ll notice that they mostly follow the rule of thirds composition.

Rule of thirds in portrait photography
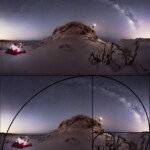
Rule of Thirds in Astrophotography
The rule of thirds can also be applied in astrophotography. The challenge here is to place each element in a way that will enhance the composition and not break it. We have a complete article explaining how to photograph the Milky Way where you’ll find more examples and tips on composing your image.

Using the rule of thirds for astrophotography will result in balanced yet powerful compositions.
If you are into night photography, I highly recommend downloading our milky Way chart to find the best days to photograph the Milky way in your location.
GET THE CALENDAR WITH THE BEST DATES TO PHOTOGRAPH THE MILKY WAY IN 2026
You'll also receive our PDF guide to photographing the Milky Way!

Other Rule of Thirds Examples
The rule of thirds can be applied to any photography genre, and it’s very effective. To create a stunning composition, you need to identify the subject in your photograph, then place it on the grid where it will create the most tension. Finally, place the complementing elements around that main subject.

Rule of thirds in wildlife photography – Photo by Ricardo Reyes.

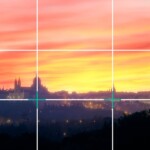
In this scenario, the sky was breathtaking, so placing the city in the bottom third emphasizes the sky more.

It’s essential to use the rule of thirds in sports photography to add to the flow of the game and convey movement and action.
How and When to Break the Rule of Thirds
Throughout this article, you’ve seen the rule of thirds explained and how to apply it. However, even though I do recommend practicing your composition with the rule of thirds, once the concepts are ingrained, then it’s time to get out of your comfort zone and break the rule of thirds.
Sometimes, breaking the rule of thirds in photography can result in an even more powerful composition. It’s all about assessing your scene and finding a way to tell a story through an image.
These are some helpful tips, that I use myself when it comes to breaking the rule of thirds:
-
- Find balance: balance in a frame doesn’t always have to be constrained by the rule of thirds guidelines. One of the most common ways to break the rule of thirds and find balance is to use symmetry. In some cases, doing this will divide the image into two equally-sized sections which will balance the photograph.

Break the rule of thirds by using a perfect symmetry like a reflection. in this case, placing the dividing line in the middle of the frame creates a perfect symmetry that gives balance to the entire image.
-
- Use leading lines: the use of leading lines is another technique that will elevate your composition. Leading lines can be anything from a river or road leading to the background or rays of light guiding the eye to the main subject.

Use leading lines to lead the eye to the subject. In this case, the river acts like a leading line.
- Fill the frame: filling the frame with your main subject is an extraordinary way to emphasize it.

Fill the frame with your subject without worrying about intersecting lines when it’s necessa
- Use a different composition technique: there are plenty of composition guidelines to choose from, and each scene might need a different approach. One of the most popular alternatives to the rule of thirds is the golden ratio.


The golden ratio is a little more complex than the rule of thirds, but it helps place every element in the image in a balanced manner.
Rule of thirds vs. Golden Ratio
The rule of thirds and the golden ratio are two of the most used composition guidelines in photography. And I’ve heard the same question many times: rule of thirds vs. the golden ratio, which is better?
Honestly, they both have their pros and cons. I do recommend learning the rule of thirds first since it’s a basic photography composition guideline that every photographer should master. However, once you’ve become familiar with the rule of thirds, I encourage you to learn about the golden ratio (also called the Fibonacci spiral or golden spiral).

The golden ratio allows for more balanced compositions, but it’s harder to master
Learning how to apply the rule of thirds first will give you a solid base to master the golden ratio, which is more complex. Also, most camera models don’t have a golden ratio grid (also known as “phi grid”).
NOTE: to better understand the similarities between the golden ratio and the rule of thirds, you should compare the phi grid and the rule of thirds grid. The phi grid is the grid representation of the golden ratio.

")
Rule of thirds grid (left) vs. Phi grid (golden ratio – right)
You can learn more about photography composition and see plenty of examples in our free photography basics for beginners PDF.
GET OUR FREE EBOOK TO
MASTER THE PHOTOGRAPHY BASICS
20 LESSONS AND 80+ PAGES WITH EXAMPLES, INFOGRAPHICS, TIPS, AND MORE!
Rule of thirds FAQ
These are the most frequently asked questions when it comes to the rule of thirds in photography. We’ve covered some of these questions through the article, but I hope this summary will help clear any remaining questions!
Conclusion
The rule of thirds is the most popular photography composition guideline. Hopefully, after reading this article you’ll learn how to apply the rule of thirds on your own because that’s the best way to master any technique. To make things easier, don’t forget to review again all the rule of thirds examples in the article.
To complement this article, I recommend checking our photography composition article, where we discuss the best compositional elements in photography beyond the rule of thirds.

The rule of thirds can be a very powerful composition guideline – Photo by David Aguilar
Once again, I encourage you to go out and practice! Feel free to share your results with us. If you have any further questions, leave them in the comment section below and I’ll be happy to help.
Happy captures!


yes
Thanks for reading, Tom! 😊