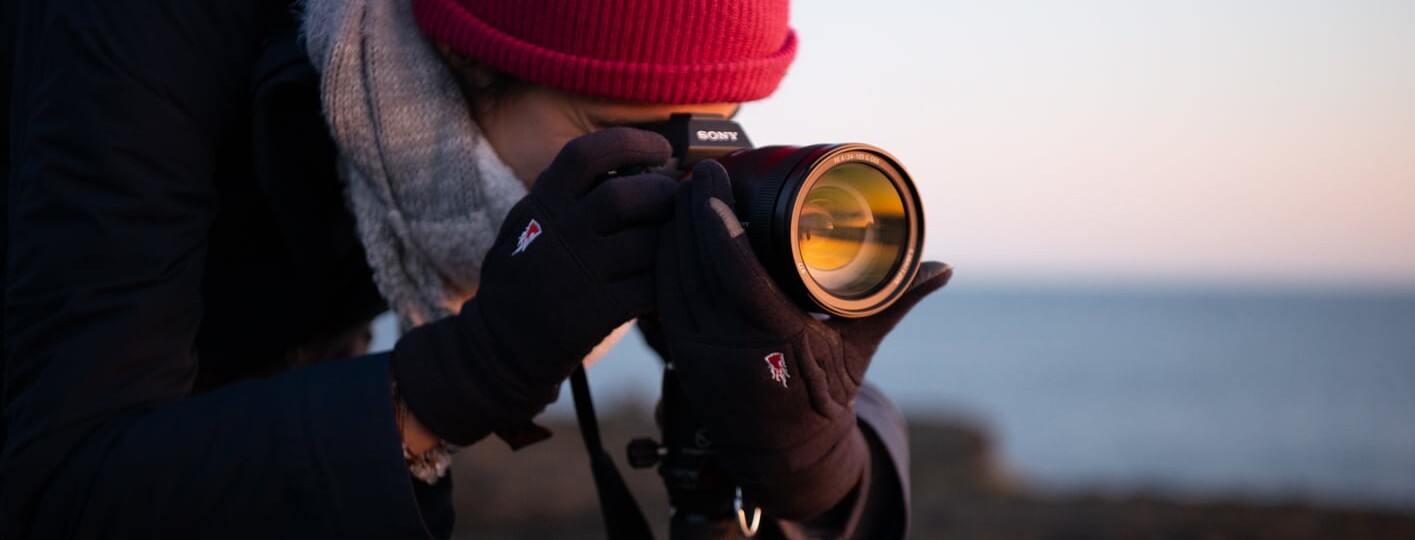
Focusing in photography is one of the most critical skills that a photographer needs. But just what is focus in photography?
Without knowing how focus works, it’s difficult to create the pictures we’re looking for. We need focus to make images that impact our viewers and convey the emotions we feel when working with a subject. That’s why in this guide to focusing in photography, we’ll be discussing how to get the most out of your camera’s photography focus points.
Understanding focus in photography starts with breaking down the different ways you can find focus with your lens and camera. From learning how to focus in-camera using both manual and autofocus to using the best photography focus techniques to nail your focus, this guide covers everything related to focusing in photography!
We’ll also be covering focus tips in photography to ensure you can fine-tune your camera focus skills to a professional level! Are you excited yet? Great, let’s begin!

GET OUR FREE EBOOK TO
MASTER THE PHOTOGRAPHY BASICS
20 LESSONS AND 80+ PAGES WITH EXAMPLES, INFOGRAPHICS, TIPS, AND MORE!
What is Focus in Photography?
Focus in photography is the process of making adjustments to the lens to find the maximum resolution, sharpness, and contrast for your chosen subject. You can do so either using manual focus or the autofocus system of your camera.
My focus definition in photography is based on using the camera’s lens either manually or with the autofocus system to make your subject look as detailed and high in contrast as possible. There are many technical focus definitions in photography, but simply put, it can be defined as finding optimal sharpness for a given subject.
Focusing in photography is very important because it highlights what’s important in the photo and what isn’t. The viewer depends on what’s focused as a guide for analyzing the composition and exploring the image. An in-focus photograph is often the difference between a stunning image and a complete fail.

Focusing in photography consists of making adjustments to the lens to find maximum sharpness and contrast
Focusing in Photography – Manual vs. Autofocus
Focusing in photography is performed in one of two ways: using manual or autofocus. Deciding when to use manual vs. autofocus depends on the subject as well as your camera gear, the light, and your skills.
Manual Focus
All photographers should know how to focus manually. No matter how advanced your camera is, it still can’t read your mind. Sometimes there isn’t enough light for the autofocus system to work, or you have the wrong focus area selected. Manual focusing can help you capture the moment much faster.
Despite autofocus being much easier, some photographers prefer manual focus mode for some genres like landscape, portrait, or macro. Manual focus for wildlife photography or sports is possibly the greatest challenge, so in those cases, it’s usually better to rely on your camera’s autofocus.
Autofocus
Learning how to use autofocus is critical to your success because some subjects move so unpredictably that it’s impossible to track them manually. The first autofocus systems were sluggish and inaccurate, but modern digital cameras can use autofocus to lock onto a subject and predict motion in real-time.
While manual focusing is typically done in genres where you have plenty of time, autofocus is always useful for quick focus. Using the autofocus in photography requires the right autofocus settings for each subject, something we’ll explore below and you can see more in-depth in our guide to autofocus modes in photography.

What are the focus points in photography?
Turn on your camera and take a good look through your viewfinder. Focusing in photography happens thanks to the circular or square marks in the display. These are your photography focus points.
Focus points in photography are zones on the camera sensor that are sensitive to changes in image contrast. Usually, you’ll see a brightly-colored or different-shaped central region with points scattered across the viewfinder image.
DSLRs typically have fewer focusing points than mirrorless cameras. Many models have roughly 51 autofocus points, while some of the latest mirrorless cameras have hundreds across the sensor. You can check our full comparison mirrorless vs DSLR here.
Many photographers only focus using the center point of the sensor, since it’s the fastest and most reliable. However, in many situations, we may need to use other focus points depending on the subject and movement.
Since the central autofocus point and other focus points are so important, we should get to know the different focus point types in photography.

Photography Focus Point Types
Photography focus points come in two varieties: linear and cross-type autofocus points.
Linear Autofocus points
Linear focus points can detect changes in image contrast only along either the horizontal or vertical dimension.
These autofocus points are less reliable, since autofocus efficiency depends on the type of lines in your frame and how the sensor is placed. It’ll be easier to focus on vertical lines when the sensor is horizontal and vice-versa.
Cross-Type AF points
Cross-type autofocus points can detect contrast changes in both the horizontal and vertical dimensions. Essentially, they are two linear focus points laid on top of one another.
The more cross-type autofocus points you have in your camera sensor, the better the camera will lock onto and track, especially once subjects leave the center of the frame. Modern digital cameras include more advanced focus points in the middle of the sensor like Dual cross-type AF points, which are two cross-type focus points together.

Since they are the most accurate, a common technique in photography is to use the central cross-type points to quickly focus on a subject and then recompose the image to suit the composition. This technique is called “Focus and recompose,” but it also has some drawbacks. For example, you can miss the focus when there’s a significant distance between the central focus point and your subject. It’s also easy to miss the focus when you’re using a shallow depth of field.
The focus point types in cameras are important because they help determine the tracking capabilities of your equipment, so a good focusing tip in photography is to know what type of focus points your camera sensor has and how they are distributed to use the cross-type AF points when possible.
Autofocus Area Modes
Photography focus points don’t have to be selected one at a time. You can use the different focusing area modes to give priority to a group of points.
By selecting one of the following autofocus area modes, you can reduce the focusing calculations the camera has to perform, allowing it to focus more quickly and make the subject tracking more accurate.
I go over how to focus in photography using area modes in much greater detail in my article on Autofocus Modes in photography! But here is a brief introduction to each one:

Camera Focus Modes
Choosing how the camera uses your autofocus points is just as important as the area they cover.
Depending on your subject and motion, there are three different camera autofocusing modes to choose from.
All three of these camera autofocus modes are covered extensively in my Autofocus Modes Guide!

How to Focus in Photography
As a photographer, there’s nothing worse than a blurry photo of a good moment. If you want to learn how to focus in camera, then practice the following steps to ensure you’ll always have your subjects in focus!
1. Decide Where You Want to Focus Within the Image
This comes down to artistic composition! Are you looking to highlight a subject in the foreground? Make the background stand out? If you’re undecided and your subject isn’t moving, try focusing with the viewfinder or the live view mode so you can preview the resulting image.

1. Decide Where You Want to Focus Within the Image
If you’re looking to find the focus point where the depth of field is as wide as possible, you’ll need to understand how to use the Hyperfocal Distance for a given lens and camera.
2. Manual Focus vs. Autofocus?
Using manual focus or autofocus comes down to how much time you have to adjust your focus and the light conditions within the scene.
My camera usually struggles to autofocus in low light, so my go-to focus option is manual when I’m shooting the Milky Way or doing Northern Lights photography. I also prefer using live view for focusing manually because the larger window gives you a clearer picture of what’s in focus.

2. Manual Focus vs. Autofocus?
3. Switch the Focus from “M” to “AF” on your Lens and Camera
If you decide to use your camera’s autofocus, you must switch your camera focus to this mode. Most focusing in-camera is controlled via a dedicated switch on the lens or body labeled AF/MF (Autofocus/Manual focus).
By enabling autofocus on your camera lens, you’ll have full access to the autofocus camera modes discussed earlier.

3. Switch the Focus from “M” to “AF” on your Lens and Camera
4. Select the BEST AUTOFOCUS MODE
Once the AF function is active, you should choose the best Autofocus mode for your subject.
Single AF is ideal for posed portraits and landscapes, and is the usual option if you’re shooting a still subject. Continuous AF is better if your subject is going to be moving, as with shooting wildlife or action. Choose autofocus Hybrid if your subject is unpredictable and can be static or moving, like a bird.
5. Set your FOCUS AREA MODE According to the Subject
How many autofocus points do you think you’ll need for your shot? Is your subject static in the middle of the composition? If so, single point is the best area mode to use. What if it’s moving across the frame, making dynamic area mode a better option?
Remember that photography focus points are key for detecting and tracking your subject, and the central focus point is the fastest and most accurate. You can also leave tracking and image focusing up to the camera’s automatic system by selecting Auto AF Area Mode in some specific situations.

5. Set your Focus Area Mode According to the Subject
6. Use the Viewfinder or Live View Mode on Your Screen
Next, you’ll be viewing the scene through either the viewfinder or live view LCD screen. Which one you choose is mostly a matter of preference.

6. Use the Viewfinder or Live View Mode on Your Screen
One benefit of using the Live View screen is having the option to zoom in to check your focus and, in some cameras, select autofocus points by tapping directly on the panel. On the other hand, the viewfinder is quicker and more intuitive for most photographers!
7. Press the Shutter Button Halfway Down or Use Back Button Focus
Assuming you’re using a camera with a two-step shutter, you press the shutter down halfway in order to focus. Once a focused image is detected, your camera will usually beep, turn the focus point to green, or offer some other confirmation.
If you’re using the continuous AF and your subject is moving, leave the shutter pressed halfway down so the autofocus can track your subject.
Then simply press the shutter button down all the way to capture the image!

7. Press the Shutter Button Halfway Down or Use Back Button Focus
Many photographers also use the back button focus. If you focus this way (something I recommend and explain below in the best focusing tips), simply press the AF-ON button to focus/track the subject and the shutter button to shoot.
8. Check and readjust your focus if Necessary
Have a look at your image and check if your focus is correct!
To do this, I always use the LCD screen of my camera and zoom in on the key details of the shot. If the focus isn’t as good as you expected, try focusing more slowly if you’ve used manual focus or using a different focus area if you’ve used the autofocus.

8. Check and readjust your focus if Necessary
Focusing in photography might seem challenging, but the more you understand how focus works, the faster this process becomes!
You can find more tips and info in our free PDF photography guide.
Other Focusing Tips in Photography
Now that we’ve discussed the process of how to focus in photography, to help you take sharper photos, here are some of the best tips for focusing in photography:
1. Use the back-button focus for more control over your focus
Most modern cameras allow you to de-link the shutter mechanism from the autofocus system and use the back-button focus (BBF). In some cameras, it’s also called the AF-ON button.
This focusing function allows you to have more control over your focus; the shutter button is used just for shooting, while the focus is with a separate button. Back button focus works this way:
- If you don’t press the focus button: Your camera works like it does in manual mode.
- If you simply press the focus button: You focus like you’re using the single focus mode.
- If you hold the focus button: You can track your subject like you would in the continuous focus mode.

1. Use the back-button focus for more control over your focus
In my case, since I switched to a full-frame camera many years ago, I’ve been using back button focus, and for me, it’s the best choice for focusing in photography.
2. Know the Autofocus Limits of Your Camera
If you don’t own the latest high-end mirrorless camera, you might not have the fastest low-light or subject tracking ability. And if you’re using an older lens, it may not be able to focus as fast as you expect.
This is not a problem; you can still focus using the right modes and technique. However, it’s fundamental to know the strengths and limitations of your camera gear to achieve the focusing results you’re looking for.

2. Know the Autofocus Limits of Your Camera
3. Use the Central Focus Points Whenever Possible
The cross-type central autofocus zone contains the most efficient photography focus points. Each point is sensitive to contrast differences along both the horizontal and vertical dimensions, and it’ll provide the fastest and most accurate autofocus in most camera sensors.

3. Use the Central Focus Points Whenever Possible
4. When Focusing is Difficult, Try Finding Areas with More Contrast
Think about where to focus in photography in situations that are challenging for your camera’s autofocus. A patch of light, color, or other high contrast setting helps the camera find focus much faster.

4. When Focusing is Difficult, Try Finding Areas with More Contrast
5. Zoom in in the Live View mode to check if your focus is correct
For me, this is one of the most important tips for focusing in photography, especially if you’re shooting stills and have the time to fine-tune your focus.

5. Zoom in in the Live View mode to check if your focus is correct
Take the time to zoom in if you’re using Live View mode. Images that look sharp when small may show missed focus when viewed at higher resolutions. Don’t trust the image preview that you see on the back of your camera, and always zoom in to check if you have the right focus.
6. Use the Best Aperture and Depth of Field for each Scene
By using the best aperture for focusing in photography, you can allow in as much light as possible, speeding up the focusing process.
The autofocus works faster and better when using wide apertures, but be careful, since a shallow depth of field when it isn’t needed can result in slower or missed focus.

6. Use the Best Aperture and Depth of Field for each Scene
In some situations, you can use a wide aperture to focus, and once you acquire focus, switch to a narrower aperture to increase the depth of field.
7. Focus on the Hyperfocal Distance to Maximize the Depth of Field
By focusing on the hyperfocal distance, you can maximize the area that’s in sharp focus across the image frame. I have an in-depth guide here that breaks down how to calculate and use the Hyperfocal Distance.

7. Focus on the Hyperfocal Distance to Maximize the Depth of Field
8. Do a focus stacking
Focus stacking (also known as focus blending) is a technique that allows you to create images that are sharp from front to back, achieving maximum sharpness in your photographs. It requires doing some technique in the field and in post-processing, but the results are totally worth it. You can learn how to do this technique in our focus stacking guide.


8. Comparing a focus-stacked photograph
9. Use manual focus for shooting night scenes
Manual focusing works best for night landscapes because cameras usually have trouble autofocusing to infinity. Refer to my handy guide if you’re interested in manually Focusing on the Milky Way or the Northern Lights.

9. Use manual focus for shooting night scenes
10. Enable Focus Peaking in Your Camera
Focus Peaking is a focus assistant that highlights both the area in focus and depth of field. Focus peaking is especially useful with manual focus so you don’t have to rely on how sharp things appear to your eyes, which can be misleading when looking through a viewfinder.

10. Enable Focus Peaking in Your Camera
11. Use software to fine-tune your focus and fix out-of-focus images
If you find you missed focus slightly, I also recommend working with image sharpening software like Sharpen AI to fix out-of-focus images! You can also use Lightroom and Photoshop for refocusing.


11. Use Software to fine-tune your focus and fix out of focus images. Refocused image with Sharpen AI
As a last tip for focusing in photography, I’d like to mention that sharpness and focusing go together. Learn how Sharpness in Photography works and how to take tack-sharp images to achieve maximum detail in your images!
Focusing in Photography F.A.Q.
Conclusion
We’ve gone from exploring what is focus in photography to how focusing works and implementing some of the best photography focusing tips to take sharp images.
Hopefully, this focusing in photography guide has helped you to understand the many uses of the focusing systems of your camera. If autofocusing is what you prefer, understanding both the camera focusing and Autofocus Area modes will ensure you get the most out of your photography focus points.
Still, I recommend practicing with the focusing manual mode, especially in situations that are challenging for your camera autofocus, like shooting in low light. Regardless of the focusing method you choose, don’t forget to check your focus on your LCD screen after shooting, zooming in on the details to see if everything is as sharp as you want it to be.
If there’s anything else you’d like to know about understanding focus points or how focusing in photography works, don’t hesitate to leave a comment below!


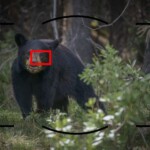


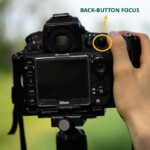

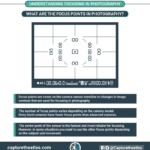


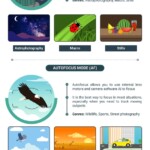

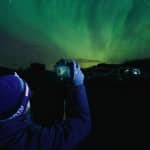


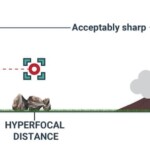


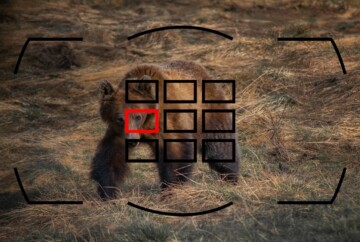

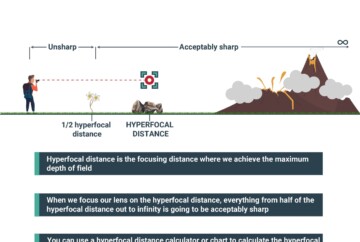


Photo focusing related all My questions gone after reading your post. Thank you so much for your awesome post.
Thank you! I’m glad to see you found my focusing article informative!
Happy shooting!
Dan