
The photography basics are fundamental for anyone who is beginning to work in photography.
Regardless of your interests, gear, or goals, having a solid foundation of the main concepts of photography is key to capturing better images and improving your photography.
However, things are not easy when you start off; What are the photography basics? Which are the fundamental concepts of digital photography? What’s the best way to learn the basic elements?
I was in that position too, and I know that it’s hard. There are plenty of photography basics articles online, but the information is often incomplete or displayed in a non-logical order.
For that reason, I decided to create this beginner’s photography guide to learning the basics.
This photography basics guide is what I’d have loved to find when I first picked up my camera; all the important information you need to understand the main photography concepts displayed in a logical and digestible order. To help you in the process, I also included plenty of examples, infographics, and photography basics cheat sheets that will make everything easier.
Ready to learn the digital photography basics?
Basic concepts of photography
We’ll dive into each photography concept below but, in a nutshell, these are the main photography basics:
- Exposure
- Aperture
- Shutter speed
- ISO
- Exposure triangle
- Depth of field
- Focal length
- Sensor size
- Focus
- Sharpness
- Camera settings
- Camera modes
- Metering modes
- Focus modes & areas
- White balance
- Histogram
- Composition
- Photography gear
- Editing
- Photography tips for beginners
Below you’ll find all these photography basics explained.
Apart from this information, the best way to learn the basics is to check the specific article that you’ll find at the end of each photography concept. You can also download this photography basics guide as a PDF if you’re interested.
I promise that if you follow this beginner’s photography guide, you’ll learn and master all the photography fundamentals in a flash!

GET OUR FREE EBOOK TO
MASTER THE PHOTOGRAPHY BASICS
20 LESSONS AND 80+ PAGES WITH EXAMPLES, INFOGRAPHICS, TIPS, AND MORE!
1. Exposure – The main element of photography
Exposure is the most important photography basic and the first photography concept that you need to understand.
You’ve probably heard before the expression “photography is painting with light”, and it’s completely true! Photography is about capturing light, and exposure is so important because it’s the amount of light collected by your camera.
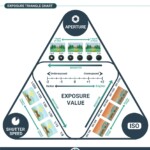
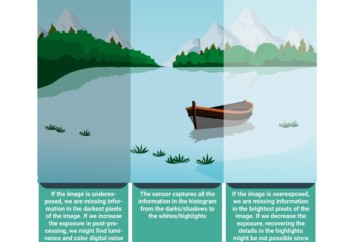
The photography exposure basics are composed of different elements that we’ll discuss below like the aperture, shutter speed, and ISO. The fundamental thing to understand is the effect of exposure, which is to capture the image with a determined brightness (this is also called “Exposure Value”).
Ideally, the image should be correctly exposed, that is, with the perfect amount of brightness where you can see all the detail in the highlights and the shadows. However, in photography exposure there’s no right or wrong, and the artistic choice of many photographers is to capture an underexposed or overexposed image. For now, we’ll focus on the elements to capture a correct exposure.
Exposure basics also has other effects on the final look of the image like the depth of field, the motion, and the digital noise. We’ll also get into this throughout this photography basics tutorial.
Below, you can see a photography basics infographic with the main effect of exposure on an image.

Not clear enough? Check out our guide to photography exposure!
2. Aperture – A fundamental concept in photography
Aperture is the first concept of the photography exposure basics.
In brief, the aperture works like our pupils; it’s the opening of the camera lens, which controls the amount of light that goes through the lens to the camera sensor.
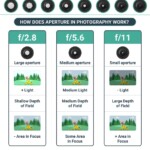
This basic photography concept has a direct effect on the exposure; the wider the aperture the brighter the image will be, and the narrower the aperture the darker it will be. It also plays a significant role in the depth of field and sharpness of the image.
The max. and min. aperture of the lens is defined by a value known as “F-stop”. The larger the F-stop number is, the smaller/narrower the aperture and vice versa. This number follows a sequence like this:

The best aperture camera settings will depend on the light, the subject that you’re shooting, and the final look that you want in your image.
You can see all the main effects of this exposure setting in the below photography basics cheat sheet for aperture.

Interested in learning more about aperture with some real examples? Click below and check out our Guide to photography aperture!
3. Shutter Speed – A key element for beginner photography
The second photography fundamental related to exposure basics is the shutter speed.
In short, shutter speed is related to how long the camera shutter is open and capturing light.
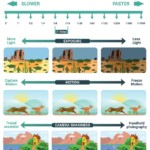
This has a significant impact on the exposure; a shorter shutter speed will translate into a darker image whereas a longer shutter speed will capture a brighter image.
Shutter speed is also a photography fundamental for capturing motion, something vital in some genres like long exposure photography. It also has an effect on the camera shakiness and the possibility of shooting handheld vs. the need for using a tripod.
The main way to measure shutter speed is using seconds and fractions of a second following a sequence like this:

The best shutter speed settings will depend on the available light and the motion that you want to capture in your subject.
You can see the main effects of this setting in the below photography basics chart related to shutter speed:

Want to find more information and examples? Check our complete guide to shutter speed!
4. ISO – A must in any beginner’s photography guide
The last of the exposure photography basics is the ISO.
In short, the ISO works by increasing the light information captured by the camera sensor.
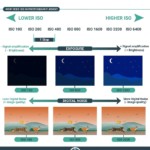
This has a drastic effect on the exposure; the higher the ISO, the brighter the image will be, and the lower the ISO, the darker the photograph will be.
Apart from exposure, ISO has a major side effect called “digital noise”. As you increase the ISO, your image will be brighter but will also have more digital noise, which is an important element related to the quality of the image.
The ISO number is usually measured using “ISO levels”, which follows this sequence:

The main ISO camera settings will depend on the available light. If you’re shooting in low-light or night environments, you’ll have to use a higher ISO if you want to capture the right exposure. The same applies if you want to use a narrow aperture or fast shutter speed and there’s not enough light. You’ll have to strike a balance with the other photography basics. This might seem complex but it’s rather easy as you’ll see in the next photography concept.
You can see all the ISO effects in the following photography basics cheat sheet.

Would you like to master ISO? Check out our Guide to ISO in digital photography!
5. Exposure triangle – the secret to understanding the photography basics
Once you understand the photography basics of aperture, shutter speed, and ISO, it’s time to put them all together!
The best way to see how these elements interact with each other is through the exposure triangle.
The exposure triangle is included in most beginning photography guides, and it’s simply an analogy to explain the effects and interaction of the main photography basics of exposure. According to this, all three elements must be in balance if you want to capture a correctly exposed image. So, when you adjust one side of the triangle, you’ll have to adjust one or the two other sides to strike a balance.
For instance, if you open your aperture, you’ll have to either reduce the shutter speed or decrease the ISO to achieve the same amount of brightness (exposure level).
Using the exposure triangle is one of the best basic photography tips for beginners, and once you understand it, it’s very easy to put it into practice.
To make things easier, below you can find a photography basics cheat sheet with the exposure triangle analogy.
")
You can find an in-depth guide full of examples in our exposure triangle guide!
6. Depth of field – A basic concept in photography
One of the fundamentals of digital photography is the depth of field.
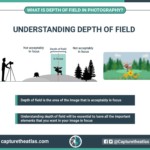
In short, depth of field is simply the space in the image that is acceptably sharp and in focus.
In photography, we can say that there’s a shallow depth of field when just a narrow portion of the frame is acceptably sharp, whereas we speak about a large depth of field when a big portion of the frame is considered to be in focus.
Depth of field is affected by many different factors:
- Aperture: The wider the aperture, the shallower the depth of field
- Focal length: The longer the focal length, the shallower the depth of field
- Focusing distance: The closer the subject to the lens, the shallower the depth of field
- Sensor size: The smaller the camera sensor size, the shallower the depth of field (*using the same focal length).
A good way to calculate the depth of field is by using a depth of field app or calculator. It’ll tell you the portion of your frame that will be reasonably sharp according to your camera, lens, and aperture.

The best way to understand this photography concept is through real examples, which you can find in our depth of field photography guide.
7. Focal length – photography lens basics
Focal length is related to the photography lens basics.
It’s a vital photography concept to understand for creating your images and choosing the lenses that you’ll need in your gear.
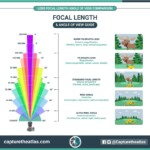
The focal length works by describing each lens in terms of millimeters from the optical center of the lens to the sensor. Depending on how short or long the focal length is, this will have a direct impact on the field of view of your images and in other aspects like the depth of field.
For example, shorter focal lengths like wide-angle lenses will have a wide-angle of view, whereas longer focal lengths like telephotos will have a narrower angle of view. The focal length will also create different effects, like distortion in wide angles of view, and magnification in narrower angles of view.
All these elements are essential for anyone who is beginning in photography since it will affect the final look of your subject and image.
You’ll find this photography concept easily explained following the below basic infographic.

You can also find more info and examples of images taken with different focal lengths in our focal length guide!
8. Sensor size – A good photography fundamental to learn
Another photography fundamental for beginners that often goes overlooked is the camera sensor size.
The camera sensor size is truly important. There’s not an absolute best sensor size in photography, but rather different sensor sizes for different photographic needs.
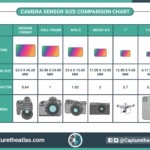
The size used as a reference in digital photography is the classic 35 mm sensor size, also known as Full-Frame. If the sensor is smaller than this size, it’s said to be “cropped”, and if it’s bigger, it’s considered “medium format.“ Knowing the different types of sensors, their qualities, and what they can achieve, is also crucial to taking the pictures that you want.
For example, a basic rule in night photography is to use a sensor with larger pixels, since these are better at capturing light and will allow you to take a better-quality image with less digital noise.
The focal length is also important since smaller sensors will offer more reach and greater magnification for shooting subjects far away like in wildlife or sports.
The depth of field is the last effect of the camera sensors. Using the same field of view, the depth of field will be narrower in cameras with larger sensors and larger in cameras with cropped sensors. An example is portrait photography, where photographers usually shoot with larger sensors to decrease the depth of field and bokeh effect.
As you can see, understanding the sensor size is one of those photography basics that you must pay attention to.
Below you can see a photography basic cheat sheet with the main types of sensors in the market.

If you want to learn more about this and see examples taken with different sensors, check our guide to camera sensor size!
9. Focus – An essential concept to master
Focusing is one of the most common struggles for anyone beginning in photography.
Briefly, focusing consists of adjusting the lens to find the maximum sharpness, contrast, and resolution for a chosen subject.
There are two ways to focus in digital photography:
- Manual focus: Using your hands to tweak the focus ring until you get to the best focus.
- Automatic focus: Using the camera’s and lenses’ internal motors to focus on a given subject.
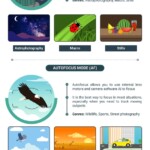
Using manual focus or autofocus will depend on the type of photography that you do. For instance, in some genres like macro and night photography, it’s better to use manual focus. Yet, in other genres, like wildlife or sports, autofocus is faster and will make things easier.
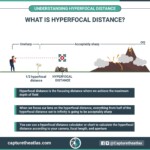
In some genres like landscape photography, you can focus on a specific distance that will help you achieve the maximum depth of field (or reasonable sharpness). This is called the Hyperfocal distance and it’s one of the best photography basics to learn. There are also more advanced techniques to achieve maximum sharpness like focus stacking that you can apply if you already have some experience.

Talking about cameras, these are very different in terms of their focusing capabilities. Basic cameras usually have worse focusing capabilities like fewer focus points, and they are less reliable, while advanced cameras have a better focusing capacity even in low-light situations.
Most digital cameras include different focus modes and areas that we’ll cover in the photography basic settings below.
This photography basics infographic breaks down the main differences between Manual Focus vs. Autofocus.

You can learn how to focus and find 10 tips for focusing in our guide to focusing in photography.
10. Sharpness – The vital photography basic for better quality
Sharpness is a basic photography concept that can be more technical than others, but it’s rather easy to understand.
In a nutshell, sharpness is just how clearly detail is captured and processed in an image.
There are many factors affecting the sharpness of an image, like the sensor resolution, the lens, and even some photography basics that we already covered like the aperture, shutter speed, and ISO.
The editing basics and post-processing techniques are also important to achieve more sharpness. Images usually lack detail when they are taken straight out of camera (something called “softness” in photography), and you can correct this by using some sharpening software.
Lastly, the viewing distance is another important factor affecting sharpness. By definition, the perception of sharpness increases as the viewing distance of the image grows. That’s why billboards have a very small resolution when looked at closely.


“Soft” vs sharpened image
I highly encourage you to dive more into this photography concept by following our sharpening article and our guide with 30 tips to take sharper photos.
11. Camera Settings – Basic photography settings
Once you understand the basic photography concepts, it’s time to put them into practice using the main photography settings on camera!
In short, these are the best camera settings for anyone starting in photography:
- Aperture: f/1.8-f/5.6 in low light or for a narrower depth of field, and f/8-f/16 for a wider DoF
- Shutter Speed: From 30 seconds to 1/4000thof a second depending on the scene
- ISO: 100-3200 in entry-level cameras, and 100-6400 in more advanced cameras
- Camera Mode: Manual camera mode or Aperture-priority mode
- Metering Mode: Matrix/Multi/Evaluative depending on your camera model
- Focus Mode: AF-S for stills and AF-C for moving subjects
- Focus Area: Single-point for stills and Dynamic/Zone for moving subjects
- White Balance: Automatic WB
- File Format: Raw File (or JPEG if you don’t want to edit your pictures)
- Drive Mode: Single shooting for stills and continuous for moving subjects
- Long exposure noise reduction: Off
- High ISO noise reduction: Off
- Color Space: sRGB
- Image stabilization: On when shooting handheld and Off when shooting from a tripod
- HDR/DRO: Off

We have a dedicated guide to basic camera settings for beginners where you can learn all the above buttons, dials, and functions on your camera.
12. Camera Modes – The basics to make the most of your camera
Understanding camera modes is one of the basics in photography to help you familiarize yourself with your camera and improve as a photographer.
To put it simply, camera modes are the camera controls that allow the photographer to choose the main exposure settings for aperture, shutter speed, and ISO.
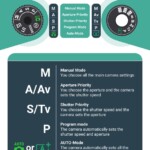
They’re also called “shooting modes,“ and these are the main modes available in most digital cameras:
- Program Camera mode (“P Mode”): Using this mode, the camera automatically sets the shutter speed and aperture.
- Shutter Priority Mode (“Tv/S Mode”): You set the shutter speed and the camera selects the aperture.
- Aperture Priority Mode (“Av/A Mode”): You set the aperture and the camera sets the shutter speed.
- Manual Camera Mode (“M Mode”): You set all the main settings on camera.
Using each mode will depend on your subject and your photographic skills, but generally, learning when to use the different camera modes is basic photography knowledge.

You can find more information and examples in our camera modes guide for beginners.
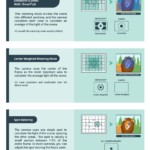
13. Metering Modes – The fundamental lighting concepts
Another photography fundamental for starters is the metering modes.
In short, metering modes are simply the way your camera calculates the available light of the scene. In photography, this can be done using the built-in exposure meter in camera or a handheld device.
Understanding how light works in photography is a basic concept that any photographer must know, and it’s the first step in learning the different ways your camera can calculate the light of the scene.
These are the basic metering modes to calculate the light in most digital cameras:
- Multi/Matrix metering: This mode evaluates the light of the entire scene by dividing the frame into different zones.
- Center-weighted metering: This mode uses the center of the frame to measure the light of the scene.
- Spot metering: Using this mode, the camera uses a single focus point to read the light.
By default, one of the basic photography techniques in any DSLR or mirrorless camera is to use Multi/Matrix metering, which will be accurate in most situations. However, in some particular scenarios, you might benefit from using either Center or Spot metering.
You can check out some examples in the below photography basics infographic related to the main camera metering modes.

If you want to dive into each specific mode and more examples, check out our dedicated guide to metering modes!
14. Focus Modes & Areas – Photography basics for any genre
You can’t learn the photography basics without understanding how the focus modes and areas work.
The focus modes help you decide whether you want the camera to lock the focus on a subject or to keep adjusting the focus as the subject moves across the frame.
The two main focus modes are:
- Single Autofocus Mode (AF-S/One-shot AF): The camera locks the focus on a subject and, if the subject moves, you’ll have to press the focus button again and repeat the process.➜ Best for stills, landscape, macro, astro, etc.
- Continuous Autofocus Mode (AF-C/AI-Servo): After focusing, the camera will track the subject when it moves within the frame. ➜ Best for action, wildlife, sports, street, etc.

Moving into the focus areas, these will help you set where the camera seeks to focus within a scene.
To do this, your camera uses different focus points and AI technology. In some genres, using a specific focus area is fundamental. That’s why the focus areas are one of the wildlife photography basics and it’s also vital in other genres like sport or street photography.
In a nutshell, these are the main focus areas in photography:
- Single Point Area Mode: You can select a single focus point. ➜ Best for landscape, still portraits, macro, and architecture.
- Dynamic Area Mode: If your subject moves, your camera will use several focus points to track it. ➜ Best for wildlife, sports, and street.
- Auto Area Mode: The camera automatically decides the best focus points. ➜ Best for scenes where you need to focus on something easy and close to the camera.
This camera basics infographic will give you a better understanding of the different focus areas.

The best way to learn this photography basic is by seeing real examples. You can see plenty in our Focus Modes & Areas article!
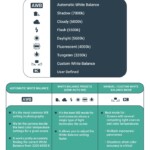
15. White Balance – A must in any photography guide
White balance is one of those easy to understand photography basics.
Briefly, white balance is a photography concept aimed at capturing accurate colors in your image without being affected by the color of the light source. White Balance is related to color temperature, which is measured in “Kelvins” or “K”. The higher the K number, the cooler the color will be.
In your camera, you’ll have several white balance options:
- Automatic white balance (AWB): The camera automatically adjusts the best WB camera setting.
- White balance Presets (Semi-Automatic White Balance): The camera includes different preset modes related to different color temperatures.
- White balance manual camera setting (Custom white balance mode): You can manually adjust the white balance by either creating a custom white balance or setting a specific Kelvin number.
One of the best photography basic tips is to set the white balance to automatic. Thankfully, the white balance is a setting that you can change in post-processing without affecting the quality of the image, as long as you shoot in Raw.
I hope this photography basics cheat sheet helps you learn when to use the different white balance adjustments.

You can find more info & examples in our basic guide to white balance!
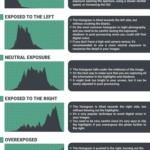
16. Histogram – Understand the exposure basics
The histogram is a photography concept that most people beginning in photography find daunting. It looks like complex mathematics but, believe me, it’s very easy to understand and one of the most useful tools in your camera.
In a few words, the histogram is just a graphic representation of the exposure levels within an image. Using the histogram, you’ll be able to see a more accurate representation of the highlights and shadows of your image.
Reading the histogram is one of the basics in digital photography and will help you see if your image is correctly exposed or under/overexposed.
This photography basics infographic will help you understand how to read the histogram.

I also created a specific article where I talk about the best histogram and show real examples of histograms in photography. You can check it out below.
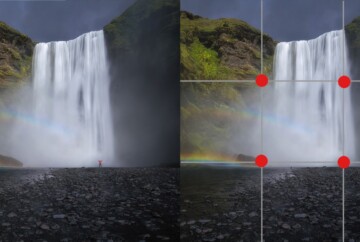
17. Composition – An indispensable photography basic
Beyond photography settings, gear, and other technical aspects, if you want your pictures to speak for themselves, one of the photography basics to master is the composition.
Composition is the language of photography, and using different compositional elements and rules, you’ll be able to capture and shape your visual message. When you compose your image, you have to arrange the elements of the scene to make them attractive to the viewer. This will also help you represent your visual message in the most harmonious and impactful way.
Composition can be broken down into different parts:
- Rules: Like the photography basic rule of thirds, the golden triangle, the rule of space, the golden spiral, the rule of odds, etc.
- Elements: Like leading lines, curves, geometric shapes, colors, etc.
- Techniques: Like symmetry, balance, repetition, patterns, scale, etc.
All these fundamentals are basic photography knowledge that you must learn if you want to capture the best possible images according to your vision.

The best way to learn composition is by studying basic photography books on composition and studying another good photographer’s or artist’s work.
You can start by checking our guide with the 25 photography composition basics.
18. Photography gear – Camera and lens basics
Just as a carpenter uses a hammer, the camera, lenses, and other gear are your main tools to create images.
Basic photography gear includes the following elements:
- Digital cameras: The basic is a digital camera, and preferably it’s a DSLR or mirrorless camera with interchangeable lenses. (You can see the different types in our DSLR vs. mirrorless guide).
When you shoot in low-light, like when photographing the Milky Way, certain camera models will help you get better results. You can see different models in our guide to cameras for Milky way photography.
- Lenses: They are as equally important as cameras to shoot quality images.
The photography lens basics include a wide range from fish-eye lenses of 7-8 mm to super-telephoto lenses like 600-800 mm.
The type of lens and focal length will depend entirely on the type of photography that you’re doing. In most scenarios, your images will be in the range from 14-400 mm.
The brightness of the lens is also crucial. Lenses with a large aperture, like f/1.8 or f/2.8, are usually aimed at shooting portraits and low-light photography like astrophotography. These are called “fast lenses”. You can see some of these in our article on the best lenses for night photography.
- Tripods: A sturdy tripod is essential in some genres like long-exposure photography, Milky Way photography, Northern Lights photography, and other photographic situations.
- Lens filters: These types of filters will allow you to create long exposures and to achieve creative effects in your images. There are many different types and models that you can take a look at in our guide to camera lens filters.
- Others: There are many other pieces of gear like camera bags, SD cards, batteries, etc., and others that you might need depending on your shooting, like flashesand external lights, photography gloves, star trackers, etc.

This basic photography concept deserves its own article, which you can find below.
19. Editing – Photography editing basics
One of the last photography basics consists of the final editing and processing of our images.
The photography editing basics are about striking a balance in the exposure between the highlights and the shadows, sharpening the image, managing the color, and generally fine-tuning the final image.
Some photographers also use post-processing to create artistic effects that can represent their vision. This, of course, depends on your personal taste, but editing and processing are photography fundamentals that you need to know to have well-rounded images.
For anyone beginning in photography, I always recommend checking editing video tutorials online from photographers they like and admire. It’s one of the best ways to be engaged in learning the editing basics.

20. Photography tips for beginners – The ultimate tips for beginning in photography
We couldn’t finish this photography concepts guide without a few photography basics tips and tricks for beginners.
- Understand how light in photography works
- Get started in photography by shooting in Raw
- Don’t be afraid of the camera’s manual mode
- Learn how to properly hold your camera
- Be aware of the importance of a tripod when you start in photography
- Take your time to zoom in on your images to find mistakes
- Study and look at as many photographs as possible
- Ask for feedback from other photographers
- Take your camera with you as much as you can
- Focus on the process, not the results

I explain these and 15 more photography basic tips in our article on the best 25 tips for beginners!
Conclusion
Learning the photography basics can look like an uphill task. There are too many photography concepts to understand, and so much information can be overwhelming at first.
However, I’m sure that using this beginner’s photography guide will make the process easier for you. My advice is to learn the main photography fundamentals one by one. Understand the theory, check the examples, and most importantly, try to put them into practice!
I hope that this photography basics tutorial along with all the infographics and specific articles will help you along the way. Remember that you can also download our photography basics PDF guide so you can check it out anywhere in the future 😉
My last tip for anyone beginning in photography is not to be shy, so if you have any questions, feel free to leave them in the comments!


This provided me with very crucial points, thanks for teaching me the basics.
Thanks Dan !
Thanks so much, I’m glad you enjoyed it! 😊
Thanks a lot! It helped me a lot. I was confused about these basics, but it helped me clarify them.
Thanks, Isha! I’m so glad you found it helpful 😊
Thanks Dan, this guide us very useful and it content more knowledge to learn
Thanks so much! I’m glad you found it helpful 😊
Thank so much, I appreciate. From Cameroon.
Thanks for reading! I’m so glad you found it useful! 😊
Very helpful, thank you!
Hi Sam, thanks so much! 😊
Thank you very much for your guide. It helps me to clear my basic concept about photography.
Thanks so much, Sanjay! 😊
Important aspects well put together. Thanks!
Thanks so much for reading! I’m glad you found it helpful 😊
A concise, useful and complete guide for beginners.
Thanks Dan
Thanks so much, Azad! Glad it helps 😉
You are really good on this tips
Many thanks, James! 🙂
Great article, very informative for beginners.
Thank you!
Very useful! Thank you!
Thank you!
Thank you,it was really helpful
Thank you so much, so glad it helps!
Thanks Dan, I love the article! I am sure this will help me getting the fundamentals down!
Glad it helped, Tamara!
This is great, Dan. It’s a really big help.
Thanks, Daisy! I Appreciate your nice words!
Tried to download your e-book, A Guide To Mastering The Basics. I answered the questions as requested but I never received a code needed to complete the process.
Randell,
There might have been an issue with the server. I’ve already sent you a copy by email.
Dan
Great beginners guide, has been very helpful to me, a complete novice to photography.
Many thanks Dan.
Thank you, Eddie! ;=)
Thanks for this tips
Thanks, Laura!